background image

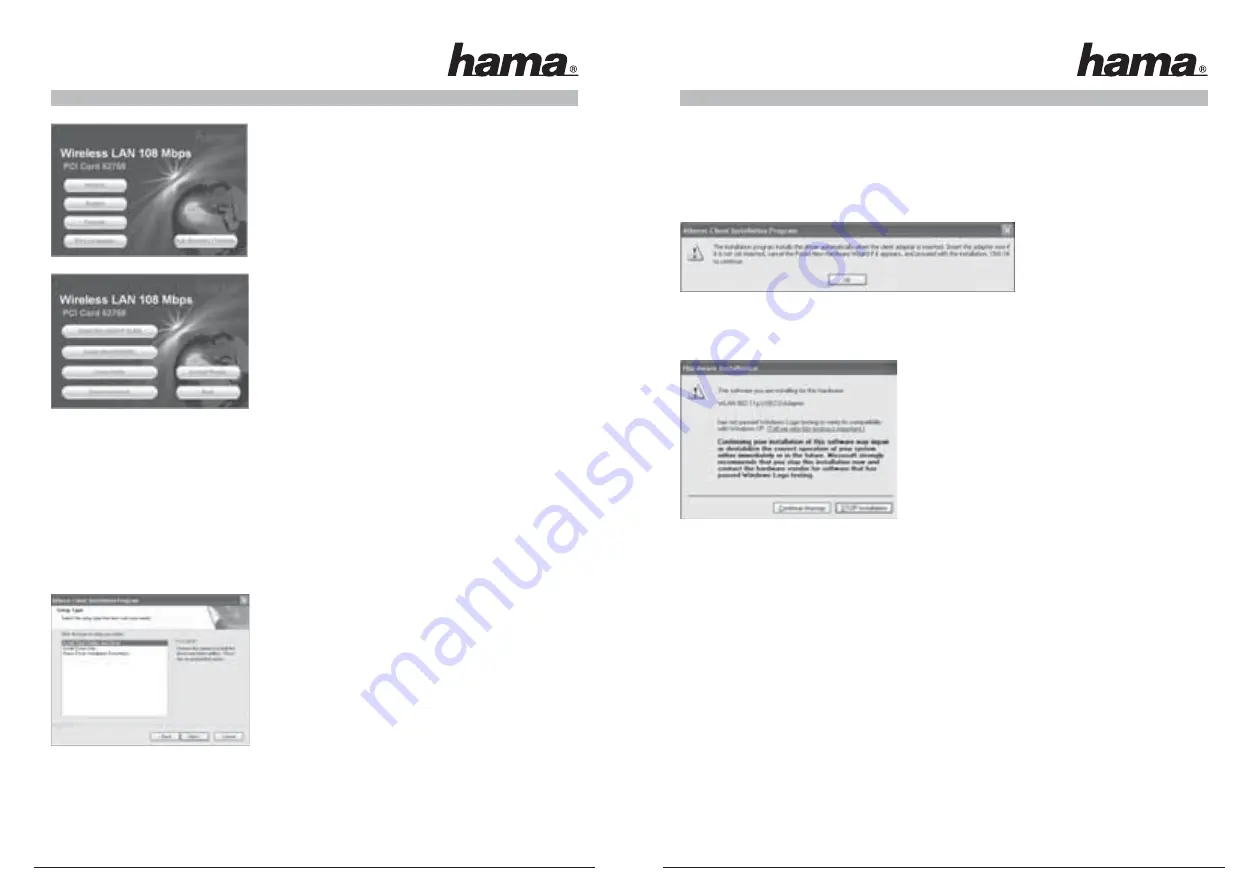
Select the required language. 

The following window is displayed when you select the language.

To continue installation, click 

Install (2000/XP 32 bit)

 if you use 

Windows® 2000 or XP as an operating system. Also be used with 

restricted functions for the Win 98/ME operating systems. With 

these operating systems, the Extended Range (XR)TM function is 

not available and the software is in English only. Click 

Install (Win 

98/ME)

 if you use Windows® 98 or Windows® ME. 

Click 

Users Guide

 to open the operating instructions. Acrobat 

Reader is required to display PDF fi les. If you have not yet installed 

Acrobat Reader, you will fi nd a free version on the enclosed driver 

CD. Click 

Download driver 

to download the latest driver from the 

Hama website. Click 

Back

 to return to language selection.

If your operating system is not listed, establish a connection to the internet (or use the CD on a computer with an 

established connection) and click 

Download driver

. The downloads for this item are then displayed in the browser. 

This allows you to check whether drivers have now been developed for previously unsupported systems.

When you select

 Install

, the InstallShield Wizard is loaded. This can take a few seconds. Please wait until the 

InstallShield Wizard starts!

A message appears informing you that driver and auxiliary programs are being installed. Click 

Next

 to 

continue. Read the license agreements and select 

“I accept the terms of the license agreement”

 if you do not 

object to them. Click 

Next

 to continue installation. 

You can now specify whether only the driver is to be installed, or if 

the auxiliary programs are also to be installed. For special applica-

tions, installation disks can also be created.

In most cases, it is best to also install the client software. For this 

reason, the description of installation and confi guration below 

refers to it. If you want to use a different confi guration program, 

such as that which is integrated in Windows® XP, select Install 

drivers only.

Select 

Install client utilites and drivers

 and click 

Next 

to confi rm.

You are then reminded that the system must be restarted at the end of the process. Confi rm your entries with 

Yes

The target folder can now be specifi ed. As a rule, no changes must be made here. If you have a good reason 

to change the folder, click 

Browse

 and select the directory required. Click 

Next

 to continue.

A prompt asks you in which program folder (in the Start menu) the links are to be created. Generally, no 

changes are required, but again the default can be changed. Click 

Next

 to confi rm.


For Windows® /XP only


The following information confi rms the selection of the confi guration assistant. The software provided 


or the Windows ® software can be used. We recommend that you use the enclosed program.


Click 

Next

 and select 

Atheros Client Utility

 and click 

Next

 to confi rm.

A message appears informing you that the driver is being installed automatically:

Click 

OK

 to confi rm.

The message that the software has not passed the Windows® logo test may appear while the driver is being 

installed:

This only means that the test has not been performed. The sta-

bility and function of the driver was tested thoroughly before 

delivery. The qualifi cation of the drivers by Hama means that 

new versions can be used far earlier and do not have to wait 

for the Windows® logo test. Click 

Continue Anyway

 to confi rm 

the message.

After installation, 

“InstallShield Wizard complete”

 is displayed. Now remove the CD-ROM from the drive and 

restart the computer by selecting 

„Yes, I want to restart my computer now”

 and clicking 

Finish

.

After the restart, you can confi gure the WLAN adapter.

3. Quick confi guration

If you are already somewhat familiar with the confi guration of wireless LAN devices, this quick guide should 

be enough to prepare the device. If you have no experience with wireless LAN devices, please read the 

comprehensive instructions from page 18.

1.  Open the wireless LAN confi guration utility by clicking the 

Atheros Client Utility

 on the 


Desktop or under 

Start/Programs/Atheros/Atheros Client Utility

.

2.  Change to the 

Profi le management

 tab and click 

Scan

!

3.  Select the required network in the list and click 

Activate

!

4.  Name the profi le in the next window. Switch to the 

Security 

tab.

5.  Select the encryption mode used in the target network and then click 

Confi gure

. If no encryption is used 


in the target network, switch to the 

Advanced

 tab and ignore item 6.

16

17

Summary of Contents for 00062768 V2

Page 1: ... u s t e r Wireless LAN PCI Card 108 Mbps 00062768 V2 www hama com Hama GmbH Co KG Postfach 80 86651 Monheim Germany Tel 49 0 9091 502 0 Fax 49 0 9091 502 274 hama hama de www hama com 00062768 V2 09 06 ...

Page 2: ...ird folgendes Fenster angezeigt Um die Installation jetzt fortzusetzen klicken Sie auf Installieren 2000 XP 32 Bit falls Sie Windows 2000 oder XP als Betriebs system verwenden Ein eingeschränkter Betrieb ist auch mit den Betriebssystemen Win 98 ME möglich Hierbei ist die Extended Range XR TM Funktion nicht verfügbar und die Software ist ausschließlich in Englisch vorhanden Klicken Sie auf Installi...

Page 3: ...n 3 Markieren Sie das gewünschte Netzwerk in der Liste und klicken Sie auf Aktivieren 4 Vergeben Sie im folgenden Fenster einen Namen für das Profil Wechseln Sie danach zur Registerkarte Sicherheit 5 Wählen Sie die im Zielnetzwerk verwendete Verschlüsselung aus und klicken Sie danach auf Konfigurieren Wird im Zielnetzwerk keine Verschlüsselung verwendet wechseln Sie zur Registerkarte Erweitert und i...

Page 4: ...ergrößerung der Reich weite durch das auf bis zu 0 25 Mbps erweiterbare Fallback der Standarddatenrate Um die Ansicht zu Aktualisieren klicken Sie bitte auf den gleichnamigen Button Mit einem Klick auf OK wird das Fenster wieder geschlossen Klicken Sie auf den Button Aktivieren nachdem Sie ein verfügbares Netzwerk aus der Liste ausgewählt haben So können Sie dieses in ein neues Profil aufnehmen Sie...

Page 5: ... Authentifizierungsmodus Verwenden Sie die WEP Verschlüsselung können Sie hier wählen zwischen Auto Offen oder Installiert Bevorzugte Zugriffspunkte Klicken Sie auf diesen Button um in der folgenden Maske MAC Adressen Ihrer bevorzugten Wireless LAN Zugriffspunkte einzugeben Sollte in ihrem Netzwerk eine Verschlüsselung verwendet werden wechseln Sie zur Registerkarte Sicherheit und setzen Sie die Ko...

Page 6: ...rschlüsselungsverfahren eine oder mehrere Möglichkeiten der Authentifizierung bietet Wählen Sie das gewünschte Profil in der Profilverwaltung aus und klicken Sie auf Ändern Wechseln Sie nun zur Registerkarte Sicherheit Grundsätzlich stehen ihnen mit diesem Gerät folgende Ver schlüsselungsarten zur Verfügung WEP Verschlüsselung mit 64 Bit 128 Bit und 152 Bit WPA und WPA2 Verschlüsselung Wir empfehlen ...

Page 7: ...thentication Protocol die einen Authentifizierungsserver RADIUS Server oder Zertifikate voraussetzen Die Angaben die sie zur Konfiguration dieser Authentifizierungsmethode benötigen erhalten Sie von ihrem Administrator Die Konfiguration ist nun soweit abgeschlossen Wechseln Sie noch einmal zur Registerkarte Aktueller Status Hier sollte jetzt eine Empfangsstärke und die ent sprechenden Informationen übe...

Page 8: ... mail produktberatung hama de Anmerkung Dieses Produkt darf nur in Deutschland Österreich Schweiz England Frankreich Belgien Spanien Niederlande Dänemark Ungarn Polen Schweden Luxemburg Irland Griechenland Tschechische Republik Slowakische Republik und Finnland betrieben werden Die Konformitätserklärung nach der R TTE Richtlinie 99 5 EG finden Sie unter www hama com Contents 1 Installing the wirele...

Page 9: ...rted at the end of the process Confirm your entries with Yes The target folder can now be specified As a rule no changes must be made here If you have a good reason to change the folder click Browse and select the directory required Click Next to continue A prompt asks you in which program folder in the Start menu the links are to be created Generally no changes are required but again the default ca...

Page 10: ...is saved here Details on the selected profile are displayed in this list The right part of the window there are various buttons for editing profiles The Order profiles button allows you to add created profiles to a list of Auto selected profiles Select the required profile in the list of the Available pro files Click Add The profile select is then displayed in the list of Auto selected profiles That means ...

Page 11: ...our PC is entered automatically If you have selected version 1 you must now enter the SSID of the target network in the SSID1 field This is in the wireless LAN settings in your router or access point or you can ask the person in charge If you have selected version 2 the SSID has already been copied automatically from the scanned list Switch to the Advanced tab In general all values here can be left...

Page 12: ...2 4 Ghz 11 Mbit s Activate this option to guarantee compatibility to 11 Mbps devices recommended Super G Recommended if the router access point or other devices in the network support this mode eXtended Range XR Recommended if the router access point or other devices in the network support this mode QoS Support for bandwidth reservation seldom required Power save mode This setting is not important...

Page 13: ...ers urlaub2006 0 Click OK to save your settings 4 2 2 WPA WPA2 encryption Wi Fi Protected Access WPA is an encryption method for WLAN WPA contains the WEP architecture but offers additional protection via dynamic codes which are based on the Temporal Key Integrity Protocol TKIP and also offers pre shared keys PSK or extensible authentication protocol EAP for user authen tication However a radius s...

Page 14: ...e second 192 168 1 2 the third 192 168 1 3 etc Select Use the following IP address and enter your IP address in accordance with the sample 1 PC IP address 192 168 1 1 Subnet mask 255 255 255 0 2 PC IP address 192 168 1 2 Subnet mask 255 255 255 0 Click Ok to confirm your entries 6 Uninstalling the driver and configuration program Switch off your PC and unplug the mains plug from the socket Open the ...

Page 15: ...ez la langue désirée La fenêtre suivante apparaît dès que vous avez sélectionné la langue désirée Cliquez sur Installer 2000 XP 32 Bit afin de lancer l installation dans le cas où vous utilisez Windows 2000 ou XP comme système d exploitation Une utilisation restreinte de l appareil est également possible avec les systèmes Win 98 ME La fonction Extended Range XR TM ne sera par exemple pas disponi bl...

Page 16: ...s 2 Commutez vers l onglet Gestion de profils et cliquez sur Analyser 3 Cochez le réseau correspondant dans la liste et cliquez sur Activer 4 Donnez un nom à votre profil dans la fenêtre suivante Commutez ensuite vers l onglet Sécurité 5 Sélectionnez le chiffrement utilisé dans le réseau cible puis cliquez sur Configurer Dans le cas où aucun chiffrement n est utilisé dans le réseau cible commutez ver...

Page 17: ... de transfert standard vers une valeur pouvant atteindre 0 25 Mbit s Cliquez sur le bouton Actualiser afin d actualiser l affichage Cliquez sur OK afin de refermer la fenêtre Cliquez sur le bouton Activer dès que vous avez sélectionné un réseau disponible dans la liste Vous pouvez ainsi l enregistrer dans un nouveau profil Vous ouvrirez ainsi le même dialogue que celui affiché lors de la création d un ...

Page 18: ...glage n est pas important pour le mode infrastructure Mode d authentification 802 11 Vous pouvez sélectionner Auto Ouvert ou Installé dans le cas où vous utilisez un chiffrement WEP Point d accès par défaut Cliquez sur ce bouton afin de saisir dans un masque les adresses MAC de vos points d accès Wireless LAN préférés Commutez vers l onglet Sécurité et continuez la configuration à la page 36 sous Con...

Page 19: ... procédé d encodage offre une ou plusieurs possibilités d authentification Sélectionnez le profil désiré dans la gestion de profils puis cliquez sur Modifier Commutez ensuite vers l onglet Sécurité De manière générale plusieurs types de codage sont dispo nibles pour votre appareil Chiffrement WEP 64 bits 128 bits et 152 bits Chiffrement WPA et WPA2 Nous vous conseillons d utiliser un chiffrement WPA W...

Page 20: ...d authentification serveur RADIUS ou des certificats spécifiques Vous pouvez vous procurer les informations requises pour la configuration de cette méthode de d authentification chez votre administrateur La configuration est ainsi terminée Commutez encore une fois vers l onglet Etat actuel Les indications relatives à l intensité de réception et les informations correspondant à votre configuration devraie...

Page 21: ...ous www hama com Ligne téléphonique directe d assistance Conseil produits Hama Tél 49 0 9091 502 115 Fax 49 0 9091 502 272 e mail produktberatung hama de Remarque Cet appareil peut être utilisé uniquement en Allemagne Autriche Suisse Angleterre France Belgique Espagne aux Pays Bas au Danemark en Hongrie Pologne Suède Luxembourg en Irlande Grèce République Tchèque Slovaquie et Finlande La déclarati...

Page 22: ...t i Windows XP integrerede skal du vælge Install drivers only Marker Install client utilities and drivers og bekræft dette med Next Nu følger en instruktion om at systemet ved afslutning af processen skal genstartes Bekræft dette med Yes Nu kan destinationsbiblioteket fastlægges Normalt er ingen ændring nødvendig Hvid du af vigtige grunde vil ændre biblioteket skal du klikke på Browse og så vælge ...

Page 23: ...gurationerne er muligt I vinduets øverste venstre hjørne vises alle gemte profiler I begyndelsen findes her kun standard profile Under denne liste ses detaljer vedrørende de udvalgte profiler I højre vinduesområde er der forskellige knapper til profilbearbejdning Med knappen Order profiles har du mulighed for at henføre oprettede profiler til en liste Auto selected profiles Marker den ønskede profil på lis...

Page 24: ...dsættes automatisk navnet på din PC Har du bestemt dig for variant 1 skal du kun indskrive SSID for objektnetværket i feltet SSID1 Dette kan du finde i din router eller dit accesspoint i Wireless LAN indstillinger eller ved at spørge en ansvarlig person Har du bestemt dig for variant 2 er SSID allerede automatisk taget fra den scannede liste Skift nu til mappen Advanced Grundlæggende er alle værdie...

Page 25: ...11 Mbit s Aktiver denne mulighed for at garantere kompatibilitet med 11 Mbps enheder anbefales Super G Anbefales når router accesspoint eller andre deltagende enheder understøtter denne funktion eXtended Range XR Anbefales når router accesspoint eller andre deltagende enheder understøtter denne funktion QoS Understøttelse af båndbreddereservering sjældent nødvendigt Power Save mode Denne indstilli...

Page 26: ...II 13 tegn urlaub2006 0 Bekræft dine indstillinger med OK 4 2 2 WPA WPA2 kryptering Wi Fi Protected Access WPA er en krypteringsmetode til WLAN WPA indeholder WEP s arkitektur men tilbyder dog yderligere beskyttelse med dynamisk nøgle der er baseret på Temporal Key Integrity Protocol TKIP og tilbyder yderligere autentifikation af bruger PSK Pre Shared Keys eller Extensible Authentication Protocol E...

Page 27: ...ressen 192 168 1 1 den anden 192 168 1 2 den tredje 192 168 1 3 osv Vælg Use the following IP address og indtast din IP adresse efter det forudgivne eksempel 1 PC IP Adresse 192 168 1 1 Subnetmaske 255 255 255 0 2 PC IP Adresse 192 168 1 2 Subnetmaske 255 255 255 0 Bekræft dine indtastninger med OK 6 Afinstallation af driver og konfigurationsprogram Sluk din PC og træk netstikket ud af stikdåsen Åbn...

Page 28: ...TE 99 5 EG naleznete na www hama com Prehlásenie o zhode podľa R TTE smernice v 99 5 EG nájdete na www hama com Τη δήλωση συμμόρφωσης σύμφωνα με την k οδηγία 99 5 EΚ περί R TTE θα τη βρείτε στη διεύθυνση www hama com Overensstemmelseserklæringen i henhold j til R TTE retningslinierne finder du under HYPERLINK http www hama com Software D GB F D Dieses Gerät darf nur in den folgenden Ländern betrieb...

Reviews: