


Scrubmaster B400 R (7190)
127
Maintenance and servicing
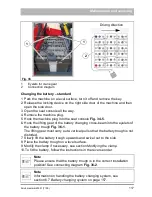
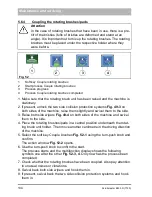
1. Empty the waste water tank, see section 5.4.1.
2. Pull up the step
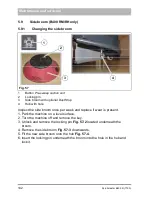
Fig. 45-1
and swivel it to the rear.
3. Open the quick release
Fig. 45-5
and remove the drain hose
Fig. 45-6
.
4. Open the cap of the flex wall tank completely until the cap support engages
Fig. 45-3
.
5. Remove the coarse dirt sieve
Fig. 45-9
upwards, tip it out, clean it with
water and put it aside.
6. Remove the holder
Fig. 45-10
of the coarse dirt sieve upwards, clean it with
water and put it aside.
7. When the waste water tank is completely empty, remove the filter tube
Fig. 45-8
upwards and clean it with water.
8. Clean the waste water tank thoroughly with the water hose/spray nozzle
Fig. 45-7
.
9. Also flush the drain hose.
10.Reinsert the filter tube
Fig. 45-8
. Make sure that the bottom filter tube
Fig. 45-4
and the top filter tube
Fig. 45-2
are seated properly.
11.Insert the coarse dirt sieve holder
Fig. 45-10
.
12.Insert the coarse dirt sieve
Fig. 45-9
.
13.Open the cap of the flex wall tank as far as it will go. This unlocks the tank
support
Fig. 45-3
and the tank cap can be closed.
14.Position the drain hose
Fig. 45-6
on the support of the maintenance open-
ing and install it using the quick release
Fig. 45-5
.
The arrow on the connection support of the drain hose points upwards.
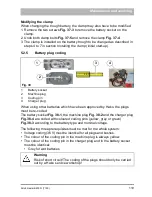
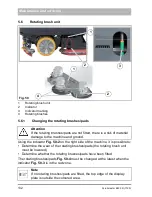
5.4.3
Cleaning the coarse dirt sieve
The flex wall tank is located in the coarse dirt sieve
Fig. 45-9
. Clean the sieve
as required but at least once a day.
1. Open the cap of the flex wall tank until the cap support engages
Fig. 45-3
.
2. Remove the coarse dirt sieve
Fig. 45-9
upwards, tip it out, clean it with
water and reinsert it.
3. Open the cap of the flex wall tank as far as it will go. This unlocks the tank
support
Fig. 45-3
and the tank cap can be closed.
Summary of Contents for Scrubmaster B400 R
Page 1: ...Scrubmaster B400 R RM RH 7190 Operating manual Part number 88 10 3255 Valid as from 03 2021...
Page 9: ...Scrubmaster B400 R 7190 9...
Page 26: ...26 Scrubmaster B400 R 7190 Safety instructions K J Fig 2 L J M A O N Q M K N P O 1 2 3 P Q L C...
Page 158: ...158 Scrubmaster B400 R 7190 Attachments options Fig 67 5 6 3 2 4 1 3 12 9 10 11 1 4 7 8...