background image

www.haiwell.com

Haiwell IoT Cloud HMI User Manual

7 / 28

the HMI device can connect to the network via Ethernet.

2. Project running

a. Select device models

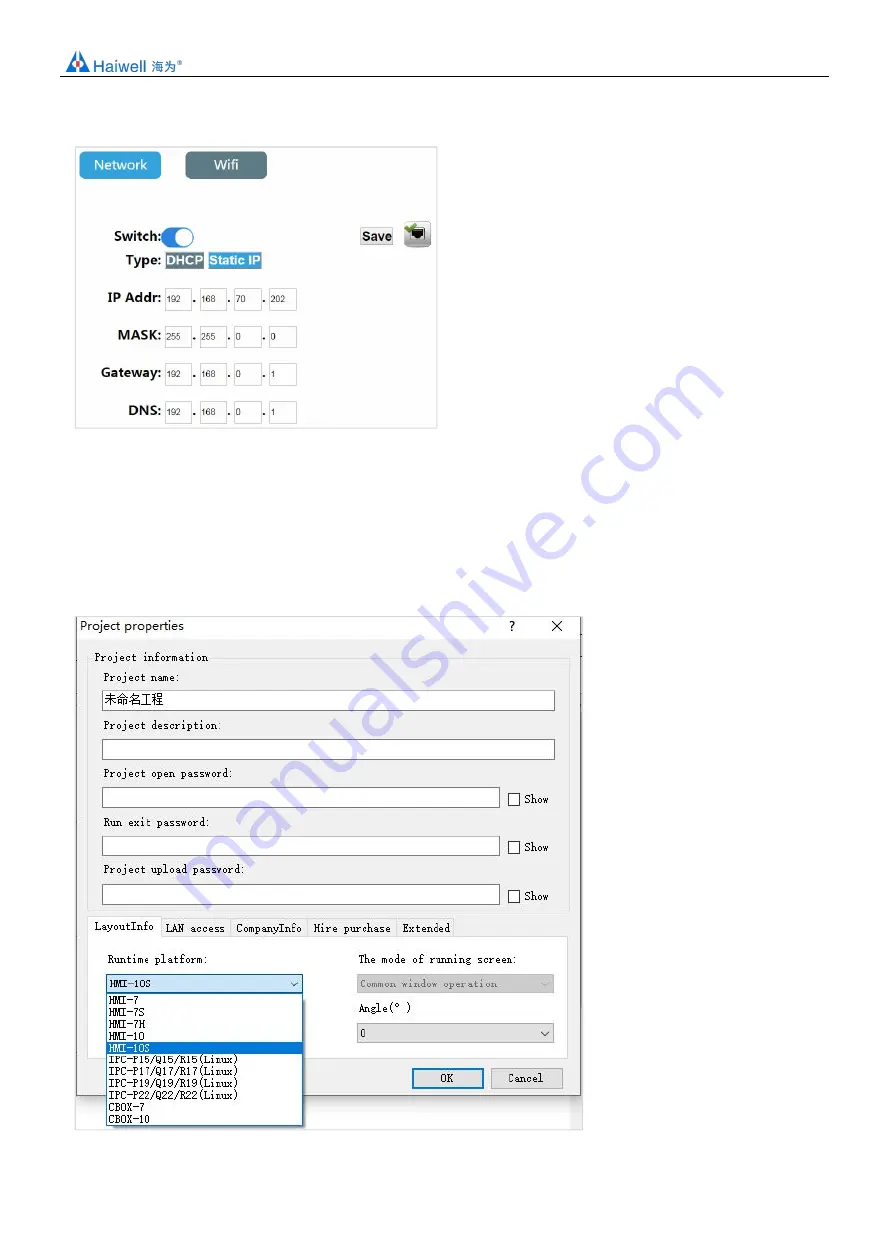
Step 1: Open Haiwell SCADA software and set up a new project;
Step 2: Open [Project configuration] in the project browser, and click [Project properties] to enter the project property

configuration interface.

Step 3: Select the device model in the [Layout Info] field, which is consistent with the current device model. In this example,

HMI-10 is taken as an example. Select HMI-10 and click [OK].

Summary of Contents for HMI Series

Page 1: ...Xiamen Haiwell Technology Co Ltd www haiwell com High speed HD HMI User Manual IoT Cloud HMI User Manual Human Machine Interface ...

Page 2: ...8 3 HMI manager 8 a Enter device manager interface 8 Local manger 8 Could manager 9 b Excute device management 9 Download project 9 Upload project 9 Offline update 10 Start calibration 10 Update device time 10 Get the PN code 10 Check the device version 10 Upload the history record 11 Restart the device 12 4 Background settings 13 a Project Settings 13 Connect Network Engineering 13 Download proje...

Page 3: ...velopment integrated SVG image editing and processing technology TCP IP network communication technology serial communication technology multi threading multi process Javascript extended script analysis and running engine and other technologies for development 2 Product Specifications Specification Model C7S C7S W C7S G C7S E C7H C7H W C7H G C7H E C10S C10S W C10S G C10S E Display Display 7 TFT 7 ...

Page 4: ... 10 1 IOT Cloud HMI High Speed Model TFT screen Storage LAN USB COM WIFI Wireless Hole Size Dimension W H D C10S 10 1 1024x600 4G 512M SD 1 2 3 260x202 270x212x35mm C10S G 10 1 1024x600 4G 512M SD 1 2 2 4G 3G 2G C10S W 10 1 1024x600 4G 512M SD 1 2 3 Yes C10S GW 10 1 1024x600 4G 512M SD 1 2 2 Yes 4G 3G 2G C10S E 10 1 1024x600 4G 512M SD 1 2 2 Global 4G 3G 2G C10S EW 10 1 1024x600 4G 512M SD 1 2 2 Y...

Page 5: ...t DCD 6 Data ready DSR 2 Receive data RXD 7 Request to send RTS 3 Transmit Data TXD 8 Clear to send CTS 4 Data terminal ready DTR 9 Ringing indicating RI 5 Signal ground SG C7S W C10S W C7H W COM3 RS232 RS485 Rxd Txd Gnd B A Wifi USB COM1 RS232 422 485 CAN LAN 24VDC COM2 COM1 Pin definition Pin Definition Pin Definition 1 Carrier detect DCD 6 Data ready DSR 2 Receive data RXD 7 Request to send RTS...

Page 6: ...t The HMI and other components which are at the bottom must maintain sufficient space to avoid equipment damage caused by poor heat dissipation Hardware installation steps Install the HMI into the cut out panel and lock the four buckles on the side with the mounting panel b Hardware wiring Devices connection with power HMI and PLC both connect with power Devices connection HMI s COM 232 interface ...

Page 7: ...aiwell SCADA software and set up a new project Step 2 Open Project configuration in the project browser and click Project properties to enter the project property configuration interface Step 3 Select the device model in the Layout Info field which is consistent with the current device model In this example HMI 10 is taken as an example Select HMI 10 and click OK ...

Page 8: ... project on the device c Run project After the project successfully downloaded wait for the HMI to restart and after restart successfully the HMI will automatically open the project startup screen and users can use the project as needed 3 HMI manager Open the scada software in computer click the device manager icon of menu or click the project open the HaiwellSacada installation document open the ...

Page 9: ...ice the following diagram b Excute device management Download project Step 1 click download project enter project download confirm Step 2 In the confirmation download interface can choose whether to keep the history and alarm records whether to keep the recipe and whether to download the packaged fonts After the setting are complete click OK Step 3 Wait for the pop up prompt Download successful cl...

Page 10: ...e_V2 17 1 5 hmi Step 2 enter offline update confirm interface click update Step 3 waiting for update to complete pop up prompt update success click OK Start calibration Click start calibration the device enter the calibration interface press the calibration mark 1above the screen for long time and enter next calibration site calibration the device touch the screen in order of left right up down mi...

Page 11: ... history record Click upload the history record enter the upload interface of history record split history file Step 1 click start split file you can split historical files for the recent period of time Step 2 waiting split the historical record to complete pop up prompt split success click OK historical file list will add current split historical files upload historical file ...

Page 12: ...ill remark have uploaded Delete history file Step 1 Select the history file in the history file list and click Delete Select File Step 2 Pop up the Confirm Delete File prompt box and click Yes Step 3 Wait for the history file to be deleted successfully The Delete Successful prompt box will pop up click OK Restart the device Step 1 Click Restart Device pop up confirmation restart prompt box click Y...

Page 13: ...nter IP setting to enter the background settings interface a Project Settings Connect Network Engineering Enter the HMI C10S background settings interface click Project click Connect Remote enter the IP of the HMI in the LAN to be connected to for remote access between HMIs Download project Step 1 Create a project click Project in the Scada menu bar expand the tab and click Generate U Disk or SD C...

Page 14: ...e Step 2 Click Download Project to enter the project download interface Step 3 Insert the U disk select USB select the project according to the requirements click OK and the hmi c10s device will automatically restart after the successful download SD card download project Step 1 Enter the HMI C10S background settings interface and click Project Step 2 Enter the project settings interface click Down...

Page 15: ...vice will automatically obtain the IP Static IP Connect the network cable select Static IP for the network type enter the correct IP address subnet mask default gateway and DNS and click Save After verification the device can be connected to the network via Ethernet WIFI settings Click WIFI to enter the WIFI settings interface which support connecting to the network via WIFI Enter the WIFI setting...

Page 16: ...ion is successful you can see the gray i click the gray i icon can set the IP address subnet mask default gateway DNS After setting click Save to set WIFI IP address information Click the gray i icon and then click Ignore wifi to disconnect the WIFI connection If you want to use the WIFI you need to re enter the password to connect ...

Page 17: ...nterface the HMI built in network card can also be shared to share WIFI hotspots for other users Turn on the personal hotspot switch and set the hotspot name and password to share the WIFI hotspot for other users Set the hotspot name click hotspot name a hotspot name input box pops up Enter the hotspot name click Enter and click Save to save the added hotspot name information ...

Page 18: ...f HMI has the following 4 different network configuration models take C7S as an example Standard HMIC7S The HMI standard version only has Ethernet and does not include WiFi 4G hotspot routing modules and the network onl procide y by the network cable With WiFi HMIC7S W HMI with WiFi version only includes Ethernet and WiFi without 4G hotspot routing module and the network is provided by network cab...

Page 19: ...ported WIFI LAN Internet unsupported unsupported Connect to the Internet Connect to the Internet unsupported Hotpot LAN LAN Internet LAN Outer net LAN Internet unsupported unsupported 4G Outer net unsupported Internet unsupported unsupported Outer net Network provided Ethernet WIFI 4G Ethernet 4G WIFI WIFI 4G Close routing mode Enter the HMI background settings interface click Network enter the ro...

Page 20: ...ter the HMI background settings interface click Network enter the routing configuration interface click Settings click 4G Routing Mode a prompt Will this turn off WIFI confirm switching to this mode click ok to set the 4G routing mode In 4G routing mode only 4G provides the network to the device and other devices can connect to the local area network and external network by connecting the personal...

Page 21: ... off personal hotspots and 4G confirm switching to this mode Click OK to set the client mode The client mode will fix the IP to 192 168 255 1 In the Client mode the network is provided by the hotspot connected by WIFI At this time the HMI is equivalent to a router The HMI is connected to the wired network and then connected to the device through the wire to provide the network to the device In thi...

Page 22: ... device number Note The length of the terminal name is 1 10 characters Set terminal code Enter the HMI background settings interface click Settings in the Settings interface you can see Terminal code click Set enter the new terminal code and click Enter on the keyboard Set buzzer switch Enter the HMI background settings interface click Settings in the Settings interface you can see Beep turn on Be...

Page 23: ...erface click Settings open the Download project password function in the Security interface set the project download password after the setting is successful the user needs to verify the password to download the project and update the firmware otherwise it cannot be executed related operations Enter background password Adding password verification into the background can avoid potential security r...

Page 24: ...nd click Enter to save the LAN access password To access the device via LAN mobile APP cloud website TVBOX etc the user must enter the correct LAN password Click Empty password a pop up set up success that is to clear the previous LAN password users can access the HMI through the LAN without entering any password Enable screen calibration Click Screen calibration pop up Enabling calibration will r...

Page 25: ... we need then the current cloud server is displayed as selected server address Click Auto to automatically select a relatively close cloud server address based on the IP address Click Close to close the window MQTT Agency The firmware version 3 16 0 20 2 16 0 20 and later versions add the MQTT agency function Click on the MQTT Agency to turn on or off the MQTT agency Turning on the MQTT agent mean...

Page 26: ...h the device manager Firmware update U disk update firmware Enter the HMI background settings click Information select Update enter the firmware upgrade interface select USB then select the appropriate firmware update package and click OK to upgrade the firmware After the upgrade is successful the device will restart SD card update firmware Enter the HMI background settings click Information selec...

Page 27: ...nterface click the button in the upper left corner of the main interface scan the QR code to add the device A prompt box for confirming the binding pops up on the device click OK the device is added successfully and the user can remotely access the device Remote control Enter the APP on mobile phone and enter the device click Access to access the device If the current project allows remote operati...

Page 28: ...tem language the device supports two languages simplified Chinese and English Exit background settings On the HMI background settings interface click Back to exit the background settings and enter the project running interface Thanks for choosing Haiwell HMI If you have any questions about our products or services please let us know Haiwell website www haiwell com Copyright 2005 Xiamen Haiwell Tec...

Reviews: