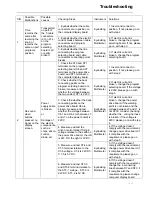
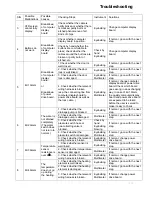
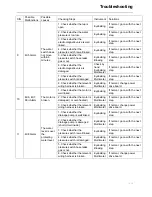
background image

Troubleshooting


16


S/N 

Possible 
Malfunctions 

Possible 
causes 

Checking Steps 

Instrument 

Solutions 

1. Eyeball whether the cable 
connectors are in position on 
the computer display board. 

Eyeballing 

1. Insert and connect in 
position. If not, please go on 
with step 2. 

2. Eyeball whether the electric 
current breaks between cable 
connectors and program 
selecting board. 

Eyeballing 

Multimeter 

2. If electric current is 
broken, change the program 
selecting board. If not, please 
go on with step 3. 

Time 
remains the 
same after   
revolving the 
knob; or 
remains the 
same on part 
programs 
position. 

Transportati
on part of 
the 5 cable 
connectors 

(ST4-1~ST-5)


on the 
program 
selecting 
board is all 
or partly 
broken. 

3. Eyeball whether the line 
connecting the program 
selecting board and cable 
connectors connecting points 
breaks. 

Eyeballing 
Multimeter 

3. If electric current is 
broken, change the program 
selecting board. 

1. Check the S10 and ST1 
terminals on the program 
selecting board, X4 and X7 
terminals on the power drive 
board, and ST3 terminal on 
the computer display board. 

Eyeballing 

1. Insert and connect in 
position. If not, please go on 
with step 2. 

2. Check whether the back 
connecting points on the 
program selecting board are 
broken; measure and test 
whether the voltage between 
the two ends of ST1 is 220 V. 

Eyeballing 
Multimeter 

2. If electric current is 
broken, change the program 
selecting board. If the voltage 
is 220V, please go on with 
step 3. 

3. Check the whether the back 
connecting points on the 
power drive board X4 are 
broken; measure and test 
whether the voltage between 
X4-1 and X4-2 (or between J3 
and J1 on the power board) is 
220 V. 

Eyeballing 
Multimeter 

3. If electric current is 
broken, change the power 
drive board; if the welding 
point is not broken and the 
voltage between J3 and J1 is 
not 220V, consider checking 
whether the  wiring harness 
is broken; if the voltage is 
220V, please go on with step 
4. 

4. Measure and test the 
silicon control diode(1S2) pin


voltage relative to the earth on 
the power drive board

the left 

is 22V DC; the right is 5V DC.

Eyeballing 
Multimeter 

4. If the voltage doesn’t 
comply with the requirement, 
change power drive board; if 
it complies with the 
requirement, please go on 
with step 5. 

5. Measure and test X7-4 and 
X7-5 terminal relative to the 
X7-6 voltage

X7-4 is 22V DC; 

X 7-5 is 5V DC. 

Eyeballing 
Multimeter 

5. If the voltage doesn’t 
comply with the requirement, 
change power drive board; if 
it complies with the 
requirement, please go on 
with step 6. 

No sound   
when 
buttons 
pressed; no 
signal on the 
display 
screen. 

Power 
supply cable 
is broken. 
 
or 
 
Damage of 
the electric 
components, 
such as: 
chips, silicon 
control, 
diode, etc. 

6. Measure and test ST3-3 
and ST3-2 terminal relative to 
the ST3-1 voltage

ST3-3 is 

22V DC; ST3-2 is 5V DC. 

Eyeballing 
Multimeter 

6. If the voltage doesn’t 
comply with the requirement, 
change the 6 connecting 
lines between X7 and ST3; if 
it complies with the 
requirement, please change 
computer display board. 


Summary of Contents for HT1006TXVE

Page 1: ... quantity Intelligence memory for the washing habit of its consumer 320mm extraordinary porthole 42 personalized tilted control panel 100mm extraordinary colour display Children s safe lock Scheduled washing function in 24 hrs Spin speed 1200 1000 rpm 29min super quick wash cycle Haier Group MANUAL CODE HT1206TXVE 00 RUSSIA Edition 2005 06 01 ...

Page 2: ... Contents 2 2 Product model illumination 3 3 Specification 4 4 Safety caution 6 5 Installation 9 6 Functions 11 7 Function schedule 13 8 Trouble shooting 15 9 Wiring circuit 19 10 Exploded view and list of parts 20 ...

Page 3: ...Temprature adjustive E Stainless steel tub F Spin speed adjustive G Computer control Examples HT1206TXVE It represents computer control washing machine with HT series appearance with 320mm big window 180 opening window 1200rpm spin speed 6kg max wash load spin speed is adjustive from 400 to 1200rpm temprature is also adjustive from to 90 and outer tub is stainless steel material ...

Page 4: ...just from to C 90 Drum capacity dry laundry water kg l 6 46 Auto water level adjust depending on volume of filled in laundry AWL Washing temperatures program controlled C 40 60 75 90 Certification s CE ISO 9001 ISO 9002 CE ISO 9001 Approvals VDE GS TÜV GS IMQ TÜV GS Rhl per average 200 wash cycles EN50242 COLD Basics data Unit dimensions H x W x D cm 85 x 59 5 x 59 Net weight kg 83 Voltage frequen...

Page 5: ...in n 1 10 Drain only n 1 11 Spin only n 1 Optional function keys additional program settings Start stop pause Load select Extra rinse program Pre wash Delay timer Soak speed temperature Packing dimensions loadability Packing dimensions H x W x D cm 93 x 65 x 66 Gross weight kg 90 0 40 HC load capacity pcs 144 Built in dimension Requested measure of niche H x W x D cm Dimensions of door cm Logistic...

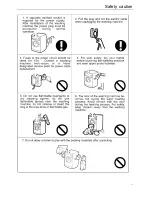
Page 6: ...Safety caution 6 ...

Page 7: ...Safety caution 7 ...

Page 8: ...Safety caution 8 ...

Page 9: ...lnstallation 9 lnstallation 9 ...

Page 10: ...Installation 10 ...

Page 11: ...Functions 11 ...

Page 12: ...Functions 12 ...

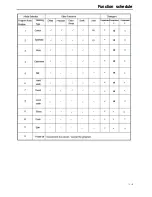
Page 13: ...Function schedule 13 ...

Page 14: ...Function schedule 14 Function schedule 14 ...

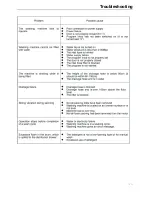
Page 15: ...Troubleshooting 15 ...

Page 16: ...ing board If the voltage is 220V please go on with step 3 3 Check the whether the back connecting points on the power drive board X4 are broken measure and test whether the voltage between X4 1 and X4 2 or between J3 and J1 on the power board is 220 V Eyeballing Multimeter 3 If electric current is broken change the power drive board if the welding point is not broken and the voltage between J3 and...

Page 17: ... an exchanging way In case of Err1 Alarm the quality computer display board and power drive board are expected to be taken before the user is served to make it easy to check 1 Check whether the drainage pump is blocked Eyeballing If normal go on with the next step 2 Check whether the drainage pump is damaged Multimeter If normal go on with the next step 3 Check whether the pressure switch hose or ...

Page 18: ...oken Eyeballing Multimeter If normal change power drive board 1 Check whether the motor is well linked Eyeballing If normal go on with the next step 2 Check whether the motor is damaged or over heated Eyeballing Multimeter If normal go on with the next step 10 Err6 Err7 FErr Alarm The motor is broken 3 Check whether the relevant wiring harness is broken Eyeballing Multimeter If normal change power...

Page 19: ...Wiring circuit 19 ...

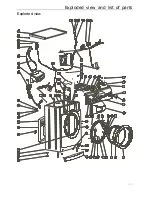
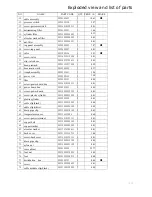
Page 20: ...Exploded view and list of parts 20 Exploded view 78 77 ...

Page 21: ...ok 0020600099 2 0 01 19 porthole handle pin 00215200024102 1 0 02 20 the spring of porthole handle 0020600090 1 0 02 21 porthole handle 0020201652 1 0 07 22 distribution handle 0020202862 1 1 69 23 control panel HT1206 0020202861 1 4 94 23 control panel HT1006 0020202863 1 4 94 24 program knob 0020201488 1 0 62 25 program knob accessory 0020201238 1 0 04 26 screw program board 00216910320111 2 0 0...

Page 22: ...crew power board box 00216910320111 2 0 01 58 power board box 0020201693 1 0 85 59 screw power board 00215000022202 5 0 01 60 screw plastic cylinder 00215000022202 2 0 01 61 plastic cylinder 0020200290 2 0 01 62 cable clip black 00215200015200 2 0 04 63 cable clip white 00214800909100 1 0 02 64 drain pipe clip 00215200018100 2 0 03 65 temperature sensor 002116102986 1 0 60 66 screw power terminal ...

Page 23: ...Exploded view and list of parts 26 Sincere Forever Haier Group Tel 86 532 88939999 Web site http www haier com ...

Reviews: