background image

Introduction

5

TV LED  Owner’s Manual 
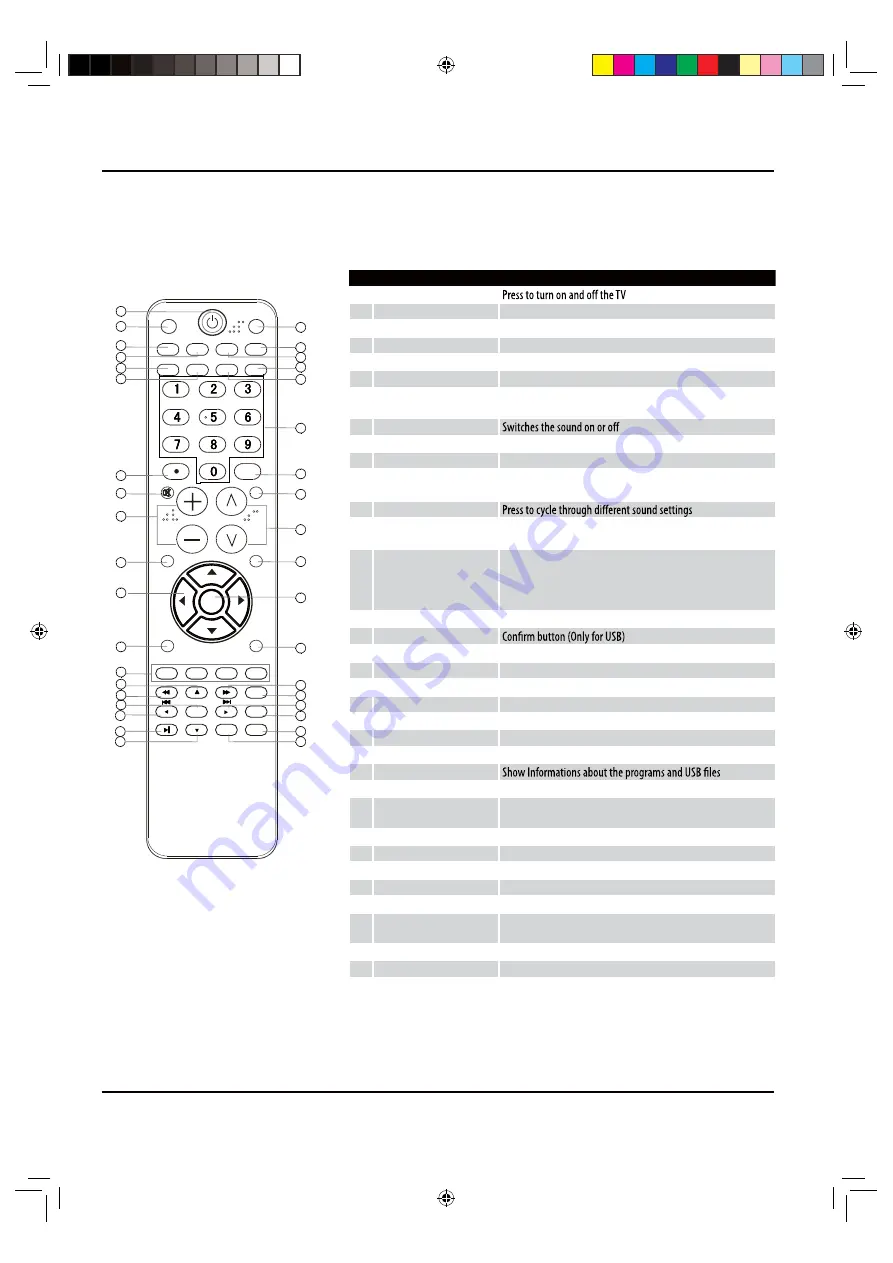
Remote control

The remote control cannot be operated unless the batteries are properly loaded.
When using the remote control, aim it at the remote sensor on the TV.

1

Power

2

INPUT

Show the input source

3

MTS/SAP

Select MONO, STEREO, SAP 

4

CCD (closed caption)

Select a closed caption option

5

P.SIZE

Select the aspect ratio

6

H.LOCK

Hotel Lock button

7

• button

Press to select digital channels. For example, to enter  “54-3”, 
press “54”, “• ” and “3”

8

MUTE

9

VOLUME UP/DOWN

Press to adjust the volume

0

MENU

Press to open the on-screen menu

A

Thumbstick (Up/Down/
Left/Right)

Allows you to navigate the on-screen menus and adjust the 
system settings to your preference

B

SOUND

C

Color button

Press to operate the Functions in GUIDE/Program Edit/Block 
Program/USB

D

G

I

X

Thunbstick(USB)

Allows you to navigate the on-screen menus in USB function,and 
17 for Previous, 34 for Next;

E

REV

Fast Reverse (Only for USB)

F

ENTER

H

Play/Pause button

(Only for USB)

J

USB

Press to switch input source to USB in

K

DNR

Digital Noise Reduction

L

SLEEP button

Press to display the sleep timer option

M

CH.LIST

Open the channel list in TV

N

FAVORITE

Open the favourite channel list in TV

O

Number buttons

Press to change a channel

P

INFO

Q

Q.VIEW

Press to jump back and forth between two channels

R

CHANNEL UP/DOWN

Channel selection(up/down)

S

Q.MENU

Adjust some functions in common use

T

OK

Accesses the highlighted item in the on-screen menu

U

PICTURE

Press repeatedly to cycle through the available picture modes

V

FWD

Fast forward(only for USB)

W

GUIDE

Display the guide when you are watching  digital  channels

Y

EXIT

Clears all on-screen displays and returns to TV viewing from any 
menu

Z

REPEAT

Replay a music or movie

[

ZOOM

Press to magnify/minify an image

ENTER

ZOOM

OK

GUIDE

EXIT

REPEAT

INPUT

MTS/SAP

INFO

MUTE

VOL

CH

MENU

Q.MENU

SOUND

PICTURE

Q.VIEW

P.SIZE

H.LOCK FAVORITE

CH.LIST

CC

DNR

SLEEP

USB

17

18
19

20

21
22
23

24

25

26

27

28

29

30

31

32
33
34
35

36
37

1

2

3
4
5
6

7

8

9

10

11

12

13

14

15
16

&6+*B(1Ꮘ㽓ᅶ᠋LQGG

Summary of Contents for HBTV-32L01HD

Page 1: ...7 7 7 9 6 21 Please READ this manual carefully before operating your TV and retain it for future reference LE32T3 LE40T3 HBTV 32D02FD HBTV 40D02FD LE32A300 LE42A300 LE55A300 HBTV 32L01HD HBTV 42L01FD...

Page 2: ...the product when there is a rainstorm especially thunderstorm 5 Do not use damaged or worn electric plugs and keep electric cord away from heat sources to avoid electric shocks or fire hazards 6 Do n...

Page 3: ...et 15 USB Mode 16 Maintenance 18 Specification 19 Format 19 Troubleshooting 20 Warning 1 Important Safety Instructions 1 Introduction 3 Controls 3 Connection Options 4 Remote control 5 Installation 6...

Page 4: ...rce options menu 2 MENU Menu display Press to access the on screen menu display 3 VOL Presstoadjustthevolume IntheMENUscreen thesebuttonsserveasright leftbuttons 4 CH Press to scan through channels To...

Page 5: ...to this jack 6 PC DVI Audio In Connect the audio L R cables from a computer to this jack 7 HDMI3 In Connect a HDMI device to receive digital audio and uncompressed digital video 8 HDMI2 In Connect a...

Page 6: ...everse Only for USB F ENTER H Play Pause button Only for USB J USB Press to switch input source to USB in K DNR Digital Noise Reduction L SLEEP button Press to display the sleep timer option M CH LIST...

Page 7: ...tenna Socket RF Coaxial Wire 75 ohm Single family Dwellings Houses Connect to wall jack for outdoor antenna Outdoor Antenna To improve the picture quality in a poor signal area please purchase a signa...

Page 8: ...the VCR Refer to the VCR owner s manual Select the input source with using the INPUT button on the remote control and then press button to select the source press OK button to confirm External AV Sou...

Page 9: ...s from a digital set top box or other digital external device refer to the figure as shown below This TV supports HDCP High bandwidth Digital Contents Protection protocol for Digital Contents 480p 720...

Page 10: ...ode is set to Plug and Play automatically by the TV Then make the corresponding audio connection C If using a sound card adjust the VGA sound as required HDMI1 IN ANT IN AIR AUDIO COMPONENT1 IN L Y P...

Page 11: ...o 1280s720p If the source device does not support Auto DVI you need to set the output resolution appropriately To get the best picture quality adjust the output resolution of the source device to 1280...

Page 12: ...Dynamic and User Eye Guard You can also press PICTURE button on the remote control to select the option Standard Mild Dynamic and User Eye Guard How to customize your own picture status Press MENU bu...

Page 13: ...e A MTS SAP button to select your desired MTS mode in a analog signal Each time you press MTS SAP button Mono Stereo or SAP appear If other languages are available on the digital signal select them wi...

Page 14: ...All channels now available will be automatically preset in order After the search has finished the first program number will display on the screen This search automatically adds only the active chann...

Page 15: ...Menu Press MENU button and then use button to select Time menu Press OK button the following menu appears on the screen Clock To set the correct time On Time Set a time for the TV to turn on Sleep Ti...

Page 16: ...OK button to enter the submenu then press button to select a channel you want to blocked press the yellow buttonon the remote control the channel will blocked press the yellow button again to cancel P...

Page 17: ...to unsupported file system please format the equipment to the above mentioned file system To achieve smooth playing ensure the following The file code rate should be lower than 300KB S Due to the limi...

Page 18: ...t PHOTO item Press ENTER to confirm the selection and enter the picture file list Press to select the picture you want to play press ENTER to confirm and then press button to play the pictures If you...

Page 19: ...o play and then press button to play the text Press to select the last or next text Toexit the Text mode just press EXIT repeatedly Note You can enjoy the music and the text at the same time 6 B 1 LQG...

Page 20: ...tton to record the program being played and press D MENU or EXIT button to make the recording interface minimum Press STOP button to stop the program recording being played For Playback the recorded p...

Page 21: ...your television not to receive the damage Accessories Owner s manual x1 Remote control x1 Alkaline battery x2 MODEL Power Consumption Net Size LxWxH Net Weight LE32T3 120W 791x210x566mm 11 9Kg Format...

Page 22: ...roblem exists in other channels Check out of picture and sound systems Refer to relative instructions in the Manual for color adjust Spots with some or all pictures Verify if the antenna is correctly...

Page 23: ...Installation Operation 21 TV LED Owner s Manual 6 B 1 LQGG...

Page 24: ...Operation Maintenance TV LED Owner s Manual 22 6 B 1 LQGG...

Reviews: