background image

21

OPERATION MANUAL

LOADING & UNLOADING TOOLING

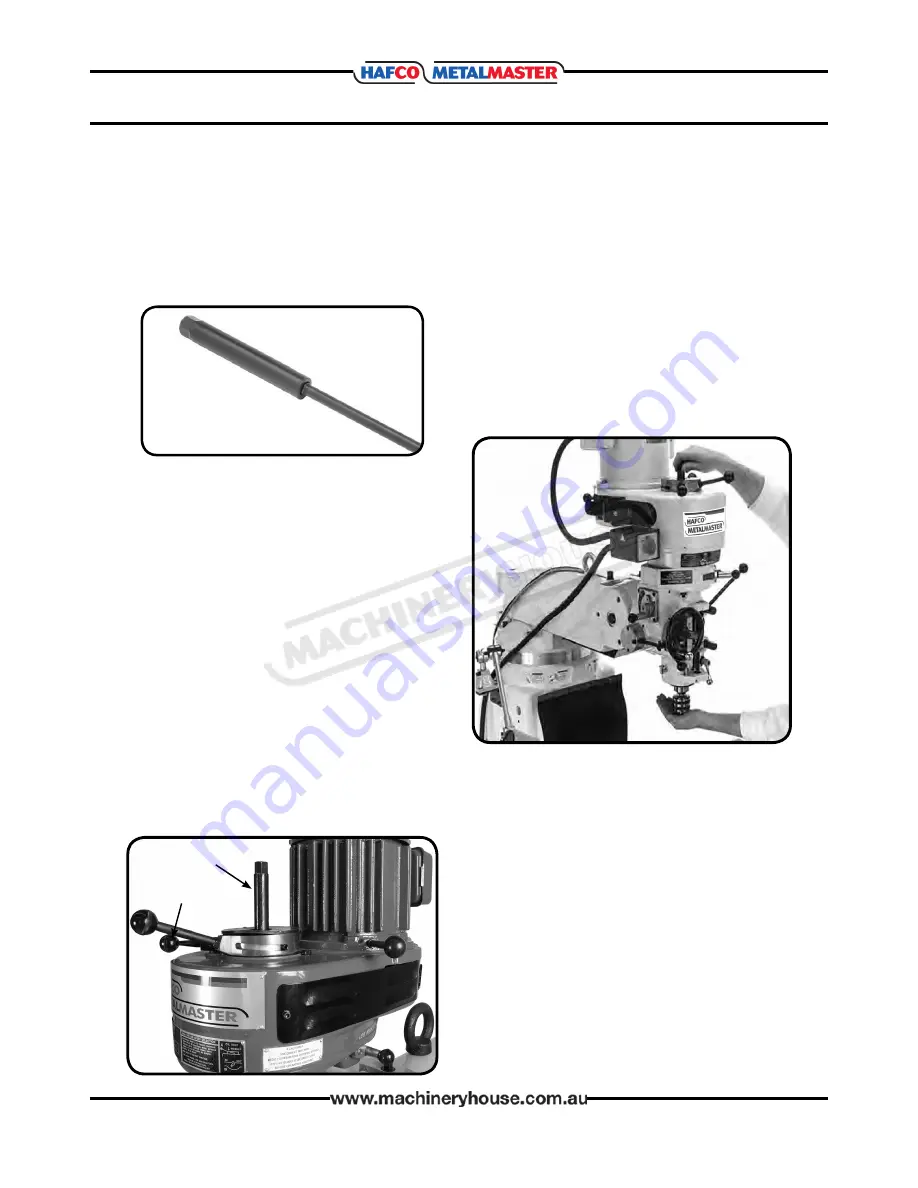
These mills are equipped with a NT-30 spindle 

taper (BM-23A) with an 12mm drawbar and a 

NT-40 spindle taper (BM-53VE, BM-63VE) with 

a M16  spindle drawbar  (Fig. 17)

Drawbar Upper 

Portion

Fig. 17

Loading Tooling

1.  DISCONNECT MILL FROM POWER!

2.  Clean any debris or surface substances       

     from inside the spindle taper and the    

     mating surface of the tooling.

NOTE: 

Debris or oily substances can prevent

the tooling and spindle from properly 

mating. This condition can cause excessive 

vibration, poor cutting results, or tool/work-

piece damage.

3.   Place the mill in the low spindle speed   


range to keep the spindle from turning   


or use the spindle brake  in the next    


steps. (B of Fig. 18)

4.    With one hand holding the tool in place,  

   insert the drawbar into the spindle from  

   the top of the head, then thread it into   

   the tool (see A of Fig. 18)

A

B

Fig. 18

5. Tighten the drawbar until it is snug. Avoid

overtightening, as this could make removing

the tool difficult

UNLOADING TOOLING

1.   DISCONNECT THE MILL FROM POWER!

2.   Place the mill in the low spindle speed    


range to keep the spindle from turning   


in the next step.

3.   Loosen the drawbar a couple of turns,    

  then tap the top of it with a brass hammer  

  to knock the tool loose at the bottom of  

  the spindle.

4.   Support the tool with one hand, then    

  completely unthread the drawbar from   

  the tool.

Fig.19

NOTE:

 Make sure that the drawbar has at

least three threads engaged with the tooling 

in the next step to avoid damaging the

threads of the drawbar or tool.

Page 21

Instructions Manual for BM-23A (M595D)

12/02/2018

Summary of Contents for BM-23A

Page 1: ...TURRET MILL OPERATION MANUAL Edition No TM 001 Date of Issue 6 2017 Models BM 23A BM 53VE BM 63VE Page 1 Instructions Manual for BM 23A M595D 12 02 2018 ...

Page 2: ...RIAL NO DATE OF MANF NOTE This manual is only for your reference Owing to the continuous improvement of the machine changes may be made at any time without obligation or notice Please ensure the local voltage is the same as listed on the specification plate before operating this electric machine Distributed by www machineryhouse co nz MACHINE DETAILS Page 2 Instructions Manual for BM 23A M595D 12 ...

Page 3: ...h Lever 18 Feed Direction Control 18 Coarse Feed Handle 19 Quill Lock Lever 19 Micrometer Adjusting Nut 19 Fine Feed Wheel 19 Depth Scale and Stop 19 Spindle Downfeed Operation 20 Loading and Unloading Tooling 21 ADJUSTMENTS Mill Head Fore Aft Adjustment 22 Mill Head Left Right Adjustment 22 Returning to Upright Position 23 Positioning the Ram 24 MAINTENANCE Lubrication 25 Gib Adjustment 26 Troubl...

Page 4: ...on System One Shot One Shot One Shot Table T Slot Size mm 16 16 16 Work Table Load Capacity Kgs 250 350 400 Spindle Speeds Vertical 8 Steps 65 2330 rpm Variable 50 3550 rpm Variable 50 3550 rpm Motor Power Vertical 2 2kW 3HP 1Ph 3 75kW 5hp 3 75kW 5hp Motor Voltage 240V 15amp 415V 20amp 415V 20amp Overall Dimensions mm W x D x H 1500 x 1700 x 2200 1800 x 2430 x 2200 1800 x 2430 x 2200 Net Weight kg...

Page 5: ...Body I Cross Handle N Headstock E Electrical Cabinet J Knee Handle O Spindle Drawbar B Become familiar with the names and locations of the controls and features shown below to better understand the instructions in this manual A B C D E F G H I J K L M N BM 23A DISPLAYED Fig 1 FRONT VIEW IDENTIFICATION O Page 5 Instructions Manual for BM 23A M595D 12 02 2018 ...

Page 6: ... Lever Quill Lock Lever Adjustable Downfeed Stop Spindle Brake Lever High Low Range Lever Fine Downfeed Handwheel Auto Downfeed Direction Pin Fine Downfeed Clutch Lever Auto Downfeed Rate Selector Quill Spindle Manual Power Downfeed Selector Motor Lock Screw Fig 2 BELT DRIVEN HEAD IDENTIFICATION Page 6 Instructions Manual for BM 23A M595D 12 02 2018 ...

Page 7: ...lly used for drilling operations Quill Lock Lever Locks the quill in any position for best rigidity Adjustable Downfeed Stop Limits depth of the quill travel The dial is graduated in incre ments of 0 01mm Typically used for repeat operations Fine Auto Downfeed Clutch Lever Engages fine auto downfeed gears Fine Downfeed Handwheel Manually controls slow spindle downfeed for fine Z axis control Auto ...

Page 8: ...wer Downfeed Selector Digital Variable Speed Display Auto Downfeed Direction Pin Fine Downfeed Clutch Lever Auto Downfeed Rate Selector Fine Downfeed Handwheel Coarse Downfeed Lever Quill Lock Lever Adjustable Downfeed Stop Quill Spindle VARIABLE SPEED HEAD IDENTIFICATION Fig 3 Page 8 Instructions Manual for BM 23A M595D 12 02 2018 ...

Page 9: ...ndle to top position when re leased Typically used for drilling operations Quill Lock Lever Locks quill in any position for better rigidity Adjustable Downfeed Stop Limits the depth of the quill travel The dial is graduated in in crements of 0 01mm Typically used for repeat operations Fine Auto Downfeed Clutch Lever Engages fine auto downfeed gears Fine Downfeed Handwheel Manually controls slow sp...

Page 10: ...xis table movement for increased rigidity during operations where the Y axis should not move B C D F One Shot Oiler Lubricates X Y and Z axis table ways G Limit Stop Restricts table movement by its positioning along front of table H Direction Knob Selects direction of table movement Middle position is neutral I Speed Dial Controls speed of power feed Rotating dial clockwise causes the table to mov...

Page 11: ...ity includes but is not limited to proper installation in a safe environment personnel training and authorization to use proper inspection and maintenance manual availability and comprehension application of safety devices integrity and the use of personal protective equipment The manufacturer will not be held liable for injury or property damage from negligence improper training machine modificat...

Page 12: ...efore walking away Never leave the machine running while unattended MAINTAIN WITH CARE Follow all maintenance instructions and lubrication schedules to keep the machine in good working condition A machine that is improperly maintained could malfunction leading to serious personal injury or death AWKWARD POSITIONS Keep proper footing and balance at all times when operating machine Do not overreach ...

Page 13: ...able should be used for leveling The table is the reference surface for both side to side and fore and aft leveling Be certain you get it level in BOTH directions 10 When the machine is level secure the base with the masonry anchors 11 Loosen the four hex head nuts that secure the head to the ram about 1 4 turn each just enough to allow rotation of the head See adjustments Page 22 12 While assisti...

Page 14: ...ication system reservoir is located on the left side of the machine The position of the milling machine mill head can be set up to accommodate the work piece being machined The mill head can be set up for angles to the left or right and for fore and aft angles The mill head can also be rotated on its turret The ram can be moved back and forth to reach work piece locations at the fore and aft extre...

Page 15: ...moves freely Fig 4 2 4 Lever 1 is shown in Fig 4 4 in the HIGH or LOW position Belt Covers NOTE If this step was not successful use HIGHLOW range lever Lever 2 Fig 4 4 to reset speed range then repeat this step until you are certain that spin dle is seated into spindle clutch 5 Remove belt housing side covers on either side of head to expose V belt and pulleys as shown in Fig 4 3 6 Loosen two moto...

Page 16: ...eed The handwheel is located on the right side of the mill head The speeds for high and low speed ranges are dis played on the panel on the front of the mill head B Fig 6 All speed changes must be made while the motor is running Attempting speed changes with the motor not running can result in damage to the drive mechanism Fig 6 Fig 5 Page 16 Instructions Manual for BM 23A M595D 12 02 2018 ...

Page 17: ... by changing the position of the shift lever The shift lever is located at the lower right side of the mill head Fig 8 The lever position closest to the operator is the High setting The lever po sition away from the operator is the Low setting The middle position is the Neutral setting Do not shift the High Low Gear Lever while the motor is running Rotate the spindle by hand while changing the lev...

Page 18: ...releases it manually by moving the lever to the right Fig 9 Feed Rate Lever The Feed Rate Lever Fig 10 is used to set the quill feed per revolution rate Three feed rates are available 0 04mm 0 08mm and 0 15mm per rev olution The positions are shown on an indicator plate under the feed rate lever The rate is selected by pulling out the knob on the feed rate lever and moving the handle to the detent...

Page 19: ...s secured with the lock nut B Fig 14 Fine Feed Wheel When the controls are set for the Fine feed using handwheel position Figure 5 the Fine Feed Hand wheel A Fig 12 can be used to manually control the upward or downward direction of the quill Remove the Manual Fine Feed Handwheel when not in use Failure to comply may cause serious injury Depth Scale and Stop The Depth Scale and Stop are used durin...

Page 20: ...11 Position auto downfeed direction pin see C Fig 16 in center of handwheel for spindle travel that is correct for your operation If necessary rock fine downfeed handwheel back and forth to move pin all the way in or out 12 Select feed direction by setting the Feed Direction Knob C position per the table NOTE The direction pin has three positions 1 In for one downfeed direction 2 middle for neutra...

Page 21: ...he next steps B of Fig 18 4 With one hand holding the tool in place insert the drawbar into the spindle from the top of the head then thread it into the tool see A of Fig 18 A B Fig 18 5 Tighten the drawbar until it is snug Avoid overtightening as this could make removing the tool difficult UNLOADING TOOLING 1 DISCONNECT THE MILL FROM POWER 2 Place the mill in the low spindle speed range to keep t...

Page 22: ...wly rotate tilt bolt B shown in Fig 21 NOTE Rotate tilt bolt clockwise to tilt head backward and counterclockwise to tilt it for ward 4 Re tighten lock bolts Fig 21 Rotating Head Left Right 1 DISCONNECT MACHINE FROM POWER 2 Loosen four lock bolts A shown in Fig 22 23 half a turn only NOTE Do not completely remove the four lock bolts as the head will fall off and may causew injury Check your model ...

Page 23: ...cator should read the same in position C and D Fig 24 of the table If not loosen the four hex nuts A of Fig 22 and reposition the mill head If the indicator does not read the same in E and F Fig 24 loosen the nuts A in Fig 21 and reposition the mill head BM 23A BM 53VE A x2 B BM 63VE Fig 23 A x2 NOTE The lock bolts shown in Fig 22 23 are threaded into T nuts that travel in a circular slot during h...

Page 24: ...wing Make sure the machine base is secured to the floor before repositioning the ram 1 DISCONNECT MACHINE FROM THE POWER 2 Loosen four turret lock bolts C Fig 25 that clamp the ram to the top of the base A half a turn should be sufficient to allow the ram to move NOTE There are two lock bolts on each side of the ram Use gentle hand pressure to avoid rapid movement NOTE In the next step take care n...

Page 25: ...tting weekly D Back gear oil cup SAE 10 or 10W spindle oil Service cup when operating in back gear mode service weekly Periodic Maintenance Requirements During operation periodically vacuum and brush chips and debris from the machine Periodically operate knee and table lead screws through full range of movement to evenly distrib ute lubricant particularly when applied using the one shot system Per...

Page 26: ...process of properly adjusting the gibs requires trial and error and patience Refer to Fig 29 31 to identify the locations of the table saddle and knee gibs and one of the two adjustment screws for each NOTE It will be necessary to remove small parts such as way wipers and covers to access the gib adjustment screws The following is the method used to adjust the gibs 1 DISCONNECT MACHINE FROM POWER ...

Page 27: ...ch at fault 8 Gearbox at fault 9 Motor overheated 10 Pulley sprocket slipping on shaft 11 Centrifugal switch at fault 12 Motor bearings at fault 1 Use correct cutter bit reduce feed rate reduce spindle RPM use coolant if possible 2 Decrease feed rate cutting speed 3 Use correct type size of metal 4 Tension replace belt s ensure pulleys are aligned 5 Clean belt s 6 Wire motor correctly 7 Test repla...

Page 28: ...ger cutting tool and slower feed rate 3 Use coolant or oil for appropriate application 4 Lessen depth of cut and allow chips to clear 5 Fully retract spindle and raise table This increases rigidity 1 Tighten table locks Page 10 2 Properly clamp workpiece on table or in vise 3 Set spindle speed correctly or use slower feed rate Page 15 16 4 Fully retract spindle and raise table This increases rigid...

Page 29: ...s not turned on plugged in 2 Shorted disconnected wiring plugs 1 Initial reading is incorrect 2 Sensor has gone bad 3 Spacing between sensor scale is incorrect 1 Power not turned on 2 Bulb is burned out 3 Short in wiring or wired incorrectly 1 Increase return spring tension 2 Replace return spring 1 Inspect wiring connections Replace repair as necessary 1 Unlock table locks 2 Select speed engage d...

Page 30: ...30 OPERATION MANUAL BM 23A BELT DRIVE HEAD Page 30 Instructions Manual for BM 23A M595D 12 02 2018 ...

Page 31: ...ing Belt Flange 1 25 LA 028 Timing Belt Pulley 1 27 JTM1 C27 Flat Head Screw W1 8x1 4 1 28 TS 0571072 Hex Jam Nut 5 8 18UNF 1 29 LA 006 Plastic Ball W3 8 2 30 LA 074 Spindle Clutch Lever 1 31 LA 073 Cam Ring 1 32 JTM1 032 Cam Ring Pin 1 33 JTM1 C33 E Ring E 5 5 1 34 LA 039 Brake Lock Handle 1 35 LA 038 Brake Lock Pin 1 36 TS 0680061 Washer W1 2 1 37 JTM1 037 Spindle Speed Plate 1 39 JTM1 039 Belt ...

Page 32: ...aring Lock Nut 1 75 JTM1 C75 Hardened Nut W7 16 1 76 LA 045 T Bolt 1 77 JTM1 C77 Bolt Washer W7 16 1 78 LA 001 Shift Crank 1 79 JTM C79 Spring Pin Ø3x20 1 80 LA 044 Back Gear Shift Bushing 1 81 LA 003 Shaft Crank Handle 1 82 LA 006 Plastic Ball 2 83 LA 004 Gearshift Plunger 1 84 LA 005 Compression Spring 1 Parts List for BM 23A Head Assembly Cont Page 32 Instructions Manual for BM 23A M595D 12 02 ...

Page 33: ...33 OPERATION MANUAL Spindle Assembly Page 33 Instructions Manual for BM 23A M595D 12 02 2018 ...

Page 34: ... 1 28 LA 144 Cluster Gear Assembly 1 29 HA 029 Cluster Gear Key 3 3 45 1 31 LA 143 Cluster Gear Shaft 1 32 HA 032 Snap Ring 2 33 LA 142 Bevel Gear Bushing 1 34 LA 141 Thrust Spacer 1 36 LA 156 Feed Drive Gear 1 37 LA 166A Key 1 40 LA 157 Feed Drive Gear 1 41 HA 041 Needle Bearing 1 42 LA 168 Bushing 1 43 LA 139 Worm 1 44 LA 138 Feed Worm Shaft Bushing 1 47 LA 137 Bevel Gear Thrust Spacer 1 48 LA 1...

Page 35: ... 086 Overload Clutch Ring 1 94 LA 094 Snap Ring 1 95 LA 018 Worm Gear 1 96 LA 079 Trip Lever 1 97 LA 078 Washer 1 98 LA 098 Snap Ring 1 99 LA 076 Clutch Arm Cover 1 100 TS 1523051 Set Screw M6 10 1 101 HA 101 Locknut 1 102 LA 077 Pin 1 103 LA 091 Cam Rod 1 104 LA 100 Trip Handle 1 105 LA 124 Screw 1 106 LA 092 Feed Trip Bracket 1 107 TS 1503051 Hex Socket Cap Screw M6 20 2 108 LA 114 Plunger 1 109...

Page 36: ...rew 1 141 LA 107 Pinion Shaft Hub 1 142 LA 058 Quill 1 143 TS 154021 Hex Nut M4 1 144 TS 1521071 Set Screw M4 20 1 145 LA 098 Feed Trip Lever 1 146 LA 099 Trip Lever Pin 1 147 HA 171 Key 2 148 LA 111 Quill Lock Sleeve 1 149 LA 109 Lock Handle 1 150 HA 150 Screw M5 10 2 151 LA 057 Felt Washer 1 152 LA 101A Pin 1 153 LA 110 Quill Lock Sleeve 1 154 LA 101 Quill Pinion Shaft 1 155 LA 043 T Bolt Assemb...

Page 37: ...37 OPERATION MANUAL BM 53VE Upper Head Parts List Page 37 Instructions Manual for BM 23A M595D 12 02 2018 ...

Page 38: ...2 VS 022 Worm Gear 1 23 VS 023 Spring Pin 5x10 2 24 VS 024 Bushing 2 25 VS 025 Dial Control Shaft 1 26 VS 026 Spring Pin 3x12 1 27 VS 027 Dial Wheel 1 28 VS 028 Wheel Handle 1 29 VS 029 Shaft 1 30 VS 030 Spring Pin 4x16 2 31 VS 031 Spring Pin 3x25 1 32 VS 032 Speed Change Chain 1 33 VS 033 Adjustment Stud 1 34 VS 034 Sleeve Nut 1 35 VS 035 Adjustment Stud 1 36 VS 036 Tilter 1 37 VS 037 Bushing 2 3...

Page 39: ...g Washer 1 80 VS 080 Snap Ring 1 81 VS 081 Nut 1 82 VS 082 Lower Housing 1 83 VS 083 Fixed Clutch Bracket 1 84 VS 084 Spring 3 85 VS 085 Stud 3 86 TS 1506021 Hex Socket Cap Screw M12x25 3 87 VS 087 Gear Shift Pinion 1 88 VS 088 Pin 1 89 VS 089 Detent Plate 1 90 VS 090 Detent Washer 1 91 VS 091 Spring 1 92 VS 092 Pinion Block 1 93 TS 1503011 Hex Socket Cap Screw M5x14 2 94 VS 094 Pinion Crank 1 95 ...

Page 40: ...JTM4VS A002B Draw Bar Washer 1 116 VS 116 Key 1 117 VS 117 Oval Head Screw 3 16x1 2 1 118 VS 007 Snap Ring 4 119 VS 005A Plastic Sleeve 2 120 JTM4VS 120 Speed Chart 1 121 JTM4VS 121 Pan Head screw M4 4 122 JTM4VS 122 Sensor Block 1 123 TS 1521041 Set Screw M4X10 1 BM 53VE Upper Head Parts List Cont Page 40 Instructions Manual for BM 23A M595D 12 02 2018 ...

Page 41: ...41 OPERATION MANUAL Base Assembly Page 41 Instructions Manual for BM 23A M595D 12 02 2018 ...

Page 42: ...26 TS 0561031 Hex Nut 3 8 2 27 MB 008 Spider 1 2 12UNC 1 28 MB 000 Column 1 29 JTM1 330A Table 1 30 LT 027 Stop Nut M8 2 31 LT 028 Table Stop 2 32 TS 1504071 Hex Socket Cap Screw M8 35 2 33 TS 1504031 Hex Socket Cap Screw M8 16 2 34 LK 002 Gib Adjusting Screw 5 16 6 35 LS 003 Table Stop Bracket 1 36 LS 008 Saddle Table Gib 1 37 LS 013 Felt Wiper 2 38 LS 005R Table Lock Plunger R 20mm 1 38 1 LS 005...

Page 43: ...03 Plunger 29mmL 1 76 LK 081 Spring Pin 8 30 1 77 LS 010 Saddle Lock Plunger 140mm 1 78 TS 1515001 Hex Socket Cap Screw M8 12 1 79 JTM4VS B79 Oil Block 1 4 1 80 JTM4VS B80 Spacer 1 81 JTM4VS B81 Turret Scale 1 82 JTM4VS B82 Rubber T Nut 6 83 MB 090 Round Head Screw 1 4 3 8 L 4 84 MK 038 Bushing 1 85 VM I40 Oil Plug 3 8 PT 3 86 MB 004 Cover 1 87 MB 041 Strainer Screen 2 88 JTM4VS B88 Lock Washer 1 ...

Page 44: ...44 OPERATION MANUAL Lead Screw Assembly Page 44 Instructions Manual for BM 23A M595D 12 02 2018 ...

Page 45: ...Z 5 10 D 10 Bearing Bracket 2 11 D 11 Spring Pin 5 25 6 12 TS 1505031 Hex Socket Cap Screw 16 13 KEY3325 Key 3 3 25 3 14 D 14 Leadscrew 1 15 TS 1503061 Hex Socket Cap Screw 8 16 H 9 Washer 4 17 D 17 Feed Screw Nut 2 18 D 18 Feed Nut Bracket 1 20 D 20 Cross Bearing Bracket 1 21 D 21 Cross Feed Screw 1 22 D 22 Cross Feed Nut 2 23 D 23 Spring Washer 1 2 3 24 D 24 Washer 3 25 D 25 Spring Washer 2 26 D...

Page 46: ...utor 1 4 A 4 Oil Regulating Distributor 1 5 A 5 Flexible Steel Tube 4x550 1 6 PH 4011 Elbow Joint 2 7 PA 401 Elbow Joint 6 8 PA 4 Thimble Nut 20 9 PB 4 Thimble 20 10 PG 004 Union 1 11 JTM4VS BUTW1458 Screw M6 x14 4 12 TS 1502061 Hex Socket Cap Screw M5 25 4 13 PD 401 Straight Joint 1 14 A 14 Nylon Piece 4x700 1 Page 46 Instructions Manual for BM 23A M595D 12 02 2018 ...

Page 47: ... connecting 14 Use correct amperage extension cords Undersized extension cords overheat and lose power Replace extension cords if they become damaged 15 Keep machine well maintained Keep blades sharp and clean for best and safest performance Follow instructions when lubricating and changing accessories 16 Keep machine well guarded Make sure guards on machine are in place and are all working correc...

Page 48: ...nspection Inspect Drill and end mills for sharpness chips or cracks before use Replace any cutting tools immediately if dull chipped or cracked Handle new cutting tools with care Cutting edges are very sharp and can cause lacerations 9 Reversing the spindle Make sure the spindle has come to a complete stop before changing the direction of the spindle Do not slow or stop the spindle by using you ha...

Page 49: ...UM Eliminate avoid loose clothing Long hair etc Incorrect adjustment may result in the head becoming detatched and a crushing hazard Mill head tilting adjustment please refer to mill head tilting instruction sheet for correct procedure Make sure all guards are secured shut when machine is on HIGH MEDIUM Ensure correct spindle direction when milling Ensure tooling is secure in chuck Stand clear of ...

Reviews: