


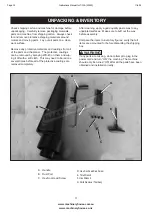


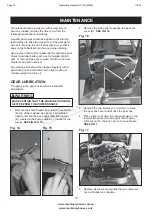


Fig. 11
15
A
B
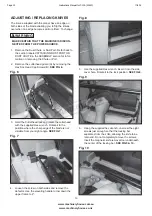
Lift the tool up until the knife separates from the
pins and remove the knife.
Rotate the knife 180 degrees so that the edge of
the knife that was facing you is now facing away
from you and reinsert the knife. If you have already
used both edges of the knife, replace the knife at
this time
Place the magnetic knife removal tool on top of the
knife. Make sure that the tool is centered on the
knife.
Place the knife on the pins in the cutterhead and
remove the knife removal tool.
Retighten the eight screws loosened.
Repeat this process for the remaining
knife
.
NOTE:
When placing the knives on the pins, you will
notice that there is some side to side movement
available in the knife. This is normal as it allows for
repositioning of the knives in case one of the knives gets
a nick in it.
NOTE:
In order to rotate the cutterhead, you will have
to depress the red lever. This will unlock the cutterhead
allowing you to rotate it to the next knife to be changed.
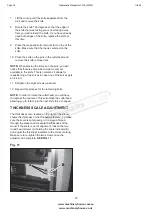
THICKNESS SCALE ADJUSTMENT
The thickness scale, located on the right of the planer,
shows the thickness of the finished workpiece. To make
sure the scale is set properly, run a piece of wood
through the planer and measure the thickness of the
wood. If the scale is out of alignment, loosen the two
round head screws (A) holding the scale indicator (B)
and adjust the thickness indicator to the correct setting.
Make sure to re-tighten the two screws once the
adjustment is complete.
SEE FIG. 11
7.
8.
9.
10.
11.
12.
www.machineryhouse.com.au
www.machineryhouse.co.nz
Page 16
Instructions Manual for T-13A (W813)
1
1/9/19