


Maintenance
C A U T I O N
Personal injury hazard. Only qualified personnel should conduct the tasks
described in this section of the manual.
N O T I C E
Do not disassemble the instrument for maintenance. If the internal components
must be cleaned or repaired, contact the manufacturer.
Clean the instrument
Clean the exterior of the instrument with a moist cloth and a mild soap
solution.
Clean the syringe
Clean the syringe regularly to keep it working properly. Use a mild
detergent for standard applications. To find whether a different cleaning
solution is compatible with the instrument, refer to
on page 3.
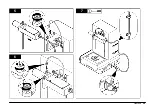
1.
Put a container with the cleaning solution on the docking module.
2.
Push the
LIFT/LOWER
button to lower the sample probe.
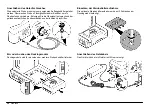
3.
Push the
LOAD
button to fill the syringe with the cleaning solution.
Note: If the plunger does not move easily in the syringe barrel, remove the
plunger, wipe the plunger with alcohol and wet the plunger seal with deionized
water.
4.
Allow the solution to stay in the syringe for a minimum of 30 minutes.
5.
Push the
LOAD
button to send the cleaning solution to the drain.
6.
Push the
LIFT/LOWER
button to raise the sample probe.
7.
Put a container with distilled or deionized water on the docking module.
8.
Push the
LIFT/LOWER
button to lower the sample probe.
9.
Push the
CLEAN
button to flush the syringe with the rinse water.
10.
Repeat the flush with rinse water for a minimum of 10 cycles.
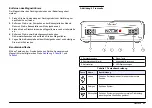
Troubleshooting
Back-flush the system
A large particle can reduce or stop the liquid flow. If this occurs, a flush in
the reverse direction can push the particle out through the sample probe.
1.
Put a small waste container under the sample probe.
2.
Push the
LIFT/LOWER
button to lower the sample probe.
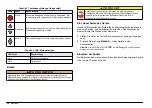
3.
Push and hold the
BACK-FLUSH
button until the back-flush cycle
starts.
The syringe fills with liquid from the drain tubing. When the syringe
closes, the liquid is sent through the sensor and sample probe.
4.
Repeat the back-flush cycle as necessary until a flush in the forward
direction with a clean sample flows at a normal rate.
Replacement parts and accessories
Note: Product and Article numbers may vary for some selling regions. Contact the
appropriate distributor or refer to the company website for contact information.
Replacement parts
Description
Item no.
Cable, USB, 2 m
460-400-4799
Fitting, probe to HRLD sensor
90630002
Module, small-vial clamp
2089099-01
O-rings, sensor, pkg/4
808-010-200
Power cord, 115 VAC, 6 ft
VP623501
Power cord, 230 VAC, 72 in.
VP623500
Power supply
230-300-0024
Sampling probe, 14 cm (5.5 in.), large bore
90620008
Stir bar, Teflon, pkg/5
600-100-0003
18
English
Summary of Contents for LANGE HIAC 9703+
Page 2: ...English 3 Deutsch 20 Italiano 37 Fran ais 54 Espa ol 71 2...
Page 9: ...1 2 3 4 English 9...
Page 10: ...5 7 6 10 English...
Page 11: ...1 2 3 4 English 11...
Page 12: ...5 7 6 12 English...
Page 26: ...1 2 3 4 26 Deutsch...
Page 27: ...5 7 6 Deutsch 27...
Page 28: ...1 2 3 4 28 Deutsch...
Page 29: ...5 7 6 Deutsch 29...
Page 43: ...1 2 3 4 Italiano 43...
Page 44: ...5 7 6 44 Italiano...
Page 45: ...1 2 3 4 Italiano 45...
Page 46: ...5 7 6 46 Italiano...
Page 60: ...1 2 3 4 60 Fran ais...
Page 61: ...5 7 6 Fran ais 61...
Page 62: ...1 2 3 4 62 Fran ais...
Page 63: ...5 7 6 Fran ais 63...
Page 77: ...1 2 3 4 Espa ol 77...
Page 78: ...5 7 6 78 Espa ol...
Page 79: ...1 2 3 4 Espa ol 79...
Page 80: ...5 7 6 80 Espa ol...
Page 88: ...www hach lange com Hach Lange GmbH 2010 All rights reserved Printed in Germany...