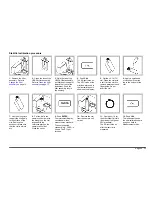
StablCal calibration procedure
1.
Remove the filter
assembly. Refer to
Change the filter
assembly
on page 15.
2.
Clean the lens of the
USEPA filter assembly.
Refer to
Clean the filter
assembly
on page 15.
3.
Hold the tab of the
USEPA filter assembly
so that the arrows point
toward the front of the
instrument. Push the
filter assembly fully in
the housing.
4.
Push
CAL
.
The S0 light turns on.
The NTU value of the
dilution water used in
the last calibration is
shown on the display.
5.
Get the < 0.1 NTU
vial. Clean the vial with
a soft, lint-free cloth to
remove water spots and
fingerprints. Do not
invert the vial.
6.
Apply a small bead
of silicone oil from the
top to the bottom of the
vial.
7.
Use the oiling cloth
to apply the oil equally
to the surface of the
vial. Remove the
excess oil. Make sure
that the vial is almost
dry.
8.
Put the vial in the
sample cell holder with
the triangle on the vial
aligned with the
reference mark on the
sample cell holder.
Close the cover.
9.
Push
ENTER
.
The instrument display
counts down, then
measures the standard.
The next expected
standard (e.g., 20.00) is
shown. The S1 light
turns on.
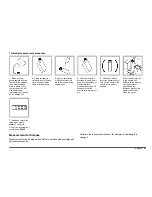
10.
Remove the vial
from the sample cell
holder.
11.
Do steps 5–10 for
the other StablCal vials
(from lowest to highest
NTU standard).
The S0 light turns on
after the last vial is
measured.
12.
Push
CAL
.
The instrument saves
the new calibration data
and goes back to
Measurement mode.
English
11
Summary of Contents for 2100N
Page 2: ...English 3 Fran ais 20 Espa ol 38 2...
Page 16: ...1 16 English...
Page 34: ...1 34 Fran ais...
Page 53: ...1 Espa ol 53...
Page 57: ......


