background image


27 

Appendix A Chassis views and technical 
specifications 

Chassis views 

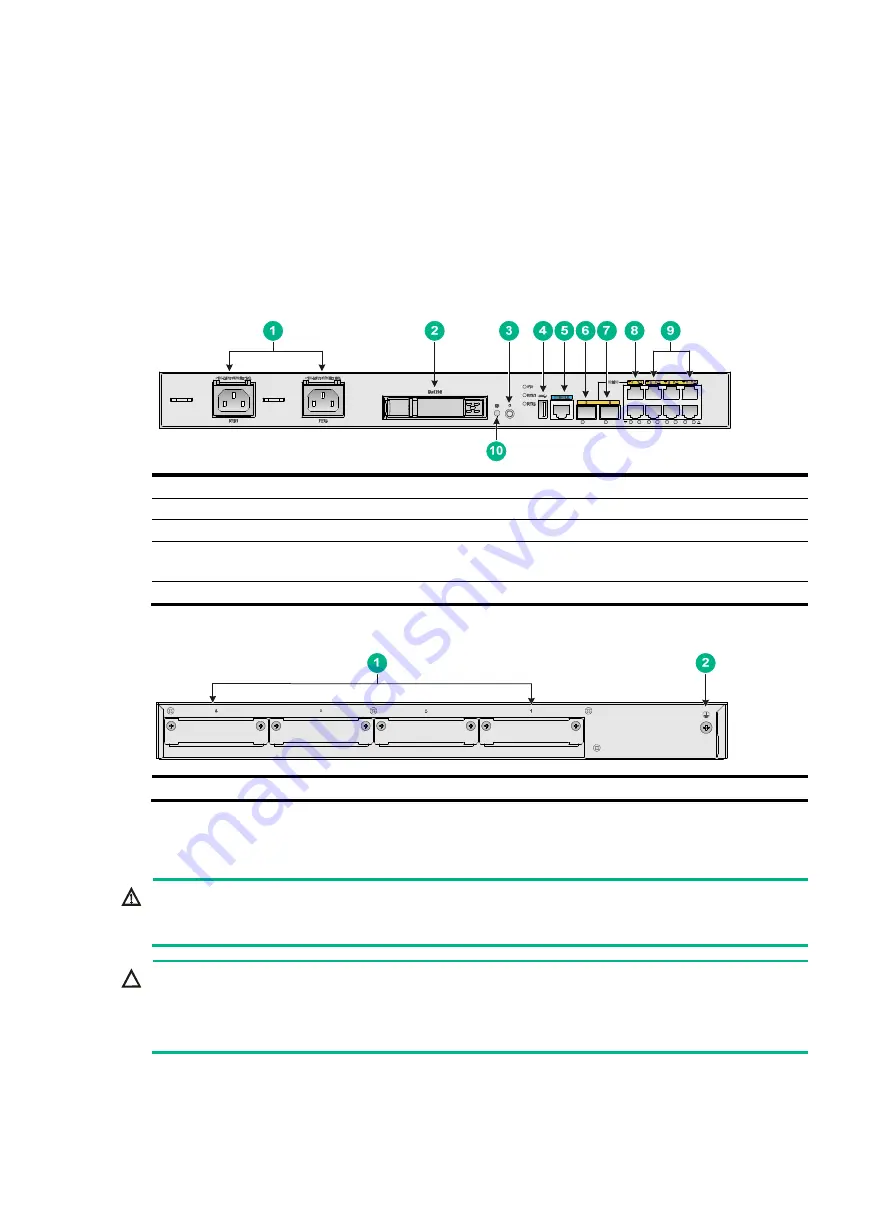
The following figures are for illustration only. 

Figure 20 Front panel 


(1) AC power receptacles PWR1 and PWR2 

(2) Hard disk slot 

(3) Power button/LED 

(4) USB port 

(5) Console port (CONSOLE) 

(6) Ethernet fiber port SFP0 (combo interface) 

(7) Ethernet fiber port SFP1 (combo interface)

(8) Ethernet copper ports GE0 and GE1 (combo 
interfaces) 

(9) Ethernet copper ports GE2 to GE7 

(10) Hard disk button (HD) 


Figure 21 Rear panel 


(1) SIC interface module slots 1 to 4 

(2) Grounding screw 


Power button 


WARNING! 

The device might still have power after you press the power button. Do not reboot the device or 
remove power cords from the device until the power button/LED goes off. 


CAUTION: 

  Forced power-off might cause data loss in virtual machines. Please use it with caution. 

  Avoid accidentally pressing the power button when the device is operating. Doing so will power 

off the device system and cause service interruption. 


The power button is used to power on or power off the Comware system and virtual machines 
created on the Comware system. 

Summary of Contents for MSR3610-I-DP

Page 1: ...H3C MSR3610 I DP IE DP ICT Converged Gateway Installation Guide New H3C Technologies Co Ltd http www h3c com Document version 6W102 20190108...

Page 2: ...respective owners Notice The information in this document is subject to change without notice All contents in this document including statements information and recommendations are believed to be acc...

Page 3: ...brackets enclose syntax choices keywords or arguments that are optional x y Braces enclose a set of required syntax choices separated by vertical bars from which you select one x y Square brackets en...

Page 4: ...s a Layer 2 or Layer 3 switch or a router that supports Layer 2 forwarding and other Layer 2 features Represents an access controller a unified wired WLAN module or the access controller engine on a u...

Page 5: ...Documentation feedback You can e mail your comments about product documentation to info h3c com We appreciate your comments...

Page 6: ...e 13 Installing a SIC interface module 14 Connecting interface cables 14 Connecting an Ethernet copper port 14 Connecting an Ethernet fiber port 15 Installing a hard disk 16 Connecting the console cab...

Page 7: ...ailure 26 Symptom 26 Solution 26 Appendix A Chassis views and technical specifications 27 Chassis views 27 Power button 27 Technical specifications 28 Appendix B LEDs 29 Appendix C Slot arrangement an...

Page 8: ...e and installation tools away from walk areas Place the device in a dry and flat location and make sure anti slip measures are in place Remove all external interface cables and power cords before movi...

Page 9: ...failure High temperature can accelerate the aging of insulation materials and significantly lower the reliability and lifespan of the device Table 2 Temperature and humidity requirements for the equip...

Page 10: ...ounded Take dust proof measures for the equipment room Maintain the humidity and temperature in the equipment room in the acceptable range Always wear an ESD wrist strap and ESD garment when touching...

Page 11: ...e shielded interface cables when necessary Lightning protection To enhance lightning protection for the device follow these guidelines Make sure the device is reliably grounded Make sure the AC power...

Page 12: ...accessories Figure 2 Installation tools Figure 3 Installation accessories Flathead screwdriver Phillips screwdriver Needle nose pliers Wire stripping pliers Wrist strap Diagonal pliers Heat gun Cable...

Page 13: ...grounding facility of power equipment or lightning protection grounding facility The device is far away from radio transmitting stations radar stations and high frequency devices Electromagnetic shie...

Page 14: ...quirements Result Accessories Installation accessories supplied with the device are ready User supplied tools are ready Reference Documents shipped with the device are available Online documents are a...

Page 15: ...he chassis contact H3C for permission Otherwise H3C shall not be liable for any consequence The installation method is the same for the MSR3610 I DP and the MSR3610 IE DP This section uses the MSR3610...

Page 16: ...Mounting the device on a workbench IMPORTANT Make sure the workbench is clean stable and reliably grounded Maintain a minimum clearance of 100 mm 3 94 in around the device for heat dissipation Do not...

Page 17: ...ice upside down on the workbench and attach the rubber feet to the four round holes in the chassis bottom 2 Place the device upside up on the workbench Make sure the rubber feet stand securely on the...

Page 18: ...80 mm 18 90 in 360 mm 14 17 in for the chassis 60 mm 2 36 in for connecting AC power cords at the front 60 mm 2 36 in for connecting the E1 cable at the rear A minimum of 600 mm 23 62 in in depth reco...

Page 19: ...ut installation holes on the front rack posts are on a horizontal line 2 Install cage nuts as shown in Figure 7 a Insert one ear of a cage nut into the marked installation hole b Use a flathead screwd...

Page 20: ...ce first ground the device reliably Ensure a minimum resistance of 5 ohms between the device and the ground To connect the grounding cable 1 Remove the grounding screw from the grounding hole on the c...

Page 21: ...ane 3 Fasten the captive screws on the SIC Figure 11 Installing a SIC Connecting interface cables Connect cables to the interfaces on the device before powering on the device Connecting an Ethernet co...

Page 22: ...exceed the upper threshold of the transceiver module before connecting a fiber Insert a dust cap into any open optical fiber connector and a dust plug into any open fiber port or transceiver module po...

Page 23: ...e hard disk or squeeze shake or strike the hard disk No hard disk is provided with the device Purchase one as needed To install a hard disk 1 Remove the filler panel from the hard disk slot 2 Press th...

Page 24: ...the configuration terminal and the RJ 45 connector to the console port of the device Figure 15 Connecting the console cable Setting configuration terminal parameters To configure and manage the devic...

Page 25: ...wing items before you power on the device There is enough space around the device for heat dissipation The interface modules and USB devices are installed correctly The device rack and power source ar...

Page 26: ...ng Normal Extend Bootware H3C MSR3610 BootWare Version 1 02 Copyright c 2004 2017 New H3C Technologies Co Ltd Compiled Date Dec 15 2017 09 17 12 CPU ID 0x14 Memory Type DDR4 SDRAM Memory Size 4096MB S...

Page 27: ...ress ENTER to get started Press Enter The device is ready to configure when you see the following prompt H3C 4 Configure basic settings for the device For information about configuring basic settings...

Page 28: ...cover intact and if you want to open the chassis contact H3C for permission Otherwise H3C shall not be liable for any consequence Replacing the hard disk CAUTION The hard disk can be removed only when...

Page 29: ...module 1 Disconnect the fiber from the transceiver module 2 Rotate downward the bail latch of the transceiver module to the horizontal position and then pull the transceiver module out of the port Yo...

Page 30: ...n the captive screws on the SIC Then pull the SIC slowly out of the slot along the guide rails 2 Install a new SIC in the slot For information about the installation procedure see Installing a SIC int...

Page 31: ...the issue 1 Power off the device 2 Verify that the device is connected to the power source correctly 3 Verify that the power source is operating correctly 4 Verify that the power cord is in good cond...

Page 32: ...console cable is in good condition 5 If the issue persists contact H3C Support Garbled display on the configuration terminal Symptom The configuration terminal has garbled display when the device is p...

Page 33: ...device but the LED for the interface module indicates that the module is operating incorrectly or faulty after the device is powered on Solution To resolve the issue 1 Verify that the interface module...

Page 34: ...button HD Figure 21 Rear panel 1 SIC interface module slots 1 to 4 2 Grounding screw Power button WARNING The device might still have power after you press the power button Do not reboot the device o...

Page 35: ...MSR3610 IE DP Console port 1 1 GE copper ports 2 combo interfaces 6 2 combo interfaces 6 GE fiber ports 2 combo interfaces 2 combo interfaces USB port 1 1 Hard disk slot 1 support for a 2 5 inch SATA...

Page 36: ...Fast flashing yellow The extended segment does not exist Off No power input or exceptions have occurred Steady green BootWare stage The SDRAM is performing self test Fast flashing green The system sof...

Page 37: ...g input Ethernet copper port LED Steady green A 1000 Mbps link is present Flashing green The port is receiving or transmitting data at 1000 Mbps Steady yellow A 10 100 Mbps link is present Flashing ye...

Page 38: ...umbering Table 10 Slot arrangement and interface numbering Slot arrangement Interface numbering An interface on a SIC interface module is numbered in the x y format x represents the slot number y repr...

Page 39: ...quisites 8 Installation tools and accessories 5 Installing a hard disk 16 Installing a SIC interface module 14 Interface module failure 26 M Mounting the device in a rack 11 Mounting the device on a w...

Reviews: