background image


2-14 

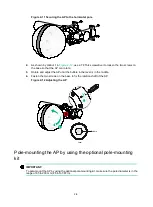
Figure 2-23 Installing band clamps 


2. 

Fasten the screws on each band clamp to secure the AP to the pole. 

3. 

As shown by callout 1 i

Figure 2-24

, use a T8 Torx screwdriver to loosen the two screws on 

the base so that the AP can rotate. 

4. 

Rotate and adjust the AP until the bubble in the level is in the middle. 

5. 

Fasten the two screws on the base to fix the rotation shaft of the AP. 

Figure 2-24 Adjusting the AP 


Mounting the AP on a custom pole 

No custom pole is provided with the AP. Prepare one yourself as needed. 

1

2

Level

Bubble

Summary of Contents for EWP-WA6630X-JP-FIT

Page 1: ...H3C WA6630X Access Point Installation Guide New H3C Technologies Co Ltd http www h3c com Document version 6W102 20210126 ...

Page 2: ...r respective owners Notice The information in this document is subject to change without notice All contents in this document including statements information and recommendations are believed to be accurate but they are presented without warranty of any kind express or implied H3C shall not be liable for technical or editorial errors or omissions contained herein Environmental protection This prod...

Page 3: ...nts that are optional x y Braces enclose a set of required syntax choices separated by vertical bars from which you select one x y Square brackets enclose a set of optional syntax choices separated by vertical bars from which you select one or none x y Asterisk marked braces enclose a set of required syntax choices separated by vertical bars from which you select a minimum of one x y Asterisk mark...

Page 4: ...as a Layer 2 or Layer 3 switch or a router that supports Layer 2 forwarding and other Layer 2 features Represents an access controller a unified wired WLAN module or the access controller engine on a unified wired WLAN switch Represents an access point Represents a wireless terminator unit Represents a wireless terminator Represents a mesh access point Represents omnidirectional signals Represents...

Page 5: ...Documentation feedback You can e mail your comments about product documentation to info h3c com We appreciate your comments ...

Page 6: ...ables 2 5 Installing the AP 2 5 Pole mounting the AP by using the provided pole mounting kit 2 6 Pole mounting the AP by using the optional pole mounting kit 2 8 Pole mounting the AP by using band clamps 2 12 Mounting the AP on a custom pole 2 14 Mounting the AP on a wall 2 16 Connecting the AP to a power injector 2 19 Connecting the AP to a power injector with two copper uplink ports 2 19 Connect...

Page 7: ...nterference sources high power radars radio stations or electrical substations unstable voltage heavy vibration and loud noise The location is not water seeping water soaking and condensing The location is away from inflammable and explosive substances The AP uses built in omnidirectional antennas For the optimal coverage make sure the installation height does not exceed 5 m 16 40 ft and no obstac...

Page 8: ...thickness of a minimum of 3 5 mm 0 14 in Weld the grounding cable of the AP onto the grounding conductor and use anti erosion treatment on the welding joint With a cross section area of a minimum of 6 mm 2 0 01 in 2 the grounding cable must be as short as possible and must not be coiled Make sure the grounding terminals of all the lightning arresters of the AP and the peer device of the AP are rel...

Page 9: ...2 lists the installation accessories to be prepared by users Figure 1 1 Installation accessories provided with the AP Figure 1 2 Installation accessories to be prepared by users Installation tools When installing the AP you might need the following tools Prepare the installation tools yourself as required ...

Page 10: ...1 4 Figure 1 3 Installation tools ...

Page 11: ...ts have been treated with corrosion protection If you pole mount the AP on the top of a building make sure the AP does not project beyond the sides of the building To avoid high temperature caused by exposure to the sun install the AP in a place without or with less direct sunlight and take protection measures if necessary Pre installation tasks Before installing an AP perform the following tasks ...

Page 12: ...art Mount the AP on a custom pole Connect the AP to a power injector Label cables Verify the installation Power on the AP Troubleshoot the AP Power off the AP Operating correctly End Install the AP Pole mount the AP by using the provided pole mounting kit Connect Ethernet cables Install the protection cover Connect the grounding cable Attach the cable to the AP Pole mount the AP by using the optio...

Page 13: ...g the cable to the AP Connecting the grounding cable CAUTION Correctly connecting the grounding cable is crucial to lightning protection and EMI protection Before connecting the AP to the power source make sure the grounding cable is correctly connected No grounding cable is provided with the AP Prepare one yourself To connect the grounding cable to the AP ...

Page 14: ...n use the grounding screw to attach the ring terminal to grounding point on the AP Figure 2 5 Connecting the grounding cable to the AP Installing the protection cover Insert the protection cover into the base and then press the cover downwards until it clicks into place Figure 2 6 Installing the protection cover 5 6 3 1 2 4 5 mm 0 20 in Grounding cable Ring terminal Heat shrink tube 1 2 2 1 ...

Page 15: ...PVC pipes iron pipes Plica tube or cable troughs for cable routing Route cable pipes and troughs neatly against the wall and connect them through hoses or pipe joints at the bend Secure cable pipes and troughs by using cable ties or angle steels at the spacing of 1 m 3 28 ft to 1 5 m 4 92 ft and ground the two ends in the case of metal tubes When you route PVC pipes outdoors in a horizontal way cu...

Page 16: ...ke sure the pole diameter is in the range of 50 to 75 mm 1 97 to 2 95 in Mounting the AP on a vertical pole 1 Secure the base of the pole to the rooftop or a concrete pier block by using expansion bolts Figure 2 8 Securing the pole base 2 Use the U bolts and pole mounting brackets provided with the AP to attach the AP to the pole and fasten the nuts ...

Page 17: ... the AP can rotate 4 Rotate and adjust the AP until the bubble in the level is in the middle 5 Fasten the two screws on the base to fix the rotation shaft of the AP Figure 2 10 Adjusting the AP Mounting the AP on a horizontal pole 1 Use the U bolts and pole mounting brackets provided with the AP to attach the AP to the pole and fasten the nuts Level Bubble 1 2 ...

Page 18: ...e and adjust the AP until the bubble in the level is in the middle 4 Fasten the two screws on the base to fix the rotation shaft of the AP Figure 2 12 Adjusting the AP Pole mounting the AP by using the optional pole mounting kit IMPORTANT To pole mount the AP by using the optional pole mounting kit make sure the pole diameter is in the range of 65 to 200 mm 2 56 to 7 87 in 1 2 Level Bubble ...

Page 19: ...o the pole 2 Insert two hex screws into the installation holes at the top of the pole bracket Do not drive the screws all the way in leaving a certain space for hanging the AP Figure 2 14 Inserting hex screws to the pole mounting brackets 3 Hang the AP on the pole mounting brackets by aligning the keyhole slots with the hex screws and then fasten the screws ...

Page 20: ... 5 As shown by callout 1 in Figure 2 16 use a T8 Torx screwdriver to loosen the two screws on the base so that the AP can rotate 6 Rotate and adjust the AP until the bubble in the level is in the middle 7 Fasten the two screws on the base to fix the rotation shaft of the AP Figure 2 16 Adjusting the AP Mounting the AP on a horizontal pole 1 Use the long bolts to secure the pole mounting brackets t...

Page 21: ...nging the AP Figure 2 18 Inserting hex screws to the pole mounting brackets 3 Hang the AP on the pole mounting brackets by aligning the keyhole slots with the hex screws and then fasten the screws Figure 2 19 Hanging the AP on the pole mounting brackets 4 Insert the other two hex screws into the installation holes at the left of the AP base and then fasten the screws to secure the AP to the pole m...

Page 22: ... mount the AP by using band clamps make sure the diameter of the band clamps is about 20 mm 0 79 in larger than that of the pole You can pole mount the AP by using stainless band clamps with a width of 12 mm 0 47 in The pole specifications depend on the specifications of the band clamps No band clamp is provided with the AP Purchase band clamps as needed Mounting the AP on a vertical pole 1 Loosen...

Page 23: ... that the AP can rotate 4 Rotate and adjust the AP until the bubble in the level is in the middle 5 Fasten the two screws on the base to fix the rotation shaft of the AP Figure 2 22 Adjusting the AP Mounting the AP on a horizontal pole 1 Loosen the screw on each band clamp to open the band clamp Slide the band clamps through the installation holes of the AP and wrap the clamps around the pole 1 2 ...

Page 24: ...ewdriver to loosen the two screws on the base so that the AP can rotate 4 Rotate and adjust the AP until the bubble in the level is in the middle 5 Fasten the two screws on the base to fix the rotation shaft of the AP Figure 2 24 Adjusting the AP Mounting the AP on a custom pole No custom pole is provided with the AP Prepare one yourself as needed 1 2 Level Bubble ...

Page 25: ...installation hole at the top of the pole mounting brackets Do not fasten the screws all the way in leaving a certain space for hanging the AP 3 Hang the AP on the pole mounting brackets by aligning the keyhole slots with the hex screws and then fasten the screws 4 Insert the other two M8 hex screws into the installation hole at the bottom of the AP base and then fasten the screws to secure the AP ...

Page 26: ...n the middle 7 Fasten the two screws on the base to fix the rotation shaft of the AP Figure 2 28 Adjusting the AP Mounting the AP on a wall No expansion bolts are provided with the AP Prepare them yourself as needed To mount the AP on a wall 1 Mark the installation holes on the wall based on the installation holes on the AP base The dimensions of the installation holes on the AP base are shown in ...

Page 27: ...er hammer into each hole and then remove the nut and washers as shown in Figure 2 31 Keep the drill bit perpendicular to the wall and hold the drill handle tightly with both hands when drilling holes In a sturdy and smooth wall use a punch to create a hole to help locate the drill bit The depths of four holes must be the same Figure 2 31 Installing a screw anchor into the wall 3 Hang the AP on the...

Page 28: ... 33 use a T8 Torx screwdriver to loosen the two screws on the base so that the AP can rotate 5 Rotate and adjust the AP until the bubble in the level is in the middle 6 Fasten the two screws on the base to fix the rotation shaft of the AP Figure 2 33 Adjusting the AP 1 2 Level Bubble ...

Page 29: ...pper uplink ports The PoE1 port on the dual port H3C power injector must be connected to the uplink network through the LAN1 port and PoE2 through LAN2 The following procedures use the PoE1 port as an example to connect the AP To connect the AP to a power injector and to the network through the Ethernet copper port 1 Connect the power cord of the injector to an AC power source 2 Connect the PoE1 p...

Page 30: ...roper places where they can be seen directly Use transparent waterproof tape to seal outdoor labels Verifying the installation CAUTION If the AP is used outdoors use the waterproof network cables dedicated for outdoor usage and the enclosure port connected by the network cable should take waterproof treatment After the installation is complete check the following items before powering on the AP Th...

Page 31: ...p all command on the AC If the AP status is R M the AP has been connected to the network AC display wlan ap all Total number of APs 1 Total number of connected APs 1 Total number of connected manual APs 1 Total number of connected auto APs 0 Total number of connected common APs 1 Total number of connected WTUs 0 Total number of inside APs 0 Maximum supported APs 3072 Remaining APs 3071 Total AP li...

Page 32: ...mensions H W D 394 260 260 mm 15 51 10 24 10 24 in Weight 4 kg 8 82 lb System power consumption 10W 48 6W IEEE standards IEEE802 11a b g n ac ax IMPORTANT An AP with product code EWP WA6630X JP FIT can be installed only indoors when it is configured to operate in the 5 15 to 5 25 GHz frequency band ...

Page 33: ...ading the image Blue Flashing at 1 Hz Only the 5G radio has associated clients Alternating between green and blue at 1 Hz Both the 2 4G and 5G radios have associated clients Ports The AP provides only one port You can connect the all in one cable provided with the AP to it The all in one cable provides the following ports with one port on each cable in ascending order of the cable length 10GE PoE ...

Page 34: ...E1 0 1 in the MAP file and GigabitEthernet 1 for configuration on the AC GE2 PSE IEEE802 3 IEEE802 3i IEEE802 3u IEEE802 3ab Used for connecting the AP to an uplink device for Internet or MAN access It can also supply PoE power to the downlink device It is represented by interface number GE1 0 2 in the MAP file and GigabitEthernet 2 for configuration on the AC Console port RS EIA 232 Used by techn...

Reviews: