background image

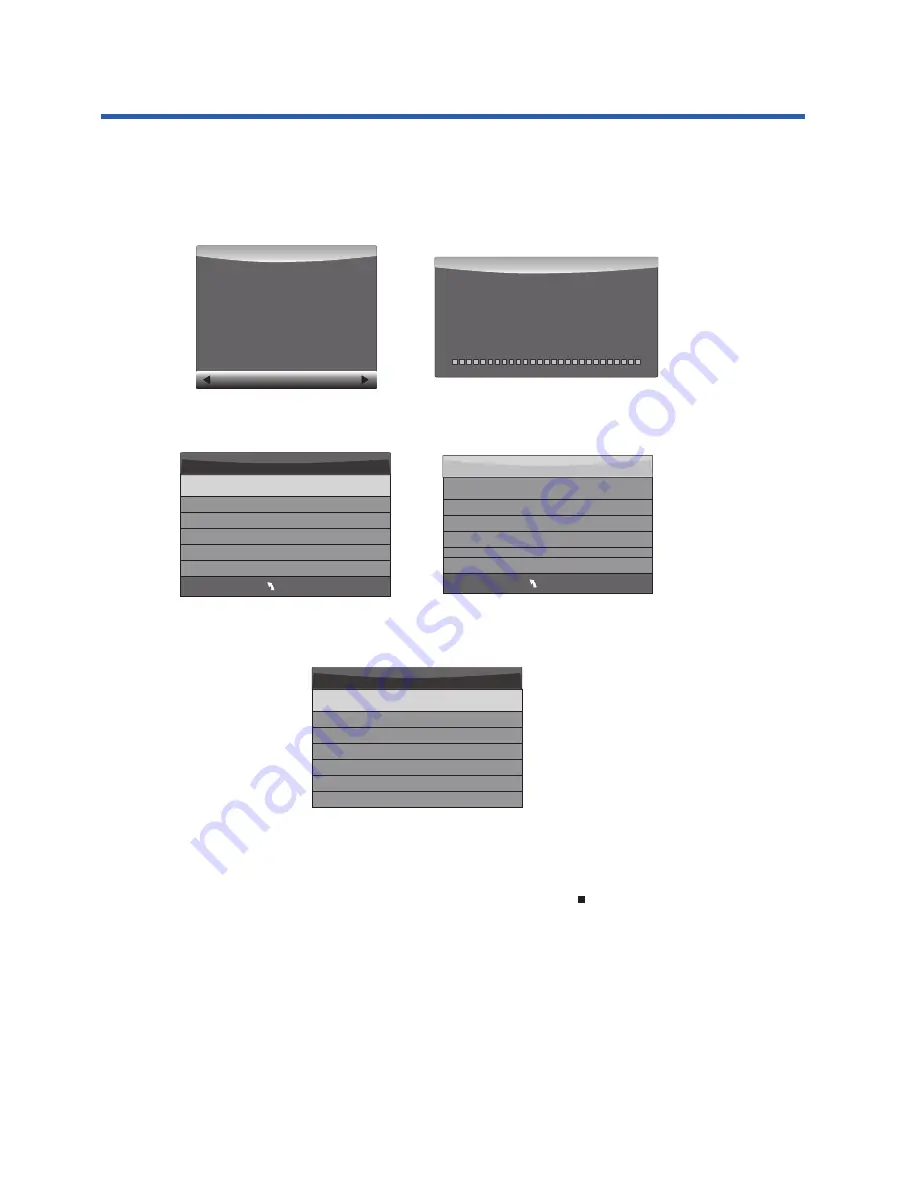
Warning!  All data will be lost.

Start                               

 Exit

Format disk

Format disk

Do not unplug USB device.

Formatting,please wait

Format disk

MENU

Check PVR File System       Checking

Free Record Limit                       6 Hr.

Select Disk                                C:

USB Disk                                     Pass

Format                                         Pass

Time Shift Size                              All

Speed                                     Checking 

MENU

Check PVR File System      SUCCESS

Free Record Limit                       6 Hr.

Select Disk                                C:

USB Disk                                     Pass

Format                                         Pass

Time Shift Size                              All
Speed        HD  support   2048  KB/s

Time Shift Size

Time Shift Disk Size          512  MB

SB  14  Mins

HD  4  Mins

Check PVR File System: checks if the PVR File System set up will work with your USB 
device or not.
Format: Refer to the details on formatting on page 21 before using this option for the 
first time. Once you have selected the type of formatting of your USB storage device, 
your TV will show various progress screens (see below).  

When the Format process has finished, you can then use the “Check PVR File System” option 
to show the speed ability of your USB storage device. Press EXIT to return to the TV mode. 

If you selected the "Hi Speed FS" format mode, you can then change the Time Shift memory size. 
Remember to set the Time Shift size to be smaller than the capacity of your USB storage device, 
or the Speed test may report an error.

2). Recording a DTV program

When viewing a DTV program, press the "

REC" button on the remote control and the 

record control tab will pop up and the PVR will commence recording. Click the “

REC" 

button again and the record control tab will disappear while the "REC" icon will remain on 
the top left of the screen. It will disappear when you click the    "stop" button on the remote 
control, and the PVR will finish recording.
PVR recording of DTV programs can also be accessed thru the EPG, and  future recordings 
can be accessed using the Schedule List option. Refer to the EPG Menu section on page 22.

3). Playing back the recording

In the USB drive, the recorded program will be saved in the folder "_MSTPVR" on the device. To play 
back the.TS format files, use the DMP (Digital Media Player) function as shown on page 27, and select 
Movie as the type of file to play back. Alternatively, press the Index button on the Remote Control to 
display the Recorded List, which shows the name of recorded DTV material on the attached USB drive. 
The order of the recordings can be selected by repeatedly pressing the Index button to view in 
Program, Channel, or Time order.

25

Advanced Features

Summary of Contents for G42TV16

Page 1: ...42 FULL HD LED LCD TV G42TV16 ...

Page 2: ...1 2 5 6 8 9 11 14 29 30 Contents Caring for the Environment Guide to the Television ...

Page 3: ...n port 12 PC AUDIO INPUT SOURCE MENU V V CH CH Standby 1 2 3 4 5 6 9 10 11 15 9 and relevant right left sound channel outputs AUDIO output External Audio signal output 13 HEADPHONE Earphone OUTPUT 15 USB Input HDMI2 VGA PC AUDIO HDMI3 HEADPHONE VIDEO L R USB AV INPUT AC INPUT 100 240V 50 60Hz RF L R HDMI1 ARC Coaxial AUDIO OUTPUT 7 8 10 10 12 13 14 14 and relevant right left sound channel inputs A...

Page 4: ...9 In teletext mode used as index In DTV mode displays the Recorded List 20 Press to stop play in USB mode 21 INFO To display the program information of the DTV show you are watching press the Info button 22 FREEZE Press to freeze the picture you are watching 23 Press to display and select the available video input sources 24 EXIT To return to the previous menu or exit menu 25 CH CH To access the n...

Page 5: ...s or who are not familiar with the transmission language Refer to your local TV guides or internet program lists to determine if Teletext is used in your area SUBTITLE Press this button to select the available sub title languages during DTV reception if any and to select Subtitle On or Off Once you have connected your TV antenna and other AV playback equipment eg CD DVD Blu ray player to the appro...

Page 6: ...5 Caring for the Environment television television packing materials Responsible disposal of the packaging Responsible disposal of appliance ...

Page 7: ...le for use by young children or infirm persons without supervision Young children must be supervised to ensure that they do not play with the apparatus 3 Do not insert any objects into any openings of an electrical apparatus 4 Do not touch any moving parts of any electrical apparatus 5 Do not use this apparatus near water No dripping or splashing any water on this apparatus To avoid the risk of fi...

Page 8: ...fied person in order to avoid a hazard A replaceable cord must be replaced with an authorised replacement from an authorised service agent only 14 Only use attachments accessories specified by the manufacturer 15 Unplug this apparatus during lightening storms or when unused for long periods of time 16 Batteries used with this product contain chemicals that are harmful to the environment To preserv...

Page 9: ...8 Items in the Box Television TV Stands Left Right Screws Remote control Two AAA Batteries Instruction Manual Quick start guide VOL CH REC ...

Page 10: ...s which are held in place by 26mm long screws Step 2 On each desk stand identify the longer leg of the stand and slide the rectangular section of the desk stands into the TV so that the longer leg is facing towards the front of the TV Insert the 26mm long screws into the holes in the rear of the TV that line up with the holes in the rectangular section of the metal desk stands and tighten the scre...

Page 11: ...Plug the other end of the Antenna Cable into a desired antenna wall socket Note Antenna cable not included 2 Your TV is equipped with an external power supply Please connect the provided power supply to the Television set and into the desired AC power outlet 3 Switch on the TV using the rocker switch on the bottom of the TV see below 4 Press the Standby button on the remote control to turn on the ...

Page 12: ...Located on the side of the TV set and select the AV option Advanced Connection Diagrams Below diagrams show the basic connection options available DVD AV OUTPUT Earphone 2 Earphone output HDMI2 VGA PC AUDIO HDMI3 HEADPHONE VIDEO L R USB AV INPUT HDMI2 VGA PC AUDIO HDMI3 HEADPHONE VIDEO L R USB AV INPUT ...

Page 13: ...URCE button on either the remote control or the button located on the side of the TV set and select the appropriate HDMI option Advanced Connection Diagrams PC AUDIO OUTPUT VGA OUTPUT DVD VGA OUTPUT HDMI2 OUTPUT HDMI3 OUTPUT HDMI2 VGA PC AUDIO HDMI3 HEADPHONE VIDEO L R USB AV INPUT HDMI2 VGA PC AUDIO HDMI3 HEADPHONE VIDEO L R USB AV INPUT AC INPUT 100 240V 50 60Hz RF L R HDMI1 ARC Coaxial AUDIO OU...

Page 14: ...ontrol or the button located on the side of the TV set and select the MEDIA option Advanced Connection Diagrams 5 AUDIO output AC INPUT 100 240V 50 60Hz RF L R HDMI1 ARC Coaxial AUDIO OUTPUT HDMI2 VGA PC AUDIO HDMI3 HEADPHONE VIDEO L R USB AV INPUT AUDIO AMPLIFIER analogue input ...

Page 15: ...n located on the bottom right hand side of the cursor arrow buttons to exit the Menu setting Channel Tuning 65 UHF CH 33 DTV TV 9 Programme s DTV 0 Programme s Radio 0 Programme s Data 0 Programme s The TV will then offer a selection of countries with Australia as the pre set option Again press the OK button to confirm this selection Your TV will now scan through all the analogue TV ATV and digita...

Page 16: ... when the TV is first powered On or reset you will first need to select the Tune Type You can select between ATV DTV or DTV ATV searching ATV Manual Tuning Programme Edit Signal Information CHANNEL Auto Tuning DTV Manual Tuning Software Update USB Software Update OAD OAD Tuning Press to select search type then press to select country eg Australia then press the OK button to start auto tuning All t...

Page 17: ...z Save MENU _ NOTE Press the teletext red button on the remote control to store the channel details after manual tuning 4 Program edit You can Delete Move Skip or FAV most TV programs from the list of TV stations previously located during the initial Auto Tuning process FAV 16 Advanced Features NOTE The Bad Normal Good bar graph on this screen shows the relative signal intensity during DTV recepti...

Page 18: ... Auto Adjust Horizontal Pos 50 Vertical Pos 50 Size 50 phase 38 OK 17 Advanced Features Press to choose the program press the teletext blue button on the Remote Control to skip this program from future up down manual channel selections and the symbol will show on the right side of the program name Choose the skipped program press the blue button again you can cancel the skip and the symbol will di...

Page 19: ...rtical screen position size and phase or select an Auto Adjust mode Balance Auto Volume Sound Mode Standard SOUND Surround Sound SPDIF Mode 3 Sound menu The third item of the menu is the Sound menu You can adjust sound effects here such as treble bass balance etc Press to move press OK to adjust 1 Sound mode Press OK Key enter Sound mode Select Menu press adjust Sound mode There are five Sound mod...

Page 20: ...TIME 1 Clock The clock time is automatically set by reading the time data that is transmitted by local Digital TV stations 2 On Off time The Off and On timers allow you to program the TV to switch On and Off at specific times that you set In order for this function to operate the TV must be powered up ie mains power switch on the TV is On and in Standby mode The Off and On timers have 6 different ...

Page 21: ...ed that this setting is not changed unless you are fluent in any new language chosen 3 HDMI CEC Consumer Electronics Control allows your TV to share control of some functions with various compatible equipment via an HDMI cable connection The HDMI cable connecting your equipment to this TV must support both ARC and CEC functionality For example with HDMI CEC set to On in the TV s menu and also on a...

Page 22: ... but their compatibility will need to be checked on a case by case basis PVR File System Type There are two types of supported formats FAT32 and Hi Speed Format You can press or buttons to choose the type of formatting If FAT32 is selected you will have to format the whole of your USB drive If Hi Speed Format is selected you will then be able to press or buttons to select the size you wish to use ...

Page 23: ...it using the cursor arrows and pressing OK Press the Play button on the Remote Control to show it in full screen size Press the INFO button to bring up a controls tab at the bottom of the screen allowing easier control of play pause stop and repeat modes Press the EXIT button repeatedly to progressively return back to the USB menu 8 EPG menu Electronic Program Guide The EPG menu is used to look at...

Page 24: ... to the EPG menu Schedule DELETE 1 Use to select a program and then press the Green Button on the Remote to display the highlighted program s information if transmitted by the TV station INFO Schedule List 04 55 28th Apr Delete Time Date Programme Title Channel Name 802 SZTVM03 08 Minute 05 Hour Apr Month 28 Date Once Mode Reminder setting BACK OK _ 28 Apr 04 39 800 SZTVM01 No Information 801 SZTV...

Page 25: ...d time will be shorter depending on the capacity of the device During the check PVR File System checking please do not choose any other operation until it is finished The recordings have to be done from within the TV PVR system The recordings can only be played in the same TV and generally not in any other kind of devices computer DVD etc which are not compatible with the TS file format In order t...

Page 26: ... set the Time Shift size to be smaller than the capacity of your USB storage device or the Speed test may report an error 2 Recording a DTV program When viewing a DTV program press the REC button on the remote control and the record control tab will pop up and the PVR will commence recording Click the REC button again and the record control tab will disappear while the REC icon will remain on the ...

Page 27: ...torage device 1 While in the DTV input source check that your USB storage device is plugged into the USB port on the side of your TV 2 Select a DTV channel then press PAUSE to start the Time Shift function The TV program will be paused on screen the Time Shift OSD appears and recording commences Press play to playback the time paused material 3 Press STOP to stop the Time Shift function and stop r...

Page 28: ...ible from the Input button on the Remote Control For playback of high data rate media files the use of an external Media Player not supplied will be required Sample1 ts Sample2 ts Return Movies 1 1 Sample3 ts Sample4 ts Resolution 688x412 AudioTrack 1 2 Subtitle 1 1 Program 1 5 Size 511457 KBytes Sample1 ts 27 Advanced Features 1 Video may become pixelated during recording when the Video bit rate ...

Page 29: ...n full screen mode When the media file Photo Music Movie or Text type is playing press the OK or Info button to display the control bar at the bottom of the screen Pause FF Prev Next FB Stop RepeatALL 00 00 33 00 04 22 Random off R In the control bar press to select the function icon then press the OK button to confirm the function Press or EXIT button to exit the control bar ...

Page 30: ...roperly Try to select other channels to check whether it is the TV or just the channel itself Ensure the TV is tuned correctly Video is working but have no audio Try increasing the volume on your remote control Double check that mute function on your remote has not been selected Press Mute button to resume sound The TV has no response with remote Operatethe remote directly facing the sensor on the...

Page 31: ...30 G42TV16 1920 H x 1080 V 2 x 10W 947 x 200 x 593mm 947 x 69 x 564mm 7 8kg 7 52kg 42 ...

Page 32: ... IB G42TV16 160623V1 ...

Reviews: