background image

6

 Deutsch

 English

 Français

 Netherlands


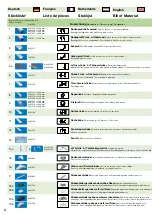
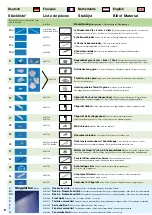
Stückliste* 

Liste de pièces 

Stuklijst  

Bill of Material 

Stegplatten


6 mm

Onderlegplaatje deurmidden grijs • Door middle underlay plate, gray 

Fensteröffner manuell schwarz 

Ouvre-fenêtre manuel noir • 

Vensteropener handmatig zwart • Window opener manual, black

Schutzklappe klar 

Cache clair • Beschermkapje transparant • 

Protective cap, transparent

Schutzprofil Gummi 

Profilé de protection en caoutchouc • Beschermprofiel 

rubber • Rubber protective profile section

Rückseite mitte


Côté arrière central • Achterzijde midden • Rear side middle

Rück- & Frontseite seitlich


Côté arrière et avant latéral • Achter- & voorzijde zijdelings • Side rear & front side laterally

Rück- & Frontseite seitlich


Côté arrière et avant latéral • Achter- & voorzijde zijdelings • Side rear & front side laterally

Front Spitz


Avant pointu • Voorzijde uiteinde • Front tip

Türteile vormontiert


Parties de la porte préassemblées • Deuronderdelen vooraf gemonteerd • Door parts pre-assembled

Seite und Dach


Côté et toit • Zijkant en dak • Side and roof

Fenster vormontiert


Fenêtre préassemblée • Venster vooraf gemonteerd • Window pre-assembled

Fensterdachfeld


Partie de la fenêtre du toit • Vensterdakveld • Window roof area

 English

 Netherlands

 Français

 Deutsch


Art.-Nr.:


Bezeichnung 

Désignation • Omschrijving • Designation


  20 a 


355 

2 + 2 

355 2 + 2 

355 - 

355 

355  -

  20 b 


260 

260 

260 

260 

260 

6

  20 c 


465 

465 

465 

465 

465 

3

  20 d 


815 

815 

815 

815 

815 

8

  21 


4

  22 


2

  23 


1

  24 


1

  25 


710 

710 

710 

710 

10 

710 

12

  26 


1260 

1260 

1260 

1260 

1260 

4

  27 


1480  2 

2220 

2220 2 

2220 

2220  4


  710 

  710 

  28 


M6x10 

62 

M6x10 

70 

M6x10 

74 

M6x10 

84 

M6x10 

92

  29 


RHx10 

12 

RHx10 

12 

RHx10 

26 

RHx10 

34 

RHx10 

40 

  30 


M6x70 

M6x70 

M6x70 

M6x70 

M6x70 

4

  31 


M6 

76 

M6 

84 

M6 117 

M6 

137 

M6  151 


  - 

  15* 


15* 


15*


  32 


420 

420 

420 

420 

420 

2

  33 


4


  34 


45 

45 

45 

45 

45 

  35 


Schraube für Clipprofil 

Vis de Profilé à clipser • Clipprofielschroef • clip profile bolt


   4,2 x 16 

12 

4,2 x 16 

12 

4,2 x 16 

12 

4,2 x 16 

12 

4,2 x 16 

12


1915x730    1 

1915x730 

 1915x730 

1915x730 

1915x730 

1

  BL 


1705x730 

 2 

1705x730 

 1705x730 

1705x730 

1705x730 

2

  BR 


1705x730 

2  

1705x730 

 1705x730 

1705x730 

1705x730 

2

  C 


225x730 

1  

225x730 

   225x730 

225x730 

225x730 

1

  D    


835x730   2 

835x730 

   835x730 

835x730 

835x730 

2

  E 


1275x730 

1275x730 

11 

 1275x730 

15 

1275x730 

18 

1275x730  22

  F 


650x730 

650x730 

   650x730 

650x730 

650x730 

2

  G 


625x730 

625x730 

   625x730 

625x730 

625x730 

9291295

9291289

9291292

9291298

9291277

9291280

9291283

9291286

*Beachten Sie die vormontierten Teile  

 an den Profilen! 

a) Windverband (2 x 2 x links) 

a) Contreventement (2 x droit + 2 x gauche) •

a) Windverband (2 x 2 x links) • a) Transverse brace (2 x right + 2 x left)

b) Seitenverbinder 

b) Raccord latéral • b) Zijverbindingsstuk • b) Side connector

c) Dachstrebenverbinder 

c) Raccord d‘entretoise du toit •  

c) Dakschoorverbindingsstuk • c) Roof strut connector

d) Zusatzverbinder 

d) Raccord supplémentaire • d) Extra verbindingsstuk • 

d) Additional connector 

Regenablauf grau ( links = 1 Paar) 

Écoulement des eaux de pluie gris (droit +

 gauche = 1 paire) • Regenwaterput grijs ( links = 1 paar) • Rain run-off, gray (right + left = 1 pair)

Firstabdeckung grau 

Cache du faîtage gris • Nokafdekking grijs • Ridge cover, gray

Türhalter-unten grau 

Support de porte inférieur gris • Deurhouder-onderaan grijs •  

Door holder below, gray

Unterlegscheibe Türmitte grau 

Blocage de porte central gris •

Clipprofil Dach unten (Regenrinne) 

Profilé à clipser inférieur de toit (gouttière) • 

Clipprofiel dak onderaan (regengoot ) • Roof clip profile section below (rainwater gutter)

Clipprofil Giebel 

Profilé à clipser du fronton • Clipprofiel gevel • Gable clip profile section

Clipprofil Seite (Regenrinne) 

Profilé à clipser latéral (gouttière) • 

Clipprofiel zijkant (regengoot ) • Side clip profile section (rainwater gutter)

M6-Schraube 

Vis M6 • M6-schroef • M6 bolt

Rhombusschraube 

Vis losange • Ruitschroef • Rhombus bolt

Dachfensterschraube mit Schutzkappe 

Vis de fenêtre du toit avec cache • 

Dakvensterschroef met beschermkapje • Rooflight bolts with protective cap

Mutter mit Flansch (*je 3 pro Strebenverbinder) 

Écrou avec bride (*chacun 3 par-


raccord d‘entretoise) • Moer met flens (*telkens 3 per schoorverbindingsstuk• Nut with flange

a) 9291697 links
b) 9291698 rechts

9291715

9291712

9291809

9291721

9291718

9291724

9291727

9291728
9291730

9291733

9291739

9291742 Schraube
9291745 Kappe

9291736

9291788

9291791

9291748 

9291735

Summary of Contents for 4290303

Page 1: ...ields Instructions de montage mod les de serre aluminium 2 6 parties Montagevoorschriften aluminium broeikas 2 6 velden Schritt f r Schritt erkl rt mit Detailabbildungen 200 cm 227 cm 154 cm 130 cm F2...

Page 2: ...330 2330 2330 2330 2330 R ckwand Rear wall Paroi arri re Achterwand Fenster Window Fen tre Venster Seitenwand Side wall Paroi lat rale Zijwand Dach Roof Toit Dak 2 teilige T r 2 part door Porte en deu...

Page 3: ...res clientes chers clients Avec cette serre en aluminium vous avez fait l acquisition d une serre con struite avec le plus grand soin et dont les profil s en aluminium sont parti culi rement stables...

Page 4: ...sol Bodemhoekverbindingsstuk Floor corner connector Giebel und Firstverbinder Raccord du fronton et raccord du fa tage Gevel en nokverbindingsstuk Gable and roof ridge connector Strebenverbinder Racco...

Page 5: ...ge St ck Longueur Pi ce Lengte stuk s Length Piece 1540 2 2280 2 1500 4 1500 2 2240 4 2240 2 2220 2 2220 2 2220 2 2220 2 2220 2 1260 4 1260 4 1260 4 1260 4 1260 4 1260 4 1260 4 1260 4 1260 4 1260 4 75...

Page 6: ...2 x links a Contreventement 2 x droit 2 x gauche a Windverband 2 x rechts 2 x links a Transverse brace 2 x right 2 x left b Seitenverbinder b Raccord lat ral b Zijverbindingsstuk b Side connector c D...

Page 7: ...1260 4 1260 4 1260 4 1260 4 1260 4 1480 2 2220 2 2220 2 2220 2 2220 4 710 2 710 4 M6x10 62 M6x10 70 M6x10 74 M6x10 84 M6x10 92 RHx10 12 RHx10 12 RHx10 26 RHx10 34 RHx10 40 M6x70 2 M6x70 2 M6x70 2 M6x7...

Page 8: ...ie len zijwand 1 door middel van schoorverbindingsstuk 17 aaneenspelden en met moe ren 31 vast dichtschroeven Zijstukschoorhouder 18a in het midden aanbrengen A 2 Bodenprofile aufstecken Bodeneckverbi...

Page 9: ...la paroi avant et arri re Bodemprofiel voor en achterwand 1 2 1 2 1 1 2 2 1 1 2 2 Bild rechts vorne links hinten Illustration right in front left behind Figure avant droite arri re gauche Afbeelding...

Page 10: ...ken und verschrauben Die Lasche mit der Einkerbung f r das Firstprofil zeigt nach innen B 2 Connect gable profile sec tions in the roof ridge Insert gable profile sections 4 up to the stop collar on t...

Page 11: ...11 B 3 4 28 31 16 16 A 2 B1 3 Eckprofil Corner profile section Profil d angle Hoekprofiel 4 Giebelprofil Gable profile section Profil du fronton Gevelprofiel B3 B2 28 31 28 31 Tip Tip...

Page 12: ...r au sol avec des vis 28 et des crous 31 Conseil Vue ext rieure de l entretoise de la paroi arri re ici C 2 Achterwandschoor monteren Beide achterwandschoren 6 met de vooraf gemonteerde schoorhouders...

Page 13: ...13 18b 6 28 28 31 28 31 5a C 5a Querstrebe Crossbeam Entretoise transversale Dwarsbalk 6 R ckwandstrebe Back wall strut Entretoise de la paroi arri re Achterwandschoor C2 C1 C3 Tip 31...

Page 14: ...nenuit los dichtschroeven Deurscharnierschoor 7 met de deurdwarsbalk 5b bovenaan van binnenuit vastschroeven Voorwandschoor 6 zoals deur scharnierschoor aanbrengen D 1 T rquerstrebe montieren T rquer...

Page 15: ...Door crossbeam Entretoise transversale de la porte Deurdwarsbalk 7 T rscharnierstrebe Door hinge strut Entretoise de charni res de porte Deurscharnierschoor D2 D3 6 Frontwandstrebe Front wall strut En...

Page 16: ...n Tip De langere kant is loodrecht S de korte ligt bo venaan O E 1 Regenrinne verbinden nur F4 bis F6 Zweiteilige Regenrinne 8 mit tels Strebenverbinder 17 fest verschrauben Gebogener Strebenverbinder...

Page 17: ...17 21 28 31 17 8 31 E E2 E3 8 Regenrinne Rainwater gutter Goutti re Regengoot E1 19a Tip Tip Tip O S...

Page 18: ...ch die Schrauben l sen und das Profil verschie ben bis die Platte reinrutscht Anschlie end fest anziehen F 1 Insert linking plates rear side Insert linking plate A into the struts from above After tha...

Page 19: ...30 BL A BR 730 730 730 25 225 1285 1285 1705 1705 835 835 BL D D BR C 26 F F2 A B C Stegplatten Linking plates Plaques nervures Lijfplaten F1 D Deur Porte Door T r Tip Tip Tip 26 Clipprofil Giebel Gab...

Page 20: ...ver het clipprofiel 26 uitsteken Tip Het profieluiteinde over lapt het clipprofiel 2 mm G 1 Firstprofil verbinden nur F4 bis F6 Zweiteiliges Firstprofil 9 mittels Strebenverbinder 17 und Mut tern 31 f...

Page 21: ...21 22 28 31 17 31 19a G 9 Firstprofil Roof ridge profile section Profil du fa tage Nokprofiel G1 G2 9 9 Tip 22 24 23 22...

Page 22: ...ginnen Sie die Montage der Seitenstreben 10 an der Stelle an der die zweiteiligen Profile aneinandersto en F4 F6 und verschrauben Sie diese unten mit dem Strebenhalter 18a und oben mit dem Strebenverb...

Page 23: ...23 28 31 10 28 19b 18b 10 H 10 Seitenstreben Side struts Entretoises lat rales Zijschoren 18a 19a 31...

Page 24: ...worden Tip De profielen moeten zo goed mogelijk aan elkaar ge schroefd worden I 1 Dachstreben verschrauben Beginnen Sie die Montage der Dachstreben 11 an der Stelle an der die zweiteiligen Profile an...

Page 25: ...25 28 31 19b 11 11 28 31 11 Dachstreben Roof struts Entretoises du toit Dakschoren 19a I 18a 28 31 Tip 29 31...

Page 26: ...mt ge woon de schroeven losdraaien en het profiel verschuiven tot de plaat erin glijdt Tot slot de schroeven weer aandraaien Trek nu de blauwe beschermende folie buiten en de witte beschermen de folie...

Page 27: ...s nervures E en G Lijfplaten 25 und 27 Clipprofil Dach unten und Regenrinne 25 and 27 Roof clip profile section below and rainwater gutter 25 et 27 Profil clipser inf rieur de toit et goutti re 25 en...

Page 28: ...en K 2 Locking screws The locking screws 30 prevent the sliding of the rooflight Slide the locking screws 30 from both sides approx 1 cm into the upper window profile section and tighten the nut 31 se...

Page 29: ...29 K 13 Fenster Window Fen tre Venster 32 Fenster ffner Window opener Ouvre fen tre Vensteropener 30 32 28 31 31 Tip...

Page 30: ...gescheiden geopend worden L 1 T runterteil einsetzen T runterteil 14a von oben in die T rscharnierstrebe 7 ein schieben L 1 Insert door lower part Insert door lower part 14a into the door hinge strut...

Page 31: ...31 24 L 14 zweiteilige T r Two part door Porte divis e en deux parties Tweedelige deur 24 Unterlegscheibe Underlay plate Blocage des parties de la porte Onderlegplaatje Tip 19a 29 31 14b 22 24 23 22...

Page 32: ...rband nur F2 bis F3 Die Windverb nde werden in al len vier Ecken des Gew chshau ses von Eckprofil 3 zu Regen rinne 8 mit Rhombusschrauben und Muttern befestigt Muttern fest anziehen Im Lieferumfang si...

Page 33: ...33 20c 20a 20b M 20 a b c Verbinder Connector Raccords Verbindingsstukken M2 M1 M3 Tip 29 31 29 31 29 31 20a...

Page 34: ...ken mit Rhombuschrauben und Muttern an Dabei wird das Bodenprofil 1 2 mit dem Eckprofil 3 ver bunden Muttern fest anziehen N 1 Insert additional connector only F4 to F6 Attach each 2 additional con ne...

Page 35: ...35 N 20d 33 N3 N1 N2 A B 29 31 20d Zusatzsverbinder Additional connector Raccord suppl mentaire 33 Schutzkappe Protective cap Cache de protection...

Page 36: ...et la noti ce de montage S ouvre hydrau liquement sans lectricit Automatische vensteropener Compleet met schroeven en inbouwhandleiding Opent hyd raulisch zonder stroom Regalboard Arbeitstisch Passen...

Page 37: ...x 2 5 cm 4290309 Set F5 374 x 227 x 11 1 x 2 5 cm 4290312 Set F6 448 x 227 x 11 1 x 2 5 cm 4290315 Set F2 4290353 Set F3 4290353 Set F4 4290356 Set F5 4290359 Set F6 4290359 Set F2 4290383 Set F3 429...

Page 38: ...en win kelhaak en opbouwhandleiding Schablone Ersatzteile aus Kunststoff Passend f r alle Gew chshausgr en F2 F6 22 Firstabdeckung 23 T rhalter 24 Unterlegscheibe T rteile Template Spare parts of plas...

Page 39: ...cm B ca 75 cm D ca 1 cm A 600 cm B 200 cm A 620 cm B 150 cm Abbildungen zeigen Gro rollen Art Nr 4210462 Art Nr 4210603 Art Nr 4290703 Art Nr 9291809 Art Nr 9291739 Art Nr 4290412 Art Nr 9291718 22 2...

Page 40: ...mons dans le cadre de la garantie tous les d fauts fonctionnels de la serre imputables une conception d fec tueuse justifi e ou un d faut du mat riel Les pi ces d tach es ainsi que le temps de travail...

Reviews: