


IMPORTANT INFORMATION ON SAFE AND EFFICIENT OPERATION,
READ THIS INFORMATION BEFORE USING YOUR PHONE.
Safety
Exposure to Radio Frequency (RF) Energy
Your phone contains a transmitter and a receiver. When it is ON, it receives and
transmits RF energy. When you communicate with your phone, the system
handling your call controls the power level at which your phone transmits.
RF Energy Interference/Compatibility
Nearly every electronic device is susceptible to RF energy interference from
external sources if inadequately shielded, designed, or otherwise configured for RF
energy compatibility. In some instances your phone may cause interference.
Medical Devices
Radio signals transmitted from the unit may cause interference to hearing
aids.
It is recommended that if you have a pacemaker fitted you check with a
medical expert before using this product.
Other
Radio signals transmitted from the unit may cause interference to electrical
equipment, such as TV’s, Microwave, Computers etc. It is recommended that
the unit be placed at least one meter away from such appliances.
Cleaning
Make sure the unit is off and the charger is not plugged in before cleaning the
unit.
Use a damp cloth or anti-static wipe to clean. Never use household polish as
this may damage the product.
1
Environmental
Only use the power supply suitable for the GTECH range. Using an
unauthorized power supply will invalidate your warranty and may damage the
telephone.
Do not expose unit to direct sunlight.
Do not expose the unit to fire, explosive or other hazardous conditions.
Declaration of Conformity
We declare under our sole responsibility that the product detailed in this
manual, and in combination with our accessories, conform to the essential
requirements of the European Union Directive 1999/5/EC Radio and
Telecommunications Terminal Equipment Directive 3.1(a).
3.1(b) and 3.2., the Radio Communications Standard (Electro-magnetic
Radiation Human Exposure) 2003, and the Australian Communications and
Media Authority Section 376 of the Telecommunications Act 1997.
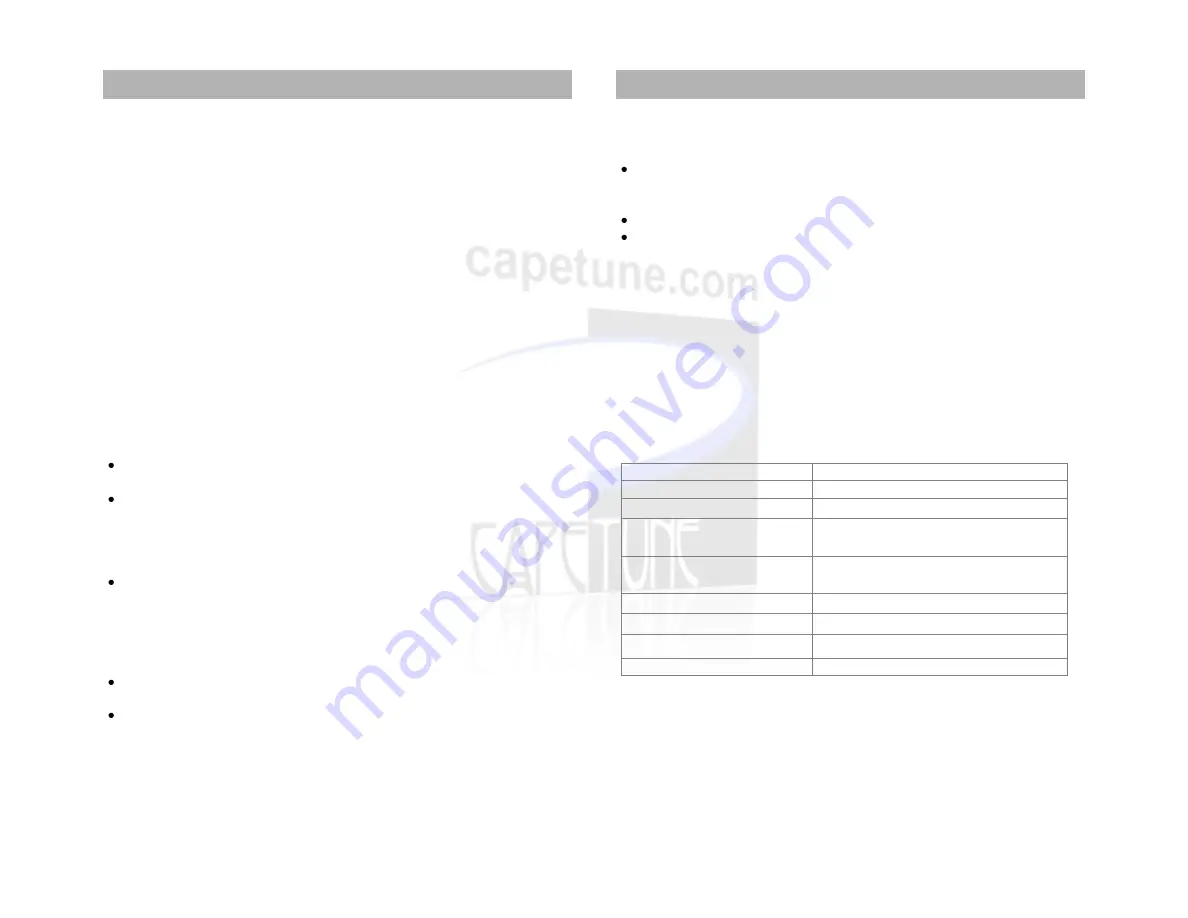
Technical Information
Dimensions (W x D x H)
200mm x 175mm x 65mm
Weight
Less than l.5kg
Mounting Mode
Desktop or Wall Mounted
Input Voltage
AC: 220V , 50Hz DC:5V l000mA
Standby Time: 24Hrs Talk Time: 3Hrs
Battery
Type: Li-ion
Voltage:5V Capacity :1000mAh
Ambient Temperature
- l0°C - 40°C
Storage Temperature
-20°C - 70°C
Relative Humidity
10% - 95%
Working Frequency
GSM 850/900/1800/1900 Mhz
2
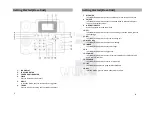
General Information
General Information


