


Save to PhoneBook
1.
Press MENU/OK to save the selected entry to the Phone Book. The display
shows
Saved To Memory
, and the entry is saved to the phone book.
2.
Press PB/EXIT 3 times to return to standby mode
You can use the
Delete All
option under the
Call Records
screen to remove all call
records for (
Missed Calls
,
Received Calls, or Dialed Calls
)
Phone Settings
Allows you to Register your Cordless Handsets, and set Ring Tones, SMS Tones, LCD
Contrast, and Language. Press Menu/OK and then 3 to proceed to the
Phone
Settings
screen.
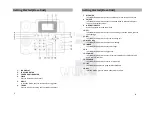
Handset Function
Refer to section “Getting Started”
SMS Tone
1.
Use the
buttons to select SMS Tone and press Menu/OK to proceed.
2.
Use the
buttons to select from 11 Tones, highlight the one you want, and
press Menu/OK to save your settings. The display will show
Success
3.
Press PB/EXIT twice to return to standby mode.
Ring Tone
1.
Use the
buttons to select Ring Tone and press Menu/OK to proceed.
2.
Use the
buttons to select from 11 Tones, highlight the one you want, and
press Menu/OK to save your settings. The display will show
Success
3.
Press PB/EXIT twice to return to standby mode.
LCD Contrast
1.
Use the
buttons to select LCD Contrast and press Menu/OK to proceed.
2.
Use the
buttons to adjust the contrast (1 – 63), and press Menu/OK to
save your settings. The display will show
Success
3.
Press PB/EXIT twice to return to standby mode.
21
Language
1.
Use the
buttons to select Language and press Menu/OK to proceed.
2.
Use the
buttons to select from Chinese or English, highlight the one you
want, and press Menu/OK to save your settings. The display will show
Success
3.
Press PB/EXIT twice to return to standby mode.
Call Service
Allows you to Divert an incoming GSM (Mobile) call to either a Landline (PSTN) or
another GSM(Mobile) number. Calls can be diverted under the following
conditions, When Busy, When there’s No Answer, or when it’s Not Reachable.
Press Menu/OK and then 4 to proceed to the
Call Service
screen.
1.
Press Menu/OK to proceed.
2.
Use the
buttons to select from (
Divert AllCall
,
When Busy, No Answer,
or Not Reachable
) and press Menu/OK to proceed. You will be presented with
the following options.
Open
Close
Query Status
Open
(
Diverts incoming calls to an appointed number
)
1.
Use the
buttons to select Open, Enter the phone number you wish to
divert to using the keypad and press Menu/OK to proceed.
2.
The display shows
Connect Net
, followed by
Success
if it was saved
successfully or
Failed
if it failed to save.
3.
Press PB/EXIT 4 times to return to standby mode.
Close
(
Cancels the diversion
)
1.
Use the
buttons to select Close, and press Menu/OK to proceed.
2.
The display shows
Connect Net
, followed by
Success
if it was saved
successfully or
Failed
if it failed to save.
3.
Press PB/EXIT 4 times to return to standby mode.
22
Using the Phone
Using the Phone


