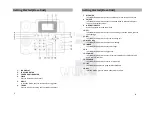
Gtech GTSIMF01 User Manual Download Page 18

 
CALL LOG 

The call log holds up to 32 Missed Calls, 32 Dialed Numbers and 32 Received Calls. 
Calls are all stored in the order they were received or dialed. Press Menu OK to 
proceed. 
 
1.


Use the 



 buttons to select from (

MISSED CALL

RECEIVED CALL, or DIALED 

CALL

) and press Menu OK to proceed. 

2.


Use  the 



  buttons  to  select  the  call  from  the  list,  and  press  Menu  OK. 

Details of the call are displayed.  

3.


Press Menu/OK and you will be presented with the following options. 


STORE RECORD 


DELETE RECORD 


DELETE ALL 


STORE RECORD 

1.


Press Menu OK to proceed. 

2.


INPUT NAME

 is displayed. Enter a name using the keypad and press Menu OK 

to proceed 

3.


INPUT NUMBER

 is displayed. Change the telephone number using the keypad 

or keep the displayed number and press Menu OK to save 

4.


The display shows 

OVERWRITE, 

press


MENU OK, you will hear a prolonged 

beep, and the number will be saved to the phonebook. 


DELETE RECORD 

1.


Press Menu OK to proceed. You will hear a prolonged beep, and the selected 
number in the call list will be deleted. 


DELETE ALL 

1.


Press Menu OK to proceed. 

2.


The display shows 

CONFIRM, 

press Menu OK to delete the entire selected call 

list. 


31 
 

Using the Phone  


Summary of Contents for GTSIMF01

Page 1: ...GTECH GTSIMF01 Desktop Wireless Phone USER GUIDE...

Page 2: ...calls on a GSM network Whilst the device can receive incoming calls on the mobile number certain functions such as SMS Alphanumeric address Call Waiting Hold Call Barring and Multi party call is not...

Page 3: ...lugged in before cleaning the unit Use a damp cloth or anti static wipe to clean Never use household polish as this may damage the product 1 Environmental Only use the power supply suitable for the GT...

Page 4: ...ower Adapter 9V Quick Reference Guide User Manual CD 3 Setting up the Base Unit Remove the GTSIMF01 from the box and proceed as follows WARNING IMPORTANT INFORMATION ON SAFE AND EFFICIENT OPERATION OF...

Page 5: ...card slot 5 Insert the SIM into the SIM card slot Connect the backup battery by clipping the connector into the pins provided Replace the battery cover when done Warning New batteries for the units a...

Page 6: ...hrough the menus 10 SET In Standby Mode press to access Phone Settings in Menu Mode press to save settings 11 REJ In Standby Mode press to reject an incoming call 12 WRITE Msg In Standby Mode press to...

Page 7: ...s 9 7 REDIAL In Standby Mode press to redial the last number 8 INT In Standby Mode press to use the intercom In Menu Mode press to transfer call to another handset 9 KEYPAD Used to dial numbers or sen...

Page 8: ...on and press Menu OK to proceed 3 Use the buttons to locate Register and press Menu OK to proceed The screen will display Register and the base unit is ready to pair Handset 1 In Idle Mode press MENU...

Page 9: ...on the GSM Mobile Network you will hear a beep at intervals to notify you of the incoming call and the display on the Base Unit will show TALK Press the Menu OK button to pick up the call The PSTN Lan...

Page 10: ...eaker Receiving a call using Speakerphone To receive a call using the Speakerphone press the button the call is then transferred to the loudspeaker Switching to the Speakerphone during a call During a...

Page 11: ...lowing options 1 Send 2 Send Save 4 Use the buttons to select the appropriate option and press Menu OK to proceed 5 Enter the number or search for the recipient in the phone book and press Menu OK to...

Page 12: ...OK and then 2 to proceed to the Call Records screen 1 Use the buttons to select from Missed Calls Received Calls or Dialed Calls and press Menu OK to proceed 19 2 Use the buttons to select the call fr...

Page 13: ...lay will show Success 3 Press PB EXIT twice to return to standby mode 21 Language 1 Use the buttons to select Language and press Menu OK to proceed 2 Use the buttons to select from Chinese or English...

Page 14: ...HH Minutes MM and Seconds SS and press Menu OK to proceed The display will show Success and the time is now set 3 Press PB EXIT twice to return to standby mode Alarm Clock Allows you to set up to 3 A...

Page 15: ...the name you want to delete and press MENU OK to proceed 2 Use the buttons to select DELETE RECORD and press MENU OK to proceed Delete All 1 Use the buttons to select DELETE ALL and press MENU OK to...

Page 16: ...pages 9 and 10 27 CHANGE PIN CODE 1 Use the buttons to select CHANGE PIN CODE and press MENU OK to proceed 2 Enter a 4 digit number and press MENU OK The new code has now been set TIME FORMAT 1 Use th...

Page 17: ...OK to proceed Set the time using the buttons and press MENU OK You will hear a prolonged beep and the Alarm is now set 29 BABY CALL In case of an emergency you can set the handset to dial a designate...

Page 18: ...DELETE RECORD DELETE ALL STORE RECORD 1 Press Menu OK to proceed 2 INPUT NAME is displayed Enter a name using the keypad and press Menu OK to proceed 3 INPUT NUMBER is displayed Change the telephone n...

Reviews: