background image

The Roll-Up III

8

Installation

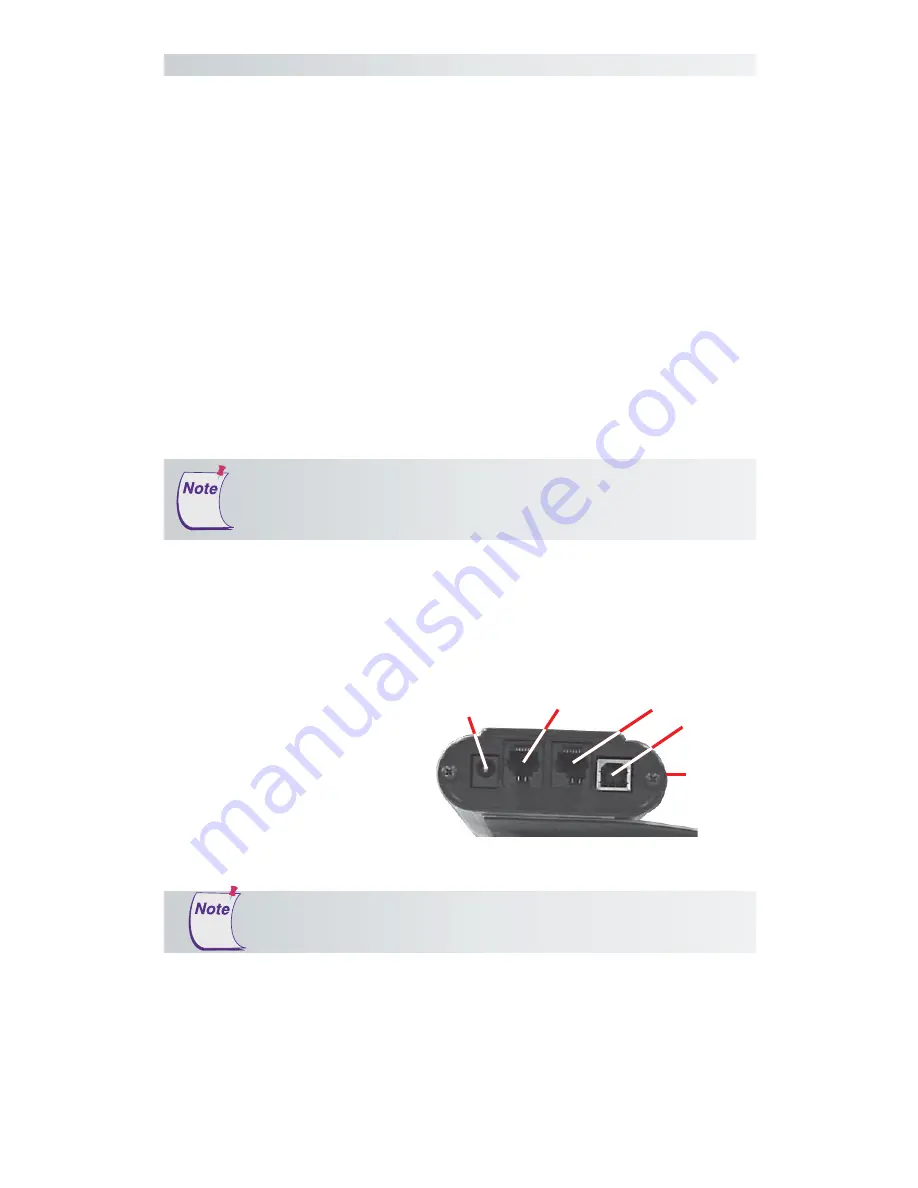
Roll-Up III Connector Panel

Serial

(RS232)

Power

(DC IN)

Transducer

(POINTER)

USB

(USB)

Housing

3

Connect the transducer
– cursor or stylus – to
the appropriate jack on
the digitizer’s Connector
Panel. The connector is
keyed and will fit only
the correct jack. Do not
force it.

Hardware Configuration

When you are using the USB interface, no data output configuration is
required. However, when you choose the optional serial interface, the
Roll-Up III must be configured to send data in a format that is compatible
with the application software. Different applications have different re-
quirements when interacting with a digitizer. The Roll-Up III has been
designed to provide the appropriate serial requirements for a wide variety
of graphic, CAD, and estimating applications using a simple code system.
The SuperSet Menu on the surface of the Roll-Up III is used to enter the
appropriate code for the software you are using. A table in the 

Using the

SuperSet Menu

 section of this manual lists the SuperSet Codes for a wide

variety of applications.

Determine, if you haven’t already, which communication connection you
will be using—USB or Serial.

1

Select a large, flat, nonmetal surface on which to place the Roll-Up III.
Clear all items from the surface.

2

Remove the Roll-Up III from its cardboard tube container and unroll it
on the selected surface.

Do not attempt to remove the controller from the housing.
Doing so could damage the digitizer and void your warranty.

Conductive materials, inks, or electronic devices on, under, or
near the Roll-Up III can cause improper operation. See the

Troubleshooting 

section for more details.

Summary of Contents for Roll-Up III

Page 1: ...1 The Roll Up III TM Roll Up III User s Guide The Portable Large Format Digitizer ...

Page 2: ...er prod ucts We strive to bring you the best the technology has to offer We urge you to visit our Web site where we will post the latest information regarding updates and changes that may impact the information in this User s Guide www gtcocalcomp com Navigate to ...

Page 3: ...On 12 Configuring Your Roll Up III for Specific Applications 13 Example Configuring for a Specific Application 13 Table 1 SuperSet Menu Codes for Selected Applications 14 Table 2 Configuration Details for SuperSet Menu Codes 20 Roll Up III Tones 23 Table 3 Roll Up III Tones 23 Introduction to the Custom Configuration Menu 24 Communication Options 24 Output Format Options 24 Mode Options 25 Using t...

Page 4: ... Regulatory Statements and Warranty 36 Radio and Television Interference 36 Canada 36 Declaration of Conformity 37 Japan 38 Bescheinigung des Herstellers Importeurs 38 European Union Directives 39 Limited Warranty for the Roll Up III 40 ...

Page 5: ...eate and manipulate objects in a graphic composition Trace a drawing or other source material to create an image on the display screen Select commands or functions from an application menu placed on the tablet surface Select items from a pull down menu on the display screen In order to send data from your Roll Up III to your digitizing application your Roll Up III must be physically connected to y...

Page 6: ...to Use Roll Up III A computer running a Windows operating system with a USB port or an RS232C serial communication port Serial signal levels must con form to EIA RS232C specifications Application software that accepts digitizer input via the Wintab API or application software that directly accepts digitizer input via the computer s RS232C serial port Optional Equipment Computer interface cable wit...

Page 7: ...mation for specific digitizers If the Roll Up III digitizer is not listed you can use the configura tion for GTCO Digi Pad Type 5 or Type 5A T5 T5A Roll Up II CalComp 9100 9500 or Summagraphics Microgrid III or ID Series Installing the TabletWorks Driver Insert the CD into the CD ROM drive on your computer The installer will autoload If it doesn t click on the Start button on the Windows Task Bar ...

Page 8: ...quirements for a wide variety of graphic CAD and estimating applications using a simple code system The SuperSet Menu on the surface of the Roll Up III is used to enter the appropriate code for the software you are using A table in the Using the SuperSet Menu section of this manual lists the SuperSet Codes for a wide variety of applications Determine if you haven t already which communication conn...

Page 9: ...n 1 Connect the interface cable to the USB jack on the Roll Up III Con nector Panel The connector is keyed and will fit only the correct jack Do not force it 2 Connect the other end of the USB cable to any one of the USB ports on your computer or USB hub The digitizer will beep four short tones indicating it is powered On See the Roll Up III Tones section on page 23 for a complete table of the Rol...

Page 10: ... 3 Configure the SuperSet Code The Roll Up III comes from the factory with the SuperSet Code pre configured See Using the SuperSet Menu RS232 Serial Connection If your software application is not Wintab compliant be sure to set the correct two digit Application SuperSet Code before connecting the serial cable to the computer SuperSet Codes can be found in Table 1 If your application is not listed ...

Page 11: ...r selections The menu button initiates the Select Mode Two digit numeric codes are entered after Select Mode is activated Most software supports Win tab using the TabletWorks drivers whose SuperSet Code is on the SuperSet Menu The Roll Up III comes from the factory with the SuperSet Code pre configured The menu button sets your preferred digitizer orientation The button toggles the digitizer alarm...

Page 12: ... desired orientation 2 Relocate the origin by clicking on the button on the SuperSet Menu that is located in the lower left corner of the digitizer You will hear four short tones when you do this Turning the Alarm Off and On You can disable the alarm if you don t want to hear a tone each time the transducer button is pressed When the alarm is off you will still hear diagnostic and menu related ton...

Page 13: ... Configuring for a Specific Application Suppose you wanted to configure your Roll Up III to operate with Autodesk s AutoCAD application You would 1 Find the entry for AutoCAD in Table 1 The SuperSet Code is 01 2 Click on the button on the SuperSet Menu You will hear one short tone indicating the digitizer is in Select Mode 3 Click on the button on the SuperSet Menu You will hear one short tone Thi...

Page 14: ...hip Coastdesign 01 Autoyacht Coastdesign 01 Autumn Zenographics 36 Batisoft 46 Best Est II Bird Construction Software 23 Bid Team Construction Data Control Inc 58 Bidpoint Vertigraph Inc 01 Bidworx for DOS Vertigraph Inc 31 Bidworx for Windows Vertigraph Inc 01 BP 340 Barudan America Inc 77 BuildNet Homesphere 09 Buildsoft Homesphere 09 BuildWare 1SqFt 01 BVH Gregg Estimating BVH Gregg Incorporate...

Page 15: ...14 DATAMINE Datamine International 82 Deed Mapping System US Soft Tech 13 DEEM Met Coil Ltd 69 Design CAD American Small Business Computers 01 Designer Micrografix 02 DigiPlus Civilsoft 01 DigiPro Prosoft 66 Digitool Roctek Corp 24 DigiWin Prosoft 68 DMS Premiere Tally Systems 57 DQ 2000 DQ Technologies Inc 85 DrawPlus Micrografix 02 Earth Graphics Deluxe Earth Graphics 01 Earthwork Civilsoft 01 E...

Page 16: ...nc 01 Floor Rite RFMS 01 GAP 01 GTCO CalComp 39 Gemini Excel 79 Generic CADD Generic Software Inc 01 Geoquest Softdesk 08 GM SYS NW Geophysics Association Inc 13 GraphPlus Micrografix 02 GTCOTEST default GTCO CalComp 01 GTCO Wintab Driver GTCO CalComp 01 HALO products Media Cybermetics 13 Hotdij Geocomp Ltd 35 IBM GFIS IBM 55 Ice System The DOS MC2 56 ICE 2000 MC2 01 IDRISI Clark University 74 IKE...

Page 17: ...o 78 Metricom ADII Dynalog 71 Micromine Micromine Pty Ltd 27 Microstation PC Intergraph Corp 09 MIKE DOS Comput Ability Inc 68 MIKE Comput Ability Inc 42 Mirage Zenographics 36 Molitors Zimmer Molitors Zimmer Estimating Syst 67 NCE Estimator 2000 National Computer Est Inc 01 On Screen Take Off OnCenter Software 01 Pagemaker Aldus Corp 02 PAD ModaCAD 50 Paydirt Cross Section DOS Spectra Physics Las...

Page 18: ...uest Earthwork Quest Solutions 01 Quest Estimator Quest Solutions 01 QuickBid OnCenter Software 01 QuickCalc Constructive Computing 58 QuickCALC Windows Constructive Computing 01 QuickDirt Constructive Computing 23 QuickDirt Windows Constructive Computing 01 QuickDirt II QuickEst III Constructive Computing 58 QuickEst Constructive Computing 43 QuickEst Windows Constructive Computing 01 QuickMeasur...

Page 19: ...ffTool US Cost 01 Terra Model DOS Plus 3 Software 09 Terramodel Trimble Navigation 01 Terrasoft Digital Resource Systems 01 Topographics IIID CEIA Inc 75 Tops II Digitizer Software Shop Systems 28 TOSCA Clark University 74 Tradesman Tradesman Software 01 Turbo Map CAD U S Softtech 01 Versacad Versacad Corp 01 Vision Bidtek 70 Visual Takeoff Comput Ability Inc 42 Wall to Wall Estimator Ramco 11 Wen...

Page 20: ...00 E 7 2 GTCO Binary 200 lpi Cont Max 18 9600 E 7 2 GTCO Binary 200 lpi Cont Max 19 9600 N 8 1 GTCO Binary 1000 lpi Point 20 1200 N 8 1 GTCO Binary 1000 lpi Cont 100 21 4800 N 8 1 GTCO Binary 40 lpmm Cont 12 22 4800 N 8 1 GTCO Binary 1000 lpi Cont Max 23 2400 N 8 1 GTCO Binary 1000 lpi Cont 12 24 9600 N 8 2 GTCO Binary 1000 lpi Cont Max 25 9600 N 8 2 GTCO Binary 1000 lpi Cont Max 26 9600 N 8 2 GTC...

Page 21: ...nt Pb CR LF 52 9600 E 8 1 GTCO Binary 1000 lpi Cont 100 Alarm 53 9600 N 8 1 GTCO ASCII 1000 lpi Cont Max Pb CR 54 9600 N 8 1 GTCO ASCII 1000 lpi Cont 12 Pb CR 55 9600 O 7 2 GTCO ASCII 1000 lpi Cont Max Alarm Pb CR 56 9600 E 7 2 GTCO ASCII 1000 lpi Point Pb Sp CR LF 57 9600 O 7 1 GTCO ASCII 1000 lpi Point Pb Sp CR LF 58 9600 N 8 1 GTCO ASCII 1000 lpi Cont 12 Pb CR LF 59 1200 E 7 1 GTCO ASCII 1000 l...

Page 22: ...oint 79 9600 O 7 2 Summa ASCII 1 10 lpmm Cont 100 LF 80 9600 O 8 1 Summa Binary 10 lpmm Point Alarm 81 9600 E 7 2 Summa ASCII UIOF 40 lpmm Point CR LF Decimal 82 9600 N 8 1 GTCO ASCII 1000 lpi Point Max Alarm Pb Sp CR LF 83 9600 N 8 1 GTCO ASCII 1000 lpi Cont Incr Pb Sp CR 84 9600 N 8 1 GTCO ASCII 1000 lpi Point Pb LF 85 9600 N 8 1 Summa ASCII UIOF 1000 lpi Point Pb LF 86 Special 87 Special 88 Spe...

Page 23: ...nment Point 1 Short Continuously Configuration Menu mode twice per second waiting for Alignment Point 2 Long once per second Eight long beeps Grid disconnected followed by short followed by four short Continuously on At power up Diagnostics failed Short 1 16 second Medium 1 4 second Long 1 2 second Configuration error tones Grid disconnected tone or Diagnostics failed tones indicate a serious prob...

Page 24: ...2C serial interface Choices are 1200 2400 4800 9600 19200 or 38400 Data Bits Data bits represent the actual data being sent from one device to another Both devices must be set for the same number of data bits Choices are Seven 7 or Eight 8 Stop Bits Each character has one or two stop bits which tell the receiving device that a character is complete The number of stop bits usually does not matter S...

Page 25: ...xclude Decimal Defines whether the period character hex 2E is included in the ASCII output report between the units and tenths digits This option is available only in Summagraphics formats Choices are Include or Exclude Return Defines whether the Carriage Return CR character hex 0D is included in the ASCII output report as a terminator This option is available in GTCO and Summagraphics formats Cho...

Page 26: ... Configuration Menu 1 Place the Custom Configuration Menu card or the copy anywhere in the active area of the digitizer The entire menu must be in the active area A piece of tape can be used to keep it in place during the con figuration process 2 Click on the button on the SuperSet Menu The alarm will beep slowly indicating that the Custom Configuration Menu Mode is now ready to receive Alignment ...

Page 27: ... you can assign the configuration to a special user definable SuperSet Code To save the configuration temporarily Click on the button on the SuperSet Menu You will hear four short tones to indicate you successfully saved the custom configu ration The configuration is saved in a temporary location where it will be retained even when the unit is powered off or reset How ever if another SuperSet Code...

Page 28: ...olling aid and it allows you to easily control the rolling action See the Transporting Roll Up III section on the next page for specific moving instructions Don t permanently attach anything to the digitizer Don t use sharp instruments on or near the Roll Up III to avoid scratching or cutting it Cuts in the digitizer will void your warranty Don t crease dent or abuse the digitizer Creases can dama...

Page 29: ...r s black back will be exposed 3 Insert the rolled digitizer into the shipping tube and allow it to fully unroll against the inside of the tube Place the factory supplied insert into the center of the rolled digitizer for support 4 Place the accessories in the accessory case and put it inside the hollow insert Place the factory supplied end caps on the tube to seal it Place the tube in the optiona...

Page 30: ...ur Technical Support Department at 410 312 9221 Be prepared to discuss the observations you made while troubleshooting A Technical Support Specialist will help you resolve the problem as quickly as pos sible If you are experiencing erratic behavior with your digitizer make sure that no conductive materials are being used This includes the graphite in pencil lead some black plotter ink and digitizi...

Page 31: ...31 The Roll Up III Procedure A Begin Troubleshooting Troubleshooting Guide This procedure should only be used to troubleshoot serial con nections ...

Page 32: ...The Roll Up III 32 Procedure B Troubleshooting Troubleshooting ...

Page 33: ...33 The Roll Up III This page left blank intentionally ...

Page 34: ... begin searching the Serial Ports for a supported tablet a If the tablet is found information about the tablet will display under Device Info near the bottom of the screen b If the tablet is not found a message will appear under Device Info near the bottom of the screen i If Wintab files were found it is possible that the TabletWorks driver has the Serial Port open ii If the Serial Port is open by...

Page 35: ... tablet as shown until the tablet is powered off reset or another SuperSet Code is selected i After saving temporary settings select File Exit to test with other applications This will leave the tablet configured to the temporary settings selected and close the Serial Port enabling other applications to communicate with the tablet b Save Power Up Settings will configure the tablet as shown Every t...

Page 36: ...ment off and on the user is encouraged to try to correct the interference by one or more of the following measures Reorient or relocate the receiving antenna Increase the separation between the equipment and the receiver Connect the equipment into an outlet on a circuit different from that to which the receiver is connected Reorient or coil cables Consult the dealer or an experienced Radio TV tech...

Page 37: ...ions Safety EN60950 1 2001 IEC60950 2001 IEC60950 1999 04 UL60950 1 CSA C22 2 NO 60950 1 03 EMC EN55022 1998 A1 2000 A2 2003 EMI EN55024 1998 A1 2000 A2 2003 EN 61000 3 2 Harmonic Current Emissions EN 61000 3 3 Voltage Fluctuations and Flicker EN 61000 4 2 Direct ESD Indirect ESD EN 61000 4 3 Radiated Susceptibility EN 61000 4 4 Electrical Fast Transients EN 61000 4 5 Surge EN 61000 4 6 Conducted ...

Page 38: ...Herstellers Importeurs Dieses Geraet wurde einzeln sowohl als auch in einer Anlage die einen normalen Anwendungsfall nachbildet auf die Einhaltung der Funk entstoerbestimmungen geprueft Es ist jodoch moeglich dass die Funk entstoerbestimmungen unter unguenstigen Umstaenden bei anderen Geraetekombinationen nicht eingehalten werden Fuer die Einhaltung der Funk entstoerbestimmungen seiner gesamten An...

Page 39: ...sources It may contain hazardous substances that could impact health and the environment In order to avoid the dissemination of the hazardous substances into the environment and to diminish the pressure on our natural re sources we encourage you to return this product to the appropriate take back system facility These facilities reuse or recycle most of the materials in this equipment in a respons...

Page 40: ...horized by GTCO CalComp c Any damage in shipment of the product claims must be presented to the carrier d Any other cause which does not relate to a manufacturing defect 3 Any product not sold or leased to a consumer within six months of GTCO CALCOMP s original sale date GTCO CalComp will pay all labor and material expenses for covered items but we will not pay for the following 1 Removal or insta...

Page 41: ...ve parts and under no circumstances shall GTCO CalComp be liable for special indirect or consequential damages The price stated and paid for the equipment is a consideration in limiting GTCO CalComp s liability Notice Some states and provinces do not allow the exclusion or limitation of incidental or consequential damages so the above exclusion may not apply to you This warranty gives you specific...

Page 42: ...GTCO CalComp make any commitment to update the information contained in this document This document contains proprietary information which is protected by copyright All rights reserved No part of this document can be photocopied or reproduced in any form without the prior written consent of GTCO CalComp Inc www gtcocalcomp ca Corporate Headquarters 7125 Riverwood Drive Columbia Maryland 21046 Tel ...

Reviews: