background image

6

 Press the “Sleep mode” button on the 

remote control. 


The display shows L and the airflow force is 

reduced. 


Press again to exit the night sleep mode. 


(You can also exit the current mode by 

pressing the “+ - “Exit button.)

 Press the “Oscillation” button on the remote 

control to switch on he oscillating function. 

This fan can swing 80 ° left and right. 


Press this button again to stop oscillating  

process.

 Press the “+” button on the remote control to 

increase the air volume. 


Press the “-” button to decrease the air 

volume. 


There are 9-speed settings.

 Press the timer button on the remote control 

to set 1 to 8 hours. Press  the timer button on 

the remote control, the display shows: ”0“ to 

cancel the timer.


After the timer function is set, other functions 

can be used normally. 


When the device is turned off, the timing 

setting is also canceled.

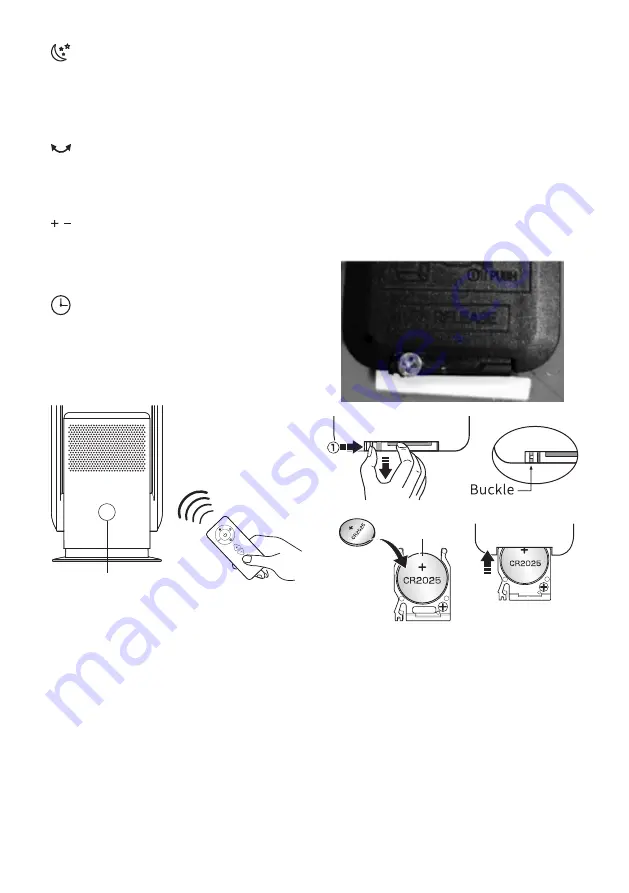
Signal receiver

The remote control should 

be pointed at the remote 

control signal receiver on 

the display to maximize 

the remote control signal.

Possible phenomenon


1.  This fan may respond to the remote control of 

other devices. 

2.  If you use the remote control of this fan, other 

devices may respond. 

This is due to the overlapping frequencies of the 

remote control. 

There is no quality problem in the product itself. 

To avoid misuse, keep the remote control away 

from other electrical devices during operation

Battery Replacing (For Remote 

Control)

1.  The remote control requires one “CR2025” 

type 3-volt lithium battery (included). If the 

operation of the remote control becomes 

unsatisfactory, replace with a new 3-volt 

lithium battery. 

2.  Place the remote control with the control 

buttons facing downward.

3.  Loosen the cover screw. Press the locking arm 

of the battery cover and pull out the tray. 

(Push tab “A” towards the middle first. See the 

Fig.1).

4.  Place one new 3V CR2025 battery into the 

battery tray with the positive “+” side facing 

up, observing the polarity markings. If the 

battery is placed incorrectly, the remote 

control will not work. CAUTION: There is 

danger of malfunction if the battery is 

replaced incorrectly. Replace only with the 

same or equivalent type of battery. 

5.  Insert the battery holder into the battery 

compartment and ensure it is secured. 

tighten the cover screw.

Summary of Contents for Mistralaire SKJ-CR022

Page 1: ...Model SKJ CR022 Smart Bladeless Fan And Air Purifier Instruction Manual ...

Page 2: ...power cord over any part of the unit Do not plug this unit into an extension lead double adapter or power board To disconnect the unit set main switch to OFF then remove the plug from the outlet This unit has hot electrical parts inside DO NOT use it in areas where gasoline paint or flammable liquids are used or stored Do not insert or allow foreign objects to enter any ventilation or exhaust open...

Page 3: ...ir inlet or outlet Make sure that the ventilation openings are free of dust lint hair and other obstacles that could impair the air flow The fan should be set up dry on a horizontal platform and should not be near heat sources corrosive air and moisture The fan should be kept a distance of 150 mm around to ensure good air circulation Warning If the adaptor is damaged the adaptor must be replaced b...

Page 4: ...ssembly power supply cord remote control operating instructions NOTE As a result of continual improvements the design and specifications of the product within may differ slightly to the unit illustrated on the packaging Air outlet Air duct Air duct Top cover of air purifier filter Top cover of air purifier filter Air inlet Air inlet Fan Enclosure Power connection Touch button Display Base ...

Page 5: ...power button for 2 seconds the buzzer will beep twice and the fan will stop running after you release your finger 5 Set the air volume When the fan is operating Click the button to adjust the air volume from 1 to 9 6 Oscillation When the fan is operating press and hold the screen touch button for 1 second The buzzer beep once and the fan starts to oscillate Press and hold the screen touch button a...

Page 6: ...ay respond to the remote control of other devices 2 If you use the remote control of this fan other devices may respond This is due to the overlapping frequencies of the remote control There is no quality problem in the product itself To avoid misuse keep the remote control away from other electrical devices during operation Battery Replacing For Remote Control 1 The remote control requires one CR...

Page 7: ...swallowed a button battery immediately go to a hospital emergency room 6 Tell others about the risk associated with button batteries and how to keep their children safe Installation away from curtains Please use the fan on a flat platform Do not place the fan in an unstable place such as an inclined or soft surface to avoid damage or malfunctions caused by the fan tipping over Avoid blocking the a...

Page 8: ...ure lights up cycle indicator light when turned on the buzzer sounds 5 times and the status is displayed after 5 seconds After replacing the filter screen the power button on the remote control device can clear the alarm for 5 seconds and the operating time is reset again Operating through Smart Life Download and install Smart Life APP Use your smart phone to scan the QR code below to download Sma...

Page 9: ...click Confirm to search device Once the configuration is completed the indicator light will stop blinking rapidly Note If the Smart Fan is failed to establish connection make sure there is no special symbol in your WiFi name should only contain letters and numbers and password try again by repeating Step 4 Step 5 to set it up Step 6 Once connected you can rename your Smart Fan and select the Room ...

Page 10: ...fully if you find the device in the Devices list You can use your echo dot through Alexa to control your Smart Lamp by voice now Control your intelligent product via Amazon Alexa When the accounts have been successfully linked you can use your smart products via control the Amazon Alexa device by voice command e g Hi Alexa turn on the device name Hello Alexa turn on the device name Hi Alexa turn o...

Page 11: ...ol your smart product through Google Home Now you can use your Google Home device to control your products using voice commands e g Hey Google turn on the device name Hey Google turn on the device name Hey Google turn off the device name Hey Google turn off the device name Hey Google set the device name to 9 speeds Hey Google set the device name to 9 Speeds Hey Google increase decrease the device ...

Page 12: ...ices with cooling heating function 3 Do not expose it to direct sunlight hot and humid places 4 Keep out of the reach of kids Disposal Do not dispose of packaging or the product through your household waste The product and packaging are made from recyclable materials plastics metals paper If the product is no longer suitable for use dispose of it in an environmentally friendly manner in accordance...

Reviews: