background image

PROTECTING CASSETTES AGAINST UNINTENTIONAL

ERASURE

Every time you record onto a tape, its contents is erased and replaced by the
new recording.

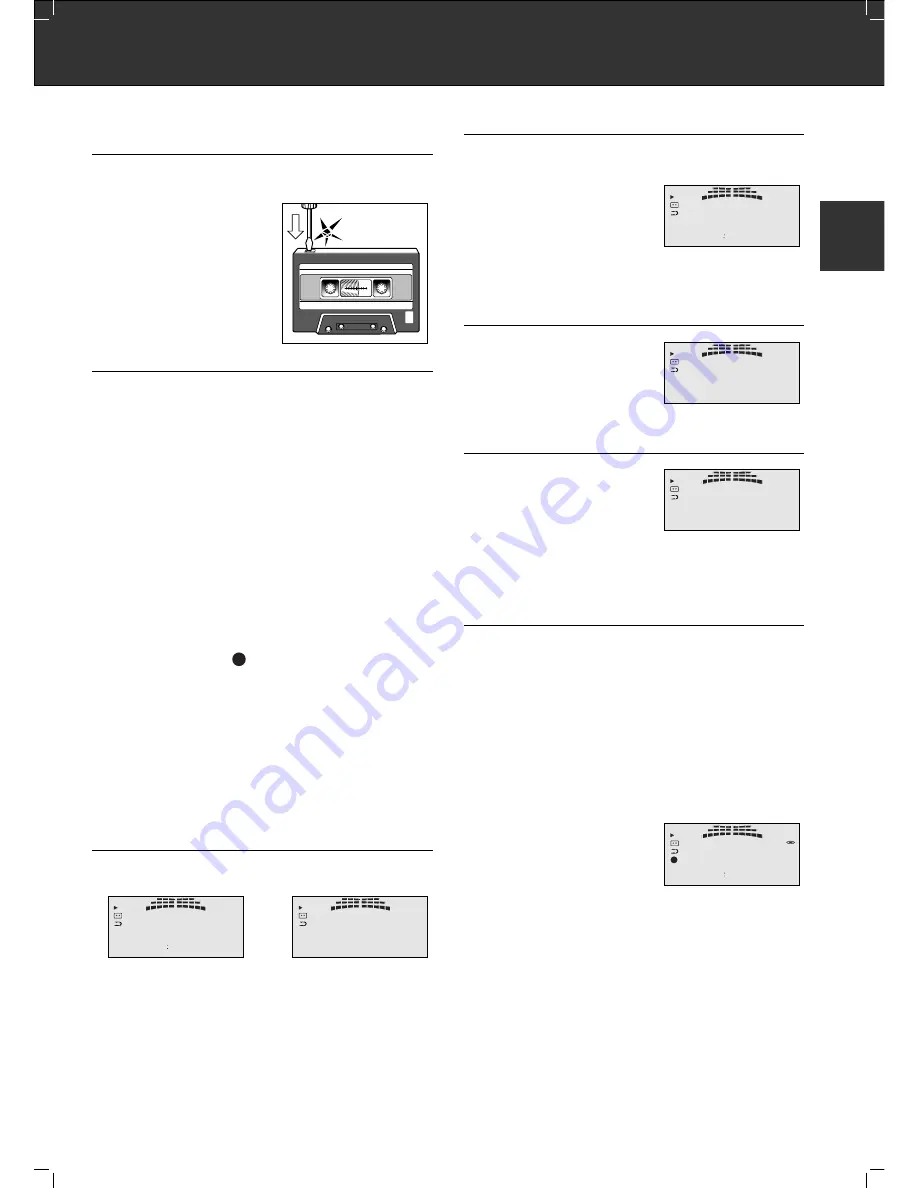
• In order to avoid unintentional erasure of a

recording, carefully remove its safety
tabs with, for example a screw driver.

– Original recordings are already protected

against unintentional erasure.

• If you wish to record on a 'protected'

cassette, place a small strip of tape over
the corresponding holes.

RECORDING

Copyright:

Making recordings from a prerecorded sound track is only permissible

insofar as the Copyright or the rights of third parties are not infringed upon.

Recording on protected cassettes is not possible, 

CASS

appears in the display

for 1.5 seconds, and recording is prevented. The cassette compartment comes
out again. 

Recording on both sides of a cassette

• Insert an unprotected cassette in the cassette compartment, wind to the

desired tape position and select the tape direction.

• If desired switch on the Dolby Noise Reduction system as described before

(with 

MODE

and afterwards 

+

or 

). 

• Select the reverse mode 

AUTOREVERSE

as described before (with

MODE

and afterwards 

3

or 

4

).

• Select the source from which you wish to record by pressing 

CD

TUNER

or

AUX

.

• Press 

RECORD

for more than 2 seconds. 

– The recording starts and the 

indication on the display lights up. 

– The drive automatically changes the side of the cassette after the first side

has been recorded; this is followed by recording on the second side.

• Press 

9

(STOP) to stop recording at an earlier point.

Recording on one side of a cassette

• If you only want to record on one side of the cassette, proceed as described

under ‘Recording on both cassette sides’ but select the reverse mode

REVERSE OFF

å

.

– The unit automatically stops recording when the end of the tape is reached.

SWITCHING FROM THE TAPE COUNTER TO THE TIMER

• Press 

Ǻ

to switch between the tape counter and the real time display (minutes

and seconds).

ADAPTING THE TIMER TO THE TAPE

The timer must first be allowed to adjust to the thickness of the cassette tape in
the cassette compartment. 

When you begin playback, the colon between
the displayed seconds and minutes (-:--)
briefly blinks. 
During this time the tape thick-ness and 
other values are calculated. When this
process is concluded, the timer then also 
displays the correct real time during fast forward and fast reverse.

RESETTING THE TAPE COUNTER

• Press 

CANCEL

, for example at the

beginning of a recording, to reset the tape
counter to 0.

STORING TAPE POSITIONS

• You can store the current tape position

by pressing 

MEMORY

.

– The indication MEMO appears in the

display. 

• When you press 

Q

(in stop mode), the

cassette deck rewinds and stops at the stored position. 

• Pressing 

MEMORY

again ends this function.

RECORDING FROM A CD TO A CASSETTE (CD-COPY)

Your cassette deck is capable of transmitting control commands to the CD-
player, enabling you to carry out the CD-COPY function by pressing just one
key. 
In addition, you can also optimally record individual CD tracks or programmes
on both sides of the cassette so that there is not an excessive amount of blank
tape on one side of the cassette.

• First there must be a cassette in the cassette compartment and a CD in the

CD player. 

• Prepare the cassette tape by winding to the desired tape position. 

• Select the desired tracks on the CD player.

• Now press 

CD COPY

for 2 seconds. 

– Recording starts. The CD player is first 

switched to pause for 4 seconds and then
starts playing

– If you are positioned at the beginning of a

cassette side, the cassette deck starts first
in order to take up approx. 6 seconds of tape leader. The CD player then
starts automatically. 

– During the recording procedure you can only use the 

9

(STOP) or 

/

OPEN/CLOSE

keys. All other functions are deactivated. 

– If the CD player is the first unit to stop playback, it automatically sends a

corresponding command to the cassette deck, and recording is stopped. 

– If the respective side of the cassette tape reaches the end first, the CD

PLAYER switches to PAUSE mode (

;

). 

– If you selected reverse mode (

), your unit switches to the other side of the

cassette and continues recording.
The tape leader is taken up, and the CD starts at the beginning of the track
just played.

1

013

P

rec

*

2429

0000

---

0789

423

rec

1

©

33

CASSETTE DECK 

(press 

TAPE

to select cassette mode)

GB

Summary of Contents for SPACE FIDELITY PA 3

Page 1: ...PA 3 ...

Page 2: ...eld that creates an air flow equally powerfull in both directions so in effect it creates circular sound pressure fields Wherever you may be in the listening space Space Fidelity gives a much broader stereo sound sensation Damping of the walls does not detract from the live performance quality of the sound and in certain circumstances may indeed improve it Space Fidelity s acoustic tube creates pr...

Page 3: ... OUT sockets of your other equipment e g tape or DAT recorder TV DSR tuner etc to the sockets AUX IN Connect the LINE IN sockets of your other equipment e g tape or DAT recorder to the sockets AUX OUT ANTENNA CONNECTION Only a good antenna system broadband cable connection to your own antenna system or a common house antenna system can guarantee optimum reception quality especially for FM stereo b...

Page 4: ...usts the volume level 0 63 FRONT OF THE SYSTEM DISC Opens and closes the CD compartment OPEN CLOSE TAPE Opens and closes the cassette compartment OPEN CLOSE DISC SELECT Selects the CD you wish to hear or the compartment 1 7 in which you wish to load a CD p This socket is for connecting standard stereo head phones with a 6 3 mm jack The system s speaker outputs are automatically switched off when t...

Page 5: ...z and for MW reception in kHz in this part of the display all relevant messages are displayed indicates the output signal REMOTE CONTROL Changing the batteries If the range of your infrared remote control seems to decrease or if certain individual functions can no longer be carried out you should replace the batteries Two mignon 1 5 Volt LR03 size AAA are required To change the batteries open the ...

Page 6: ...T mode will be entered in which you can assign names to CD s with the following keys to go to a next previous position on the display cursor 3 4 to go through the alphabet 0 9 and space symbol CANCEL to clear the name Q R to start forward or backward search 3 4 to skip to next or previous tracks MEMORY to call up the programming mode or to save individual tracks press more than 2 seconds to review...

Page 7: ...B to start cassette playback in normal or reverse direction 9 to stop all cassette functions to switch the cassette deck to PAUSE Q R When the unit is in STOP mode fast forward or backward When pressed during playback MUSIC SEARCH forward to the beginning of the next track or backward to the beginning of the current track Ǻ to switch the display indication between the COUNTER tape counter and TIME...

Page 8: ...th the POWER SOUND key you can switch to three sound settings as follows POWER SOUND FLAT USER POWER SOUND POWER SOUND slightly accentuates the lower and higher frequencies which renders a more balanced overall sound during quieter passages Its effectiveness depends in turn on the setting of the volume knob The sound is thus optimally adapted to human hearing sensitivity which is also dependent on...

Page 9: ...rch stops the AUTO COMPARE function first verifies whether the station which has been found is already stored in the station memory If this is the case the memory location of the station is displayed as well as the name of the station if it already exists Stations which are received with a weak field strength may be skipped These can be tuned to manually If desired you can also interrupt the searc...

Page 10: ...isplay Keep the key depressed for an additional 5 seconds until the display shows 87 5 MHz the station memory is deleted If you now press one of the 3 or 4 keys FREE is shown on the display If you release the CANCEL key before these 5 seconds have elapsed the erase function is not carried out RDS RADIO DATA SYSTEM Your unit is capable of receiving and evaluating RDS information which is broadcast ...

Page 11: ...gy VARIETY Programmes that mostly offer light entertainment e g talk shows quiz shows and guessing games cabaret shows sketches chat shows etc often featuring music POP M Pop music Programmes with popular and modern hits from home and abroad ROCK M Rock music Programmes with international music of the younger generation often with a heavy emphasis on rhythm EASY M Light music Programmes with light...

Page 12: ... the display Warning This set is designed for normal CDs Therefore do not use any accessories like disc stabilizer rings or CD treatment sheets etc as offered on the market because it may cause jamming of the changer mechanism Do not load more than 1 disc into 1 tray PLAYING AN ENTIRE CD FROM STOP Press B Playback begins with the first title The display shows the current title number and the title...

Page 13: ...l the first character on the display starts flashing Then press CANCEL and hold it pressed down for 10 seconds First ERASE appears on the display If you release the key the erase function is not carried out However if you keep the key depressed the title memory is deleted and the message E2P ERASED appears briefly on the display PLAYING TITLES IN A SPECIFIC SEQUENCE PROGRAMME You can store up to 7...

Page 14: ...he playback function A B can only be started if there is a cassette in the cassette compartment If you press A B Q or R and the compartment is empty CASS appears on the display for 1 5 seconds and then the cassette compartment opens If desired switch on the Dolby Noise Reduction system as described before with MODE and afterwards or Playback of one cassette side Select the reverse mode REVERSE OFF...

Page 15: ...the cassette compartment When you begin playback the colon between the displayed seconds and minutes briefly blinks During this time the tape thick ness and other values are calculated When this process is concluded the timer then also displays the correct real time during fast forward and fast reverse RESETTING THE TAPE COUNTER Press CANCEL for example at the beginning of a recording to reset the...

Page 16: ...g wings 1 kg ACCESSORIES Instructions For Use Ident card System remote control transmitter 2 x 1 5 VC micro batteries type LR03 AAA 2 x tools for removing the tube Subject to technical alterations and alterations in styling E and O E This device is interference suppressed in accordance with applicable EC regulations This device complies with the safety regulations according to VDE 0860 and thus wi...

Page 17: ... the unit or pointed at an excessive angle RADIO OPERATION No sound Due to bad stereo reception the muting function is active Select FM MONO reception or adjust the frequency Strong hum or hiss Adjust the aerial Station signal is too weak Connect to an outside aerial for improved reception CD CHANGER OPERATION CD compartment does not close CD not correctly inserted PLAY B key does not work CD is s...

Page 18: ...GRUNDIG AUDIO INTERNACIONAL 4701 BRAGA PORTUGAL 1 2 3 4 5 6 7 8 9 53598 941 01 ...

Reviews: