background image

 37

MODIFy MENU 

  __________________________________

Setting a priority to a dictation

Note:

The  dictation  machine  must  have  been  configurated  with 

the corresponding PC software. An author's name has to 

be  transferred  to  the  dictation  machine  together  with  a 

maximum priority (smaller than 16).  
The single-workstation installation of the PC software  eva-

luates  »

no priority

«  with  level  16  and  »

high priority

«  with 

the maximum author priority which you set. 

  The optional network installation of the PC software eva-

luates level 16 to »

no priority

«. If »

high priority

« is set the 

level is set to the maximum author priority assigned to the 

author by the system administrator. 
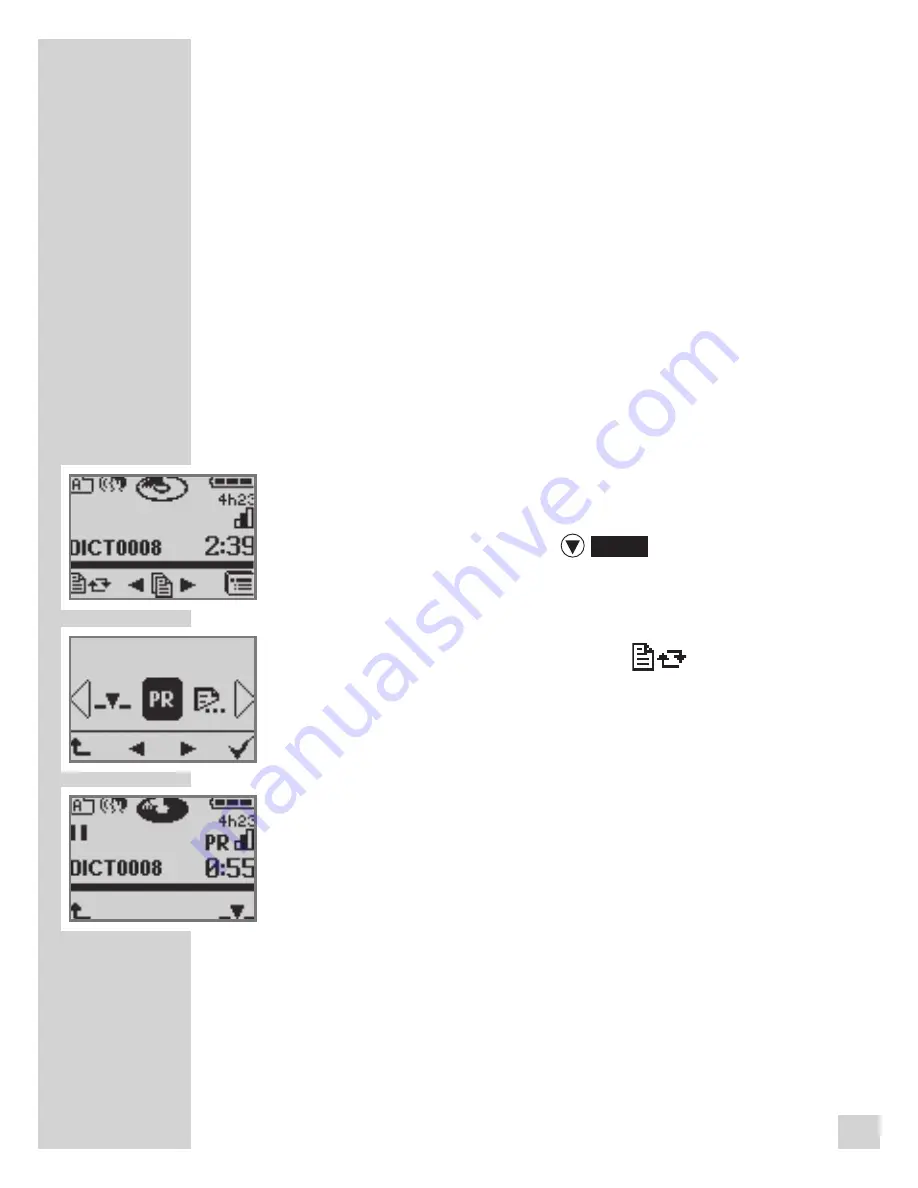
•   Move the slide switch to  »

STOP

« during recording. 

•  Select the chosen dictation with the navigation buttons 

»

◄►

« (see „Select and listen to a dictation).

•  Press  the  left  selection  button  »

«,  to  go  to  the 

Modify menu. 

•  Select the »

Priority on,


PR

« priority function from the 

display.

  –  The dictation is marked with a »

PR

«, displayed above  

  the time data.

 •  If the selected dictation already has a priority you can 

erase it with the  »

Priority off,


PR

« menu item.

Summary of Contents for Digta 415

Page 1: ...ENGLISH DIGTA 415 www grundig gbs com...

Page 2: ...g dictations on remova ble memory cards 20 Recording 20 Saving dictations selecting a folder 21 Dictation 21 New dictation 22 Recording pause 22 End recording 22 Modifying the dictation 24 Inserting a...

Page 3: ...System requirements 69 Connecting and separating the dictation machine and the PC 69 USB parallel operation 69 PC file transfer 70 PC microphone operation USB Audio USB HID 71 Configuration of the di...

Page 4: ...age Protect your machine from expos ure to moisture rain splashing liquids Never lay your dictation machine down near a heater or directly into sunlight Note You must not open the dictation machine un...

Page 5: ...the Grundig Website on the internet at www grundig gbs com The performance features described by Grundig only apply to genuine Grundig accessories Please make sure to choose only genuine accessories...

Page 6: ...s new button new dictation Labeled in the bottom display line Green indicator for USB connection Yellow indicator for power supply LED indicator Record illuminated red Record pause blinking red Insert...

Page 7: ...ar view________________________________________ On Off switch Keylock Compartment for recharge able battery Slide switch for fast forward stop start record play back and rewind Card slot for MMC SD ca...

Page 8: ...ning storage time Dictation length Status bar Current button functions for ex modify dictation select dictation menu Recording Play back mode Recording in folder A Voice activa tion on Card indicator...

Page 9: ...tment of the rechargeable battery Insert the rechargeable battery Make sure the polarity and position are right see figure Warning Never insert batteries into the compartment for the rechargeable batt...

Page 10: ...ns socket Connect the USB plug of the power supply cable to the PC USB socket of the dictation machine After a short time the display indicates that the batte ries are recharged and the green recordin...

Page 11: ...on machine by moving the On Off slide switch upwards to the OFF HOLD position With the dictation machine switched off plug it into the Digta Station After a short time the charging indicator appears o...

Page 12: ...charging state is displayed Before the rechargeable battery is completely flat a short warning beep will sound and the rechargeable battery symbol will flash on the display There won t be a warning si...

Page 13: ...election button Select the symbol for dictations in PC power supply mode with the navigation buttons and confirm with the right selection button Now your dictation machine is supplied with power by th...

Page 14: ...to PC This can result in data loss If a full memory card e g with over 300 dictations is inserted into the dictation machine with factory default settings or with a reset dictation counter it takes u...

Page 15: ...a non formatted memory card is inserted confirm this with the right selection button The FORMAT DELETE ALL display should also be acknowledged with the right selection button The memory card may not b...

Page 16: ...with the author s recognition selected and confirmed by the user when he she swit ched on the machine This ensures that other dictations are not accidentally edited or worse deleted We recommend you...

Page 17: ...he keys are now locked and the HOLD symbol appears in the display If you wish to unlock the keys again push the On Off switch back to ON You can stop your recording or play back again If you press the...

Page 18: ...g but ton DICT Each figure you entered in will appear as a star symbol to screen from view Having entered the fourth figu re you will access the main menu If the wrong PIN was entered three times you...

Page 19: ...you have to wait for 30 seconds to try again Entries may be done as often as you like The PUK is generated from the device s specific serial number and will be supplied to you or to your system admin...

Page 20: ...hapter SETTINGS IN THE MENU Formatting be observed There are six folders available for this purpose one main folder and five subfolders labeled A B C D and E This allows you to sort your dictations fo...

Page 21: ...ss the new button A new dictation with the next highest number availa ble is created display DICT0003 for example The time and date are saved together with each new dictation displayed only on the PC...

Page 22: ...is ended the time and data are saved along with it displayed only on the PC Modifying the dictation During play back you can record over the previously recor ded text at the current position or append...

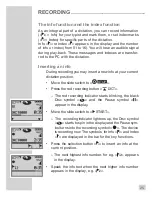
Page 23: ...ording indicator lights up the black Disc symbol starts to spin in the display and the Pause symbol turns into the recording symbol Caution This will overwrite your old dictation starting at this poin...

Page 24: ...lide switch to STOP once you have reached the dictation position at which you wish to insert the text Press the red recording button DICT the red recording indicator starts blinking the black Disc sym...

Page 25: ...a new info at your current dictation position Move the slide switch to STOP Press the red recording button DICT The red recording indicator starts blinking the black Disc symbol and the Pause symbol a...

Page 26: ...he black Disc symbol and the Pause symbol appear in the display Move the slide switch to START The recording indicator lightens up the Disc symbol startstospininthedisplayandthePausesymbol turns into...

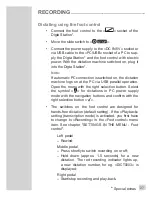
Page 27: ...tton Select the symbol for dictations in PC power supply mode with the navigation buttons and confirm with the right selection button The switches on the foot control are designed for hands free dicta...

Page 28: ...28 Note Select the fast forward function using the slide switch function FFWD on the dictation machine RECORDING_______________________________________...

Page 29: ...ictation name is displayed as text possibly abbreviated Move the slide switch to START ThewhiteDiscsymbol startstospininthedisplay the play back symbol appears on the left in the display and the statu...

Page 30: ...an alternative ly jump to the start and end of a dictation Note If an info or index was inserted during dictation the next info start info end or index is jumped to If you are at the end of a dictatio...

Page 31: ...on buttons see Select dictation and listen to it Move the slide switch to START to listen to the dic tation Move the slide switch to STOP during play back when you have reached the dictation position...

Page 32: ...he desired dictation with the navigation buttons see Select dictation and listen to it Move the slide switch to START to listen to the desired dictation Move the slide switch to STOP during play back...

Page 33: ...dex Move the slide switch to REW or press the FFWD button At an index and at the beginning of every info mes sage the winding briefly stops and you will hear one signal At the end of an info message y...

Page 34: ...he automatic computer connection is activated the dictation machine will log on to the computer in USB parallel mode Call up the menu with the right selec tion button With the navigation buttons selec...

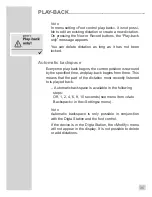
Page 35: ...ack begins the current position is rewound by the specified time and play back begins from there This means that the part of the dictation most recently listened to is played back Automatic backspace...

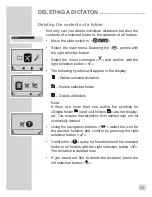
Page 36: ...esired dictation with the navigation buttons see Select dictation and listen to it Press the left selection button to enter the modify menu Select between the Delete Insert Priority on PR Postpone or...

Page 37: ...ou set The optional network installation of the PC software eva luates level 16 to no priority If high priority is set the level is set to the maximum author priority assigned to the author by the sys...

Page 38: ...o the transcription office by connecting the dictation machine via USB Move the slide switch to STOP Select the chosen dictation with the navigation buttons see Select and listen to a dictation Press...

Page 39: ...lete a dictation if this attribute is deactivated on the PC or in the dictation machine Move the slide switch to STOP Select the folder in which your dictation is located see Saving a dictation select...

Page 40: ...n name appears in the display Press the left selection button to change the menu Confirm the Deleting function to change the menu with the right selection button Confirm the function in the submenu wi...

Page 41: ...r in the display Delete selected dictation Delete selected folder Delete all folders Note If there are more than one author the symbols for Delete folder and All folders are not display ed This ensure...

Page 42: ...rm the Deleting function to change the menu with the right selection button Select the symbol in the submenu that now appears and confirm by pressing Press the right selection button to set the starti...

Page 43: ...er delete all dictations in all folders Settings see the following page Functions available if the device is connected to a PC USB parallel operation PC file transfer and PC microphone operation The P...

Page 44: ...ff Switch off audio signals Switch display lighting on off Change date time Activate workflow functions typist dictation type group USB parallel operation automatically via USB connection or hand oper...

Page 45: ...index during play back Select the menu item Index in play in the settings menu and confirm with the right selection button Select the Index function Index on or Change Speed function 1 0 1 5 Index off...

Page 46: ...hone using the naviga tion buttons The selected function turns black Recommended for loud speakers Prevents overmodulation for dictations which are pro cessed by a voice recognition system Normal sett...

Page 47: ...ophone sensitivity for example for nor mal dictation or persons who speak loudly As soon as the speaker starts to speak again the recording will continue Go to the menu command Voice activation and co...

Page 48: ...switch off the machine manually it will switch off itself after about 30 minutes Move the On Off switch to OFF HOLD and then again to ON to switch on the device again Select the menu item in the sett...

Page 49: ...nals Confirm your choice with the right selection button Note If all signals are switched off you will not hear a signal when the memory is full or the rechargeable battery is flat If you dictate with...

Page 50: ...Light and confirm with Using the navigation buttons select the seconds off 15 seconds or 30 seconds The selec ted function is displayed inversely Even in switched on mode the backlighting only remain...

Page 51: ...ter or change the year month day hours and minutes successively using the navigation buttons The current function is shown on black background Confirm each of your settings with The setting is saved a...

Page 52: ...selection of transcribers will be offered for each new dictation No entry no typist is chosen for the dictation Automatic each new dictation will be assigned to the same transcriber Confirm your choi...

Page 53: ...entry or Automatic On request A selection of formats will be offered for each new dictation No entry no dictation type was chosen Automatic each new dictation shows the same dictation type Confirm yo...

Page 54: ...Select On request No entry or Automa tic On request a group may be selected for each new dictation No entry no group selected Automatic each new dictation has the same group Confirm your selection wit...

Page 55: ...arallel opera tion and confirm with the right selection button The dictation machine remains in dictation mode when USB connected The PC supplies it with power Select Auto connect automatic USB parall...

Page 56: ...ions via headphones connected to the Digta Station Select the menu item Speaker in the settings menu and confirm with the right selection button Select Speakers on or Speakers off Confirm with the rig...

Page 57: ...o to menu item FFWD Rewind and confirm with Use the navigation buttons to select the speed The selected function turns black Very slow FFWD Rewind speed approx 1 3 of the fast setting Slow FFWD Rewind...

Page 58: ...e pedals on the foot control are designed for hands free dictation Left pedal Reverse Middle pedal Pressbriefly to switch recording on or off same function as the red recording button DICT on the dict...

Page 59: ...e menu_ ______________________ Foot control assignment for play back The pedals on the foot control are designed for tran scription operation Left pedal Reverse Middle pedal Fast forward Right pedal S...

Page 60: ...n The automatic back space function is only available when the foot control is set to play back In hands free dictation mode foot control set to record the right pedal does not perform automatic backs...

Page 61: ...ount till 9999 You should not reset the counter too often to avoid conflicts with dictations having the same name and being stored on the PC Go to the Reset counter menu item and confirm with The Rese...

Page 62: ...ation machine as well as each time you reactivate it from the Sleep mode Select the PIN menu item from the settings menu and confirm with the right selection button Enter the old PIN via the navigatio...

Page 63: ...isplayed Go to the Version menu item and confirm with The serial number of your dictation machine and the version number of the firmware software appear in the display Note For information on new soft...

Page 64: ...t to delete the internal memory Confirm the complete formatting of the memory or the memory card with the right selection button An egg timer appears during the formatting process the progress is illu...

Page 65: ...ensitivity dictation low middle sensitivity Voice Activation off Switch off automatically after 5 minutes Audio signals 15 seconds Lighting automatic Time date 01 01 2005 00 00 Workflow lists Typist d...

Page 66: ...he menu display Select the language menu item and confirm with the right selection button Select the desired language with the navigation but tons and confirm with the right selection button Settings...

Page 67: ...ndi cator at the Digta Station of the PC Additionally you may use a USB audio function to dic tate into the Grundig PC software or in voice recognition systems Foot control The connection of a foot co...

Page 68: ...make you a mobile member on the dictation network You have all author and transcriber addresses at your fingertips for sending dictations Your typing pool is perfectly organized with dictations identi...

Page 69: ...ected to one dictation machine at a time If you connect a second dicta tion machine to the USB interface the PC will not detect it i e Windows will only display one removable disk drive USB parallel o...

Page 70: ...der Start the recording in your sound program and speak the message The red LED at the dictation machine lights up the disc symbol is spinning Press the button and hold on pressing it to mute the micr...

Page 71: ...ictations with the same information you can configure your dictation machine accordingly If you are a member of a pre installed dictation network you will find all available settings in the PC softwar...

Page 72: ...the PC Switch on the dictation machine The symbol appears on the display of the device and the dictation machine is identified by the PC as a removable disk You will find the gh0415 hex file on the ww...

Page 73: ...Do not interrupt the loading process for any reason This could make the dictation machine inoperative Then format the memory in the dictation machine see Settings in the menu Formatting Note If you wi...

Page 74: ...oftware that analyzes the DSS header e g a database system The detected codes are displayed by the PC software supplied with the portable dictation machine and by the desktop software in the overview...

Page 75: ...y as a memory card Note Only plug in or unplug the DigtaScan when the portable dictation machine is switched off Plug the DigtaScan into your dictation machine as depicted below Note Make sure that th...

Page 76: ...e locking screw if present Press the latch on the back of the DigtaScan The Digta Scan is unlocked and you can now pull it out of the memory card slot See the illustration on previous page DIGTASCAN 4...

Page 77: ...tons to select the sub menu and then press the button Use the navigation buttons to select or and then press when you create dictations with the new but ton you are prompted to scan You can now scan i...

Page 78: ...dictation as usual If you want to scan a barcode point the barcode reader at the barcode as pictured and press the button The device now scans the code with a red laser beam The machine acknowledges...

Page 79: ...codes that you have scanned and included in dictations with are stored in the Topic field in the new dictation s accompanying note Displaying a barcode for a dictation Push the slide switch to STOP Us...

Page 80: ...ttons to select and then press the button and appear in the display along with the number of the dictation Point the reader at the barcode and press the button The device now scans the code with a red...

Page 81: ...ess the button Use the navigation buttons to select and then press the button Point the reader at the barcode and press the but ton The scanned barcode appears in the display Press to confirm the barc...

Page 82: ...e dicta tion whose barcode is to be deleted Press the button Use the navigation buttons to select and then press the button Use the navigation buttons to select and then press the button The barcode a...

Page 83: ...cognition accuracy Programming code table We provide a table with programming codes in barcode format You can open this PDF table with Acrobat Reader You can print the required programming codes and t...

Page 84: ...uired programming codes from the programming code table There are usually two programming codes displayed for the usable barcode symbologies the upper for activation ENABLE and the lower for deactivat...

Page 85: ...n Use the navigation buttons to select The PROG BARCODE menu function appears in the display Note see also Restoring the default settings Scan in the programming code with the button The machine ackno...

Page 86: ...ation machine Switch on the dictation machine Push the slide switch to STOP Press the button Use the navigation buttons to select and then press the button Use the navigation buttons to select The PRO...

Page 87: ...ctations according to the scanned codes The detected codes are displayed by the PC software included with the portable dictation machine and by the desktop software in the overview of the accompanying...

Page 88: ...select and then press the button Use the navigation buttons to select or and then press OK when you create a dictation with the new button you will be prompted to it You can now scan a RFID code and...

Page 89: ...ess the button The device will now scan the RFID code If the RFID code was successfully scanned the device will ack nowledge this by emitting a single tone The RFID code appears in the display If you...

Page 90: ...ote Additional functions The RFID Reader has the same functions as the barcode reader See the chapters on the barcode reader for further informa tion on operation The menu is located under Displaying...

Page 91: ...DSS format cannot be played back Remedy Play back the dictation on another dictation machine or on the PC If available load new firmware which is able to play back this DSS format 1585 Not supported...

Page 92: ...dictation machine powered from the USB port on your PC 8322 BATTERY LOW Battery voltage too low for formatting Remedy Recharge the batteries or operate the dictation machine powered from the USB port...

Page 93: ...ARE INCORRECT The gh0415 hex firmware file contains false data e g firmware of another device Remedy Perform an update with another gh0415 hex 9756 NOMEMORY Partial deletion has not started since ther...

Page 94: ...the accom panying note for the dictation 9801 INSERT TO INFO FORBIDDEN The current position of the dictation is contained in an informa tion It is not possible to insert into information Remedy Delet...

Page 95: ...ard is not supported e g a card with more than 2 GB Remedy Use a DigtaCard by Grundig Business Systems 17992 MEDIA DAMAGED The internal memory or external memory card is faulty Remedy Replace old MMC...

Page 96: ...ssed at the same time no firmware file is found Remedy Copy a file with the name gh0415 hex into the SYSTEM folder and start the load of the old ver sion afterwards All messages with different numbers...

Reviews: