background image

ENGLISH

30­

USB-MODE

­----------------------------------------------------------------------------------------------------------------------------------

The­file­browser­

The file browser displays the data (AVI., JPEG, 

MP3, MP4 or WMA data) that the external 

data medium offers.
If a data medium contains different file formats, 

you can deactivate data you do not need for 

the playback using a filter function (All Sup-

ported, Text, Movie, Music, Photo).

All Supported

A

a

s

S

1/1

PMP

\:C

Bilder
Musik 1
Musik 2
Filme

1

2

3

4

5

6

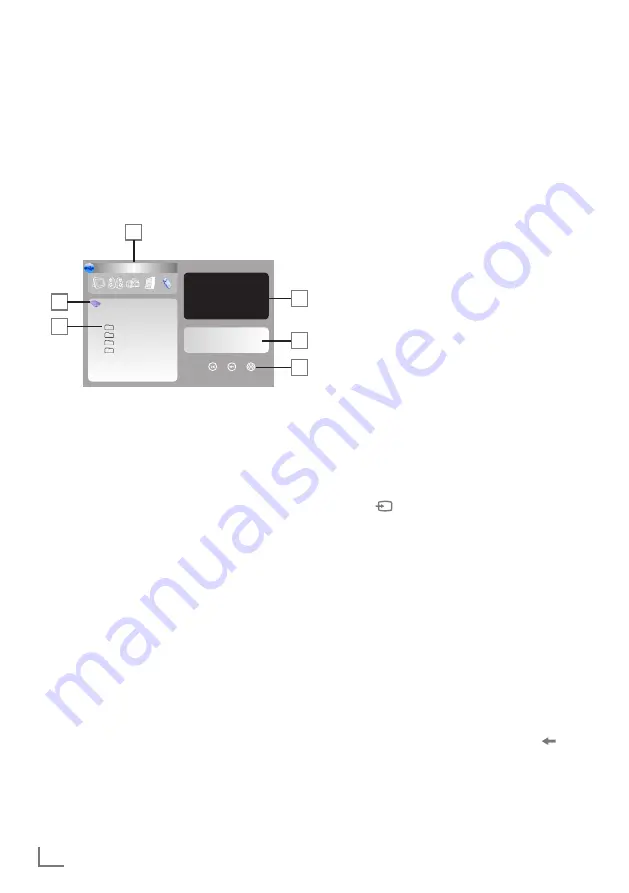
The­main­menu­of­the­file­browser

1

 Selected data format.

2

 Name of the data medium.

3

 Total folders on the data medium.

4

 Inset picture of a selected JPEG picture.

5

  Status information for the selected file.

6

  Repeat functions.

Settings­in­the­USB­setup­menu

Opening­the­USB­setup­menu

1

 Open the menu with »

M

«.

  – The »PICTURE« menu is displayed.

2

 Select the »USB SETUP« menu with »

r

« or 

»

e

«.

Note:

Additional operations are explained in the 
following sections.

Switching­on­automatic­preview

If the automatic preview is switched on, you can 

see the selected JPEG picture in the main menu 

of the file browser.

1

 Select »Auto Preview« with »

q

« or »

w

«

2

 Press »

r

« or »

e

« to switch on the (on) func-

tion.

3

 Press »

M

« to end the setting.

Selecting­the­display­duration­of­

the­slideshow

1

 Select »Slide Show Interval« with »

q

« or »

w

«.

2

 Select the time (3, 5, 10 seconds) with »

r

« or 

»

e

«.

3

 Press »

M

« to end the setting.

Selecting­the­display­mode

1

 Select »View Mode« with »

q

« or »

w

«.

2

 Press »

r

« or »

e

« to select the function.

3

 Press »

M

« to end the setting.

Playback­–­Basic­functions

1

 Press »

« to select data medium, press »

q

« 

or »

w

« to select »USB« and press »

OK

« to 

confirm.

  –  The file browser (the “Contents”) of the 

data medium is displayed.

2

 Select file format (All Supported, Text, Movie, 

Music, Photo) with »

r

« or »

e

«.

3

 Switch to the file overview with »

OK

«.

4

 Select the file you want with »

q

« or »

w

« and 

press »

OK

« to confirm.

  –  A list of sub-directories appears. 

Note:

Switch back to the main folder with » «.

5

 Select the track or picture with »

q

« or »

w

« 

and start play by pressing »

8

!

« (red).

  –  You can view information on the film by 

pressing »

« (red).

Summary of Contents for 19 VLC 2001 C

Page 1: ...mes 20 Recording 21 Setting programmes for recording 22 Playback 23 Sorting or deleting programmes in the recording list 24 TELETEXT MODE 24 FLOF text and normal text mode 24 Additional functions 25 C...

Page 2: ...switched off it can be dam aged by a lightning strike to the mains or the antenna cable Always disconnect the mains and antenna plugs during a storm 7 Clean the screen with a soft damp cloth Only use...

Page 3: ...e digital stations are converted by the television set and can be on the built in USB external data media for example an external hard drive and USB memory stick 7 Function Time Shift is a special tec...

Page 4: ...a you may have to try it out at different positions until you get the best reception 2 Plug the mains cable supplied into the AC IN mains socket of the television 3 Plug the mains cable into the wall...

Page 5: ...r reacts properly to remote control commands the batteries may be flat Be sure to remove used batteries 7 The manufacturer accepts no liability for damage re sulting from used batteries Environmental...

Page 6: ...I1 HDMI socket audio video input HDMI ANT IN Antenna socket U Headphone connection 3 5 mm jack USB USB socket for external data media and PVR function HDMI2 HDMI socket audio video input HDMI CI Commo...

Page 7: ...ats Zapping function Opens the pre selection for AV channels and the USB input Then select with q or w and con firm using OK Switch the television on from standby mode select channels in steps Opens t...

Page 8: ...browser and switches to play back pause Start playback in the file browser green E E Selects a page in teletext mode starts the reverse picture search in the file browser yellow 7 Freeze frame selects...

Page 9: ...t is not already supplied with a voltage via a mains plug or similar supply 7 Otherwise you may cause a short circuit and irreparably damage your antenna 3 Select the Active Antenna Power with q or w...

Page 10: ...re sets 1 In the Programme Table menu press q or w to select the channel to be moved 2 Press green to highlight the channel 3 Enter the new presets with one two or three digits using 1 0 4 Press OK to...

Page 11: ...55 Sharpness 50 Colour Temperature Medium Select Back Exit Picture settings 1 Open the menu with M The PICTURE menu is displayed 2 Select Picture Mode Brightness Con trast Colour Sharpness or Colour...

Page 12: ...nnels broadcast at different volumes The automatic volume limiting AVL function means the volume is kept the same when you switch between channels 1 Select AVL with q or w and then select On with r or...

Page 13: ...ctivities surroundings scene changes or the appearance the gestures and facial expressions of the actors are described This sound is transmitted at the same time as the normal sound with digital telev...

Page 14: ...nel position with q or w and press OK to confirm 3 Switch back to the television channel with 1 0 Switching between digital and ana logue channels 1 Open the INPUT Source menu by press ing 2 Press q o...

Page 15: ...s EPG to see programme information Notes 7 Not all stations supply provide a detailed TV guide 7 Many broadcasters supply the daily pro gramme but no detailed descriptions 7 There are broadcasters whi...

Page 16: ...nal sources from a set top box on the Euro AV socket the picture fills the screen completely and with the correct geom etry 4 3 format The picture is shown in 4 3 format LetterBox format The letterbox...

Page 17: ...television 2 Yes appears when you connect the data medium Select No with e and press OK to confirm Settings for PVR mode Note 7 The PVR File System menu can only be se lected during live use when usi...

Page 18: ...confirmed by pressing OK the external data medium is format ted this can take some time 6 Press M to end the setting Testing the external data medium After formatting the external data medium you can...

Page 19: ...e Broadcast appears The scenes in the time shift memory are deleted Recording You can record programmes The data for these programmes is recorded on an external data medium and this archive is adminis...

Page 20: ...otes 7 Before you start timer recording a warn ing message appears with a 20 second countdown this gives you the opportunity to switch back to the set television channel 7 If the timer recording start...

Page 21: ...ars 2 Press q or w to select the broadcast and or OK to start playback 3 Press 7 to end playback The television switches to the current broad cast Forward reverse picture search 1 During playback pres...

Page 22: ...e the programme 4 Confirm the security query by using q or w to select the Yes button and press OK to confirm Note 7 You cannot delete programmes in the Re cording list menu which are currently being...

Page 23: ...can double the character size 1 To enlarge the character size of a teletext page press DOUBLE repeatedly Page stop A multiple page may contain several sub pages which are automatically scrolled by the...

Page 24: ...ing with q or w and press OK to confirm 3 Select Primary or Secondary with q or w and press OK to confirm 4 Press r or e to make the setting 5 Select Close with q or w and press OK to confirm 6 Press...

Page 25: ...ision channels which are not suitable for children using a per sonal PIN code 1 Select Block Programme with q or w and press OK to confirm The Block Programme menu appears 2 In the Block Programme men...

Page 26: ...reset volume and the desired channel after the set time in stand by mode has elapsed 1 Select On Time with q or w and press OK to confirm 2 Select Activate with q or w and press r or e to choose when...

Page 27: ...tch off the function by pressing r or e to set it to Off 3 Press M to end the setting Setting the time zone The television automatically detects the local dif ference to Greenwich Mean Time the select...

Page 28: ...o a data medium along with other file types The files can be compiled in folders This struc ture is similar to that of an MP3 CD Connecting external data media 7 Before connecting the data medium swit...

Page 29: ...f the automatic preview is switched on you can see the selected JPEG picture in the main menu of the file browser 1 Select Auto Preview with q or w 2 Press r or e to switch on the on func tion 3 Press...

Page 30: ...w and highlight with OK 3 Start playback with 8 red 4 Press 7 yellow to end playback Note 7 To remove the highlighting select the track with q or w and switch off the marking with OK Selecting a track...

Page 31: ...ect your external devices to depends on the sockets the external device is equipped with and the signals which are available 7 Note that with many external devices the res olution of the video signal...

Page 32: ...ignal stereo analogue 7 Channel position SCART 1 Connect the SCART socket on the televi sion and the corresponding socket on the external device using a EURO AV cable video and audio signal Note 7 If...

Page 33: ...confirm Headphones Connecting the headphones 1 Plug the headphone jack 3 5 mm jack plug into the headphone socket on the right side of the television Note 7 Prolonged listening with the head phones at...

Page 34: ...8 picture fre quency 60 Hz Selecting the channel position for the PC 1 Press select the PC channel with q or w and press OK to confirm Settings for the PC 1 Open the menu with M The PICTURE menu is di...

Page 35: ...Interface slot go to the CA Module sub menu Access control for CA module and smart card 1 Open the menu with M The PICTURE menu is displayed 2 Select the CHANNEL SETUP menu with r or e and confirm wi...

Page 36: ...he Cable and press OK Scan Type is active 7 Press r or e to select the scan type Quick or Full Quick scanning function sets the channels according to the cable operator information in the broadcasting...

Page 37: ...or w and press r or e to make the setting 5 Select the Scan Type with q and press r or e to select the DTV 6 Select the TV Connection Type with q Press r or e to select the Aerial 7 Press OK to start...

Page 38: ...tion by pressing q or w and press r or e to make the setting 5 Select the Scan Type with q Press r or e to select the ATV display and start the search with OK Analogue Manual Tuning System BG Current...

Page 39: ...t preset change or enter the name of a stations as well as skip channels Select channel lists 1 Open the menu with M The PICTURE menu is displayed 2 Select the CHANNEL SETUP menu with r or e and confi...

Page 40: ...witch to the symbol and press OK to highlight the television chan nel The channel is marked with Note 7 Channels can be enabled again Press q or w to select the channel press e to switch to the symbol...

Page 41: ...TURE menu appears 2 Select the OPTIONS menu with r or e 3 Select the Software Update menu by press ing q or w 4 Press OK to start the software update The software is updated automatically if possible...

Page 42: ...tan dards EN 60065 EN 55013 EN 55020 EN 55022 EN 55024 Environmental note This product has been made from high quality parts and materials which can be re used and recycled Therefore do not throw the...

Page 43: ...setting Automatic or manual channel setting fine tuning Antenna Have antenna cable or system checked No colour Colour intensity at maximum Turn up the colour TV standard setting if setting option is...

Page 44: ...e of plug is used it must be protected by a 5A fuse either in the plug or at the distribution board If this type of plug be comes defective ensure that the fuse is removed before disposal to eliminate...

Page 45: ...www grundig com 10 23 72011 742 1500...

Reviews: