


Whenever changing blade or adjusting blade
tension or tracking, blade support bear-
ings and blade guides must be re-adjusted
before resuming operation to ensure proper
blade support.
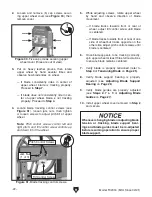
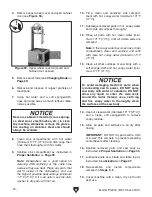
Figure 30. Five cap screws securing upper
wheel cover (three are out of view).
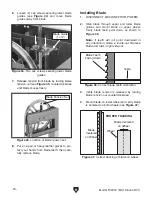
Figure 31. Blade tracking control screws.
-22-
Model T32304 (Mfd. Since 02/21)
2. Loosen and remove (5) cap screws secur-
ing upper wheel cover (see
Figure 30), then
remove cover.
3. Put on heavy leather gloves, then rotate
upper wheel by hand several times and
observe how blade rides on wheel.
— If blade consistently rides in center of
upper wheel, blade is tracking properly.
Proceed to
Step 7.
— If blade does not consistently ride in cen-
ter of upper wheel, blade is not tracking
properly. Proceed to
Step 4.
4. Locate blade tracking control screws (see
Figure 31), loosen jam nuts, then tighten
or loosen screws to adjust pitch/tilt of upper
wheel.
Note: Pitch control screws control left and
right pitch, and tilt control screw controls up
and down tilt of the wheel.
5. While adjusting screws, rotate upper wheel
by hand and observe direction of blade
movement.
— If blade tracks towards front or rear of
wheel, adjust tilt control screw until blade
is centered.
— If blade tracks towards front or rear of one
side of wheel but tracks opposite on the
other side, adjust pitch control screws until
blade is centered.
6. Once blade appears to be tracking correctly,
spin upper wheel at least three full revolutions
to ensure blade remains centered.
7. Verify blade is properly tensioned (refer to
Step 4 of Tensioning Blade on Page 25).
8. Verify blade support bearing is properly
adjusted (see
Adjusting Blade Support
Bearing on Page 26).
9. Verify blade guides are properly adjusted
(see
Steps 2–7 & 9 of Adjusting Blade
Guides on Page 27).
10. Install upper wheel cover removed in Step 2
and secure.
Tilt Control Screw
Pitch Control Screws
Jam Nut
(1 of 3)
Summary of Contents for T32304
Page 52: ......