-30-
Model T32002 (Mfd. Since 02/20)
Operation
Symptom
Possible Cause
Possible Solution
M
achine slows when
operating.
1. Operator is using too much pressure.
2. RPM too low.
1. Use less pressure when grinding/buffing.
2. Adjust RPM.
Wavy condition
on surface of
workpiece.
1. Machine vibrating.
2. Workpiece not being held firmly.
3. Grinding wheel face uneven.
4. Grinding wheel is too hard.
1. Make sure machine is securely mounted on a solid
surface (
Page 17).
2. Use a holding device to firmly retain workpiece.
3. Dress grinding wheel (
Page 28).
4. Use softer wheel (
Page 20)/reduce feed rate.
Lines on surface of
workpiece.
1. Impurity on grinding wheel surface.
2. Workpiece not being held tightly.
1. Dress grinding wheel (
Page 28).
2. Use a holding device to firmly retain workpiece.
Burning spots
or cracks in the
workpiece.
1. Improper type of grinding wheel.
2. Improper feed rate/spindle speed.
3. Workpiece requires quenching to keep
cool.
1. Try a wheel which is softer style or coarser grit
(
Page 20).
2. Slow down rate of movement of workpiece into
wheel/spindle speed.
3. Quench workpiece in water to cool.
Grinding wheel dulls
quickly, grit falls off.
1
. Workpiece pressure too great.
2. Wheel is too soft for material being ground.
3. Wheel diameter too small.
4. Wheel dressed incorrectly.
5. Defective wheel bonding.
1
. Use less workpiece pressure.
2. Use harder bond (
Page 20).
3. Replace wheel (
Page 22).
4. Re-dress wheel (
Page 28).
5. Consult manufacturer of grinding wheel/replace
wheel.
This machine is equipped with a universal motor
that uses two carbon brushes to transmit electri-
cal current inside the motor.
These brushes are considered to be regular
"wear items" or "consumables" that will need to
be replaced during the life of the motor. The fre-
quency of required replacement is related to how
much the motor is used and how hard it is pushed.
Replace both carbon brushes at the same time
when the motor no longer reaches full power, or
when the brushes measure less than
3
⁄
16
" long
(new brushes are
3
⁄
8
" long).
Items Needed
Qty
Phillips Head Screwdriver #2 ............................ 1
Carbon Brushes (PN PT32002026) ...........1 Pair
To replace motor brushes:
1. DISCONNECT MACHINE FROM POWER!
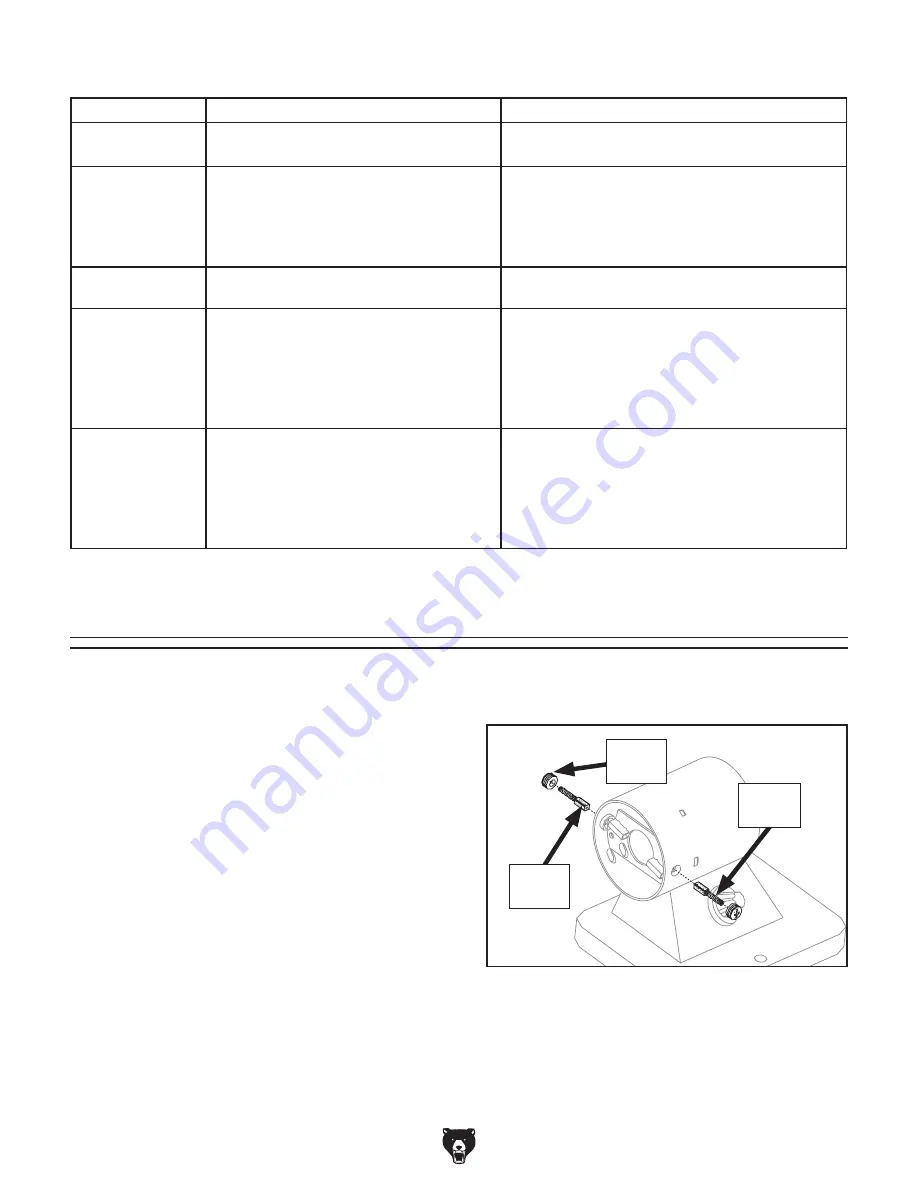
2. Remove brush caps, brush springs, and worn
brushes from motor (see
Figure 23).
Figure 23. Location of motor brushes (wheel
cover removed for clarity).
Brush
(1 of 2)
Cap
(1 of 2)
Spring
(1 of 2)
3. Replace both motor brushes and re-install
with springs and brush caps.
Replacing Motor Brushes
Summary of Contents for T32002
Page 36: ......

