background image

Overview

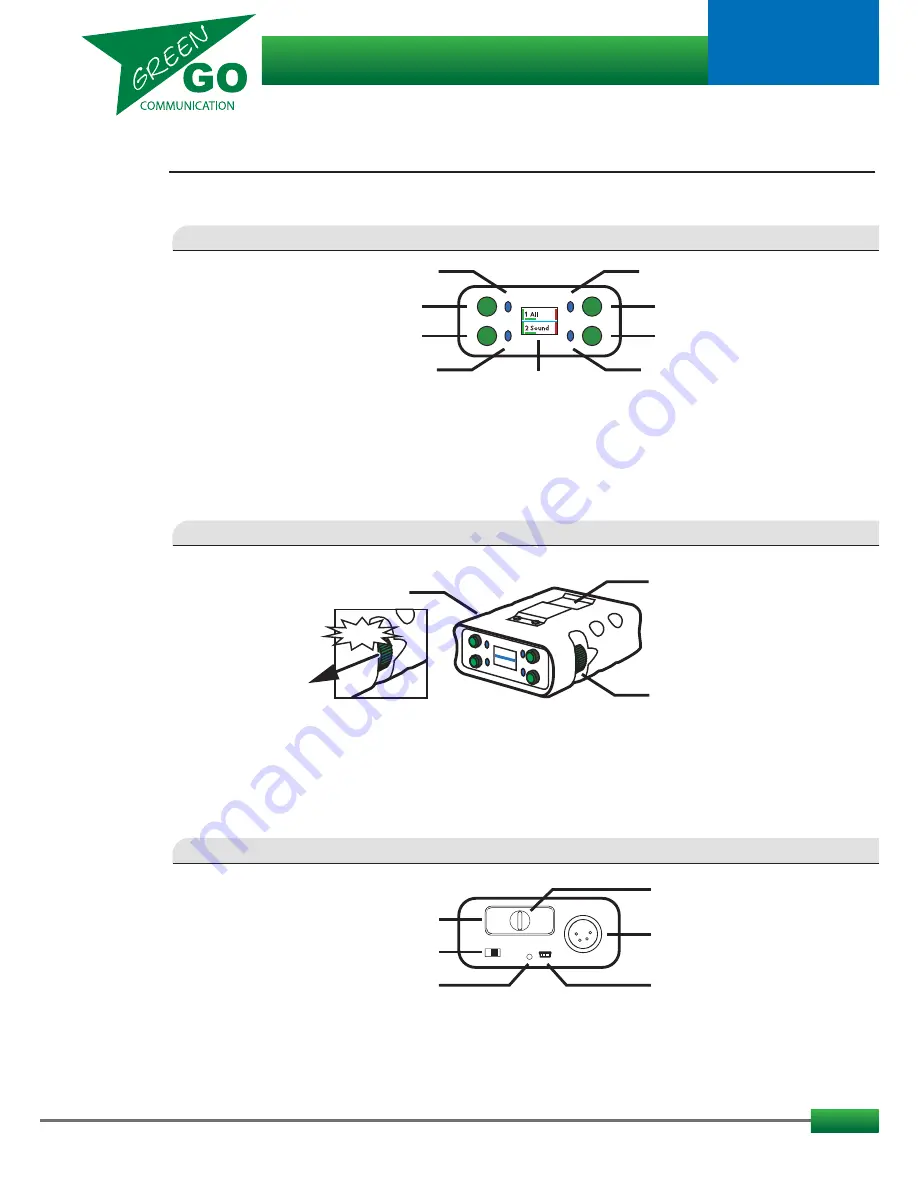
Indicator LEDs 1- 4: 

Indicates Pushbutton activity

Pushbuttons 1- 4:


The Pushbuttons are used for communication functions, such as Talk and Call and 


are also used in combination with the Encoders.

Display: 


A full-colour OLED high-resolution display provides text information, cue signals, 


and shows the functions of the 4 buttons

Battery bay:  

For easy change of Li-Ion battery GGO-NGRP

mini USB connector: 

Used for charging the battery and PC/MAC connection


Slider:


Turns power ON/OFF and be used for Force Reconnect, if this feature is enabled. 

Indicator LED: 

    Battery charging indicator. Red when charging.

XLR-4 pin: 

For connecting Headset 

Clickbutton Encoders:  

Used for scrolling and selecting when navigating the menu. 


Also controls functionalities, such as volume and channel selection.


One on each side allows for easy operation for both right and left handed users. 

Beltclip:   


Yes, you guessed it. For easy attachment of the beltpack.

2

Clickbutton Encoder

Beltclip

Clickbutton Encoder

Indicator LED 4

Indicator LED 3

Indicator LED 2

Display

Indicator LED 1

Pushbutton 1

Pushbutton 2

Pushbutton 3

Pushbutton 4

XLR 4 pin

Battery bay

mini USB

Battery Quarter Turn Lock

Indicator LED

Slider

REAR VIEW

FRONT VIEW

SIDES + BOTTOM VIEW

CLICK!!

Green Go Wireless Beltpack

model nr. GGO-WBPX

User guide

Summary of Contents for GGO-WBPX

Page 1: ...configuration See the Functions and How to sections for more information about the Configuration file Whats in the box Wireless Beltpack 1800 mAh Li Ion Battery miniUSB USB cable USB Charger 1 Overvi...

Page 2: ...ed Indicator LED Battery charging indicator Red when charging XLR 4 pin For connecting Headset Clickbutton Encoders Used for scrolling and selecting when navigating the menu Also controls functionalit...

Page 3: ...umes Roaming The Beltpack can be set to search roam for and connect to another paired antenna in order to obtain a better signal This requires that the roaming function has been enabled The settings a...

Page 4: ...Start pairing Click Start pairing The display will read Registering When done the display will read Registered and the Antenna will appear in that slot It can take a few seconds for the display to up...

Page 5: ...he UI layout When changing the UI it will affect which functions are available and where to find them For changing the UI enter the Setup Menu and scroll to Device Options and click Enter Scroll to UI...

Page 6: ...volume The encoders can however be assigned new functions These functions can be None Side Tone Program Volume and Main Volume To do this enter the Setup Menu Scroll to Device Options and Click Enter...

Page 7: ...assign them to a channel For fastest access place the Users and Groups you have most interaction with at the lowest channel number Channel assignment To have access to a specific User or Group via the...

Page 8: ...hen you do not need to hold in the pushbutton to Talk A simple buttonpress to enable Talk and another buttonpress to disable Talk Listen on Talk If Listen on Talk is on Talking on a Muted channel will...

Page 9: ...her own speakers headset This can be done in the Setup Menu Audio settings SideT Talk Is to enable your microphone audio to be transmitted to an assigned channel user or group This is done by pressin...

Page 10: ...elect channel to assign User or Group to Exit Go back ID 258 ID of User or Group assigned to the channel Exit Go Back Group Assign Group to channel User Assign User to channel None Remove assignee fro...

Page 11: ...0 5 s Isolate If you enable Talk on a channel all other channels will or will not be muted Default Off Range On Off Buzzer Enable or disable the buzzer sound that will sound if an alert is received De...

Page 12: ...ct Enabled Force Reconnect Setup Country Select region for change off frequency band Exit Go Back Europe US Japan Device Options Exit Go Back UI 2 part Select the displays UI layout This will also aff...

Page 13: ...olume Batt Low Enable or disable Battery Low warning Warning will display and alert will sound for 1 sec The interval between warnings will decrease as power is getting lower Default ON Range ON Off B...

Page 14: ...ration file on all units If you go to the setup menu clone config and check to see if more than one config is available There is an echo on the system Establish if any microphones are open close to sp...

Page 15: ...Gate Threshold Sidetone level All wired units Noise Latency mic network headphone Wireless beltpack Noise Latency mic network headphone Frequency response standard Frequency response enhanced Enhance...

Reviews: