background image

65

Installation and Maintenance

Service Manual

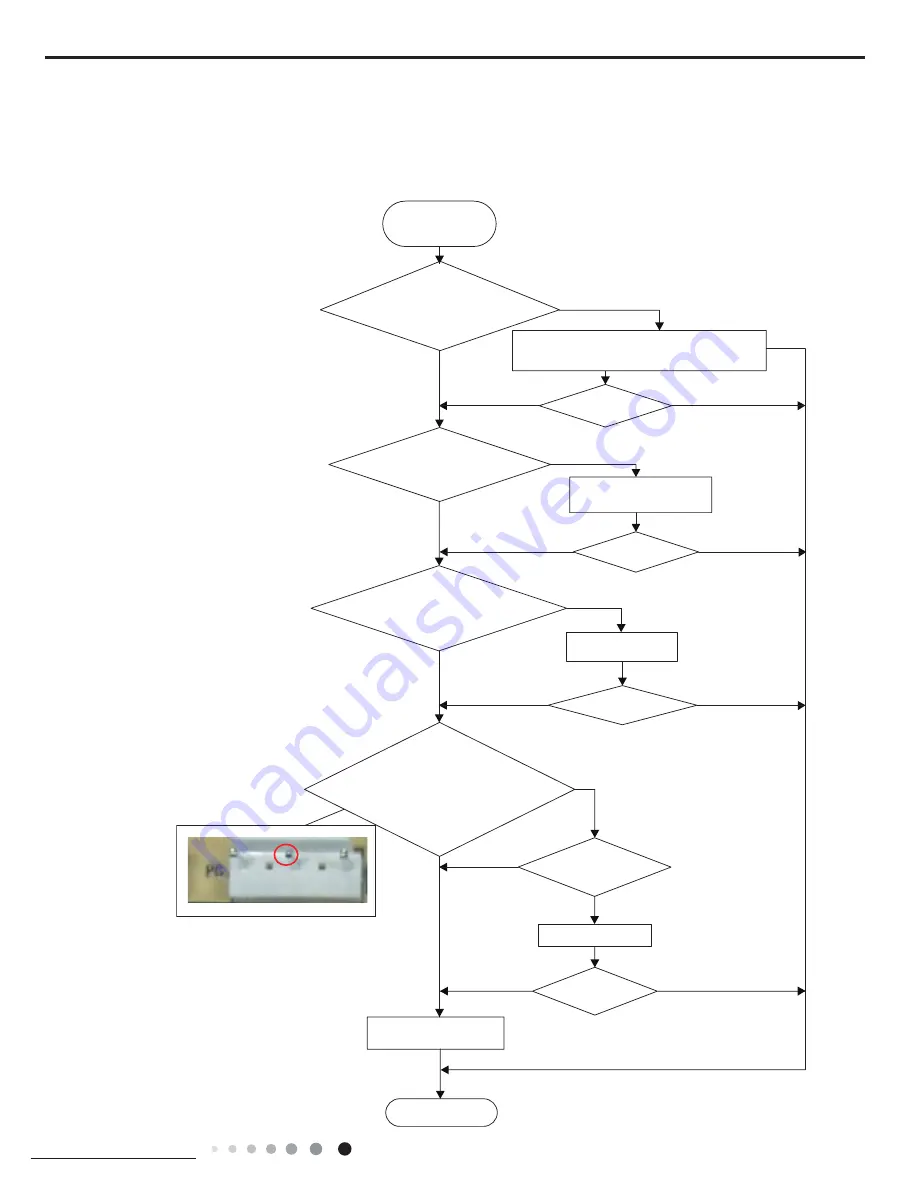
(2) Malfunction of Blocked Protection of IDU Fan Motor H6

Main detection points:
● SmoothlyIs the control terminal of PG motor connected tightly?
● SmoothlyIs the feedback interface of PG motor connected tightly?
● The fan motor cant operate?
● The motor is broken?
● Detectioncircuit of the mainboard is defined abnormal?
Malfunction diagnosis process:

Start

While power is off stir the blade 

with a tool to see whether the 

blade rotates  smoothly 

Check if the connection of PG 

motor feedback terminal is firm

Check if the connection of PG 

motor control terminal is firm

Turn on the unit again; measure 

whether the output voltage on 

control terminal for PG motor is 

more than 50V  within 1 min after 

the louvers are opened

Tighten the screw; reassemble the blade, motor 

and shaft bearing rubber base sub-assy to make 

sure there is no foreign object between them

Yes

Yes

Yes

Yes

Yes

Yes

Yes

Yes

Yes

Yes

No

No

No

No

No

No

No

No

No

Is malfunction 

eliminated

Is malfunction 

eliminated

Is malfunction 

eliminated

Is malfunction 

eliminated

Is the motor started up

Replace PG motor

Replace the mainboard 

with the same model

Measure the voltage of this foot to 

neutral wire on the mainboard

End

Reinstall the blade 

and motor correctly

Insert the control terminal 

of PG motor tightly

Summary of Contents for GWH09ACC-K6DNA1A

Page 1: ...els Change for life GREE ELECTRIC APPLIANCES INC OF ZHUHAI GWH09ACC K6DNA1A GWH12ACC K6DNA1D GWH12ACC K6DNA4D GWH12ACC K6DNA5D GWH18ACD K6DNA1D GWH18ACD K6DNA5D GWH18ACD K6DNA4D GWH24ACE K6DNA1A Refri...

Page 2: ...Printed Diagram 22 6 Function and Control 26 6 1 Remote Controller Introduction 26 6 2 GREE App Operation Manual 32 6 3 Ewpe Smart App Operation Manual 33 6 4 Brief Description of Modes and Functions...

Page 3: ...1 Indoor Unit 79 10 2 Outdoor Unit 86 11 Removal Procedure 93 11 1 Removal Procedure of Indoor Unit 93 11 2 Removal Procedure of Outdoor Unit 98 Appendix 113 Appendix 1 Reference Sheet of Celsius and...

Page 4: ...GWH09ACC K6DNA1A I GWH12ACC K6DNA1D I GWH18ACD K6DNA1D I Outdoor Unit GWH12QC K6DNA1D O GWH09ACC K6DNA1A O Remote Controller YAC1FB9 WiFi GWH18QD K6DNA1D O GWH24QE K6DNA1E O GWH24ACE K6DNA1A I GWH12AC...

Page 5: ...GWH12ACC K6DNA5D CB341000600 GWH12ACC K6DNA5D I CB341N00600 GWH12QC K6DNA1D O CB419W15500 6 GWH12ACC K6DNA1D CB497001600 GWH12ACC K6DNA1D I CB497N01600 7 GWH18ACD K6DNA1D CB497002100 GWH18ACD K6DNA1D...

Page 6: ...r Unit Product Code CB497N03000 CB497N03000 Fan Type Cross flow Cross flow Fan Diameter Length DXL mm 98X633 5 98X633 5 Cooling Speed SS H MH M ML L SL r min 1200 1100 1050 950 900 850 800 1200 1100 1...

Page 7: ...Output W 30 30 Fan Motor RLA A 0 36 0 36 Fan Motor Capacitor F Outdoor Unit Air Flow Volume m3 h 1600 1600 Fan Type Axial flow Axial flow Fan Diameter mm 400 400 Defrosting Method Automatic Defrosting...

Page 8: ...NA5D I Indoor Unit Product Code CB497N01600 CB497N01602 CB344N00700 CB497N01600 CB341N00600 Fan Type Cross flow Cross flow Fan Diameter Length DXL mm 98X633 5 98X633 5 Cooling Speed SS H MH M ML L SL...

Page 9: ...900 Fan Motor Power Output W 30 30 Fan Motor RLA A 0 36 0 36 Fan Motor Capacitor F Outdoor Unit Air Flow Volume m3 h 2200 2200 Fan Type Axial flow Axial flow Fan Diameter mm 438 438 Defrosting Method...

Page 10: ...4D I Indoor Unit Product Code CB497N02100 CB341N00700 CB497N02100 CB497N02102 CB344N00900 Fan Type Cross flow Cross flow Fan Diameter Length DXL mm 106X706 106X706 Cooling Speed SH H M L SL r min 1230...

Page 11: ...otor Speed rpm 800 800 Fan Motor Power Output W 60 60 Fan Motor RLA A 0 4 0 4 Fan Motor Capacitor F Outdoor Unit Air Flow Volume m3 h 3200 3200 Fan Type Axial flow Axial flow Fan Diameter mm 520 520 D...

Page 12: ...Product Code CB497N01900 CB497N01903 CB344N00800 CB497N01900 Fan Type Cross flow Cross flow Diameter Length DXL mm 108X830 108X830 Fan Motor Cooling Speed SH H M L SL r min 1250 1150 1050 950 900 850...

Page 13: ...800 Fan Motor Power Output W 60 60 Fan Motor RLA A 0 58 0 58 Fan Motor Capacitor F Outdoor Unit Air Flow Volume m3 h 3200 3200 Fan Type Axial flow Axial flow Fan Diameter mm 520 520 Defrosting Method...

Page 14: ...i l o o C Outdoor temp C Capacity ratio Outdoor temp C g n i t a e H Capacity ratio Outdoor temp C g n i t a e H Capacity ratio Outdoor temp C Heating operation ambient temperature range is 15 C 24 C...

Page 15: ...door unit Compressor revolution rps Indoor Outdoor P MPa T1 C T2 C 27 19 35 24 09K 0 8 1 1 12 to 15 65 to 38 TURBO High 57 12K 0 8 1 1 11 to 14 64 to 37 60 18K 0 9 1 1 12 to 14 75 to 37 52 24K 0 9 1 1...

Page 16: ...2 W3 09 12K 889 294 212 201 5 541 5 146 18K 1013 307 221 125 5 685 202 5 24K 1122 329 247 207 685 230 09 12K 18K 24K Unit mm D H W 75 35 55 W3 W2 W1 55 35 75 D H W 35 55 W3 W2 W1 55 35 79 154 43 W1 W2...

Page 17: ...14 Technical Information Service Manual 3 2 Outdoor Unit 780 596 848 286 540 257 320 Unit mm 12K 18 24K 340 963 700 396 890 560 364 Unit mm...

Page 18: ...15 Technical Information Service Manual Unit mm 09K 712 782 257 320 540 286 510...

Page 19: ...ic expand valve Strainer Compressor Accumlator Connection pipe specification Liquid pipe 1 4 6mm Gas pipe 3 8 9 52mm 09 12K Gas pipe 1 2 12mm 18K Gas pipe 5 8 16mm 24K Indoor unit Outdoor unit COOLING...

Page 20: ...YEGN Yellow Green BK Black VT Violet OG Orange Note Jumper cap is used to determine fan speed and the swing angle of horizontal lover for this model 60000700068803 5 21752 5 20 0 18 7 6 1625 7 03 6 1...

Page 21: ...8 1 1 1 3 1 75 2 3 0 62 7 21 6 7 3 1 8 5 127 0RWRU DSSOLHV WR WKH LURQ VKHOO PRWRU JURXQG RQO 1 225 81 7 GWH09ACC K6DNA1A O CB497W03000 GWH09ACC K6DNA1A O CB497W03001 600007000687 RI HOHFWULF VKRFN 3...

Page 22: ...25 8 1 0 1 7 5 1 3 0DLQ RDUG 2 1 1 0 3 3 1 02725 3527 725 29 5 2 5 29 203 6 7 5 9 8 203 203 9 8 8 5 0 1 7 5 1 32 5 1 1 8 1 1 1 3 1 75 2 3 1 8 5 0 62 7 21 6 7 3 1 225 81 7 127 0RWRU DSSOLHV WR WKH LURQ...

Page 23: ...5 28778 2875220 7 03 6 1625 867 7 03 6 1625 3 0 2 1 1 02725 1 3 LURQ VKHOO PRWRU RQO DSSOLHV WR WKH 1RWH 0RWRU JURXQG 6361000021801 GWH18QD K6DNA1D O CB419W15601 B 1 20B 11 5 51 1 3OHDVH GRQ W WRXFK D...

Page 24: ...0 1 7 LURQ VKHOO PRWRU RQO DSSOLHV WR WKH 127 0RWRU JURXQG 7 5 27720 7 5 1 5 3OHDVH GRQ W WRXFK DQ HOHFWURQLF FRPSRQHQW RU WHUPLQDO ZKHQ WKH PDFKLQH LV UXQQLQJ VWRSSLQJ RU KDV EHHQ SRZHUHG RII IRU OHV...

Page 25: ...wire 4 Interface of neutral wire 5 Interface of fan 6 Interface of health function live wire 7 8 Auto button Interface of WIFI 9 Up down swing interface Interface of PG feedback 10 11 12 Needle stand...

Page 26: ...ic heater 5 Terminal of 4 way valve 6 Interface of outdoor fan 7 Interface of earthing wire 8 Communication interface 9 Interface of netural wire 10 Interface of live wire 11 Terminal of electronic ex...

Page 27: ...ature sensor 3 Terminal of electronic expansion valve 4 Terminal of outdoor fan 5 Terminal of 4 way valve 6 Terminal of compressor electric heating 7 Terminal of chassis electric heating 8 Terminal of...

Page 28: ...8 9 1 Terminal of compressor 2 Terminal of electronic expansion valve 3 Terminal of temperature sensor 4 Overload terminal of compressor 5 Terminal of outdoor fan 6 Live wire 7 Communication wire 8 E...

Page 29: ...l doesn t have if press the corresponding button on the remote controller that the unit will keep the original running status After putting through the power the air conditioner will give out a sound...

Page 30: ...turning off the unit by pressing ON OFF button indoor fan will continue running for a few minutes at low speed In this period Hold fan speed button for 2s to stop indoor fan directly Having set X FAN...

Page 31: ...blink The first entering will display according to the initial curve setting value of original factory 2 Adjust and button could change the corresponding setting temperature after adjusted press Turb...

Page 32: ...e the fan speed is not available The Quiet function is only available for some models When quiet function is selected Under cooling mode indoor fan operates at notch 4 speed 10 minutes later or when i...

Page 33: ...30 Technical Information Service Manual...

Page 34: ...31 Technical Information Service Manual...

Page 35: ...l it When GREE App is installed register the account and add the device to achieve long distance control and LAN control of Gree smart home appliances For more information please refer to Help in App...

Page 36: ...App is installed register the account and add the device to achieve long distance control and LAN control of smart home appliances For more information please refer to Help in App 6 3 Ewpe Smart App O...

Page 37: ...on Ambient temperature is Tamb Tcompensation for heat pump unit and Tamb for cooling only unit 4 If theres I feel function Tcompensation is 0 Others are same as above 5 Fan mode Under this mode indoor...

Page 38: ...ote control code 01 current set temperature will be displayed 2 Only when remote control signal is switched to indoor ambient temperature display status corresponding remote control code 10 from other...

Page 39: ...door ambient temperature Tcompensation 1 unit operates according to the previous status When Tpreset Tindoor ambient temperature Tcompensation 2 compressor stops operation and outdoor fan will stop 30...

Page 40: ...rating under this mode fan speed will adjust according to auto fan speed if compressor stops operation under this mode indoor fan will be in residual heat blowing status When power on communication li...

Page 41: ...n 1 If the compressor is shut down and Tset up Tindoor ambient temperature Tcooling indoor ambient temperature compensation 0 5 C start up the machine for cooling the cooling operation will start 2 Du...

Page 42: ...witched on 2 Defrosting a Defrosting starts the compressor is shut down and restarts it after 55 second delay b Defrosting ends the compressor stops then starts it after 55 second delay 2 Outer Fans C...

Page 43: ...se it should not be started and should be stopped to treat according to the overload protection Clear the trouble at the mode of power turn off heating and the protection times are not counted 2 Frequ...

Page 44: ...rature at normal speed during discharging you should limit the frequency raising of compressor 3 Reducing frequency at normal speed and stopping machine If Tfrequency reducing temperature at normal sp...

Page 45: ...he compressor frequency by reducing 30Hz 90s till the lower limit After it was running 90s at the lower limit if T frequency reducing temperature at normal speed of module TModule you should stop the...

Page 46: ...be regarded as four way valve reversion abnormity And then it can run if stop the reversion abnormity protection for four way valve 3 min and if it still cant run when the reversion abnormity protect...

Page 47: ...stop operation 3 When 0 C Toutdoor amb 2 C the electric heating of chassis will keep original status 7 Electric Heating Function of Compressor 1 When Toutdoor amb 5 C compressor stops operation while...

Page 48: ...ore checking and maintenance 2 The air condition must apply specialized circuit and prohibit share the same circuit with other appliances 3 The air conditioner should be installed in suitable location...

Page 49: ...ere there may be leaked corrosive gas or flammable gas If there leaked gas around the unit it may cause explosion and other accidents 7 Do not use extension cords for electrical connections If the ele...

Page 50: ...area The naked flame is prohibited in the maintenance area and the no smoking warning board should be hanged Check whether the appliance mark is in good condition Replace the vague or damaged warning...

Page 51: ...ng tape 4 Electroprobe 7 Electronic leakage detector 10 Pipe pliers pipe cutter 2 Screw driver 5 Universal meter 8 Vacuum pump 11 Pipe expander pipe bender 3 Impact drill drill head electric drill 6 T...

Page 52: ...e wall Space to the obstruction Space to the obstructio Space to the obstruction A t l e a s t 3 0 0 c m At least 50cm At least 200cm At least 30cm At least 30cm At least 50cm Drainage pipe At least 2...

Page 53: ...ang the indoor unit Make the bound pipes pass through the wall hole and then connect outdoor unit Neaten the pipes Vacuum pumping and leakage detection Check after installation and test operation Fini...

Page 54: ...ce for safety purpose Note 1 Safety Precaution 1 Must follow the electric safety regulations when installing the unit 2 According to the local safety regulations use qualified power supply circuit and...

Page 55: ...2 Note Left Wall 55 70mm Right Mark in the middle of it Level meter Rear piping hole Wall Space to the wall above 150mm Space to the wall above 150mm 55 70mm Rear piping hole Insulating pipe Torque w...

Page 56: ...r installation when binding them When binding to a certain degree separate the indoor power and then separate the drain hose As show in Fig 15 3 Bind them evenly 4 The liquid pipe and gas pipe should...

Page 57: ...hassis 2 Connect the drain hose into the drain vent As show in Fig 19 3 Fix Outdoor Unit 1 Place the outdoor unit on the support 2 Fix the foot holes of outdoor unit with bolts As show in Fig 20 09 12...

Page 58: ...leakage detector Check if there is leakage with leakage detector 2 With soap water If leakage detector is not available please use soap water for leakage detection Apply soap water at the suspected po...

Page 59: ...tection E5 During cooling and drying operation compressor and outdoor fan stop while indoor fan operates During heating operation all loads stop 1 Supply voltage is unstable 2 Supply voltage is too lo...

Page 60: ...nt temperature sensor is open short circuited F3 During cooling and drying operating compressor stops while indoor fan operates During heating operation the complete unit will stop operation Outdoor t...

Page 61: ...rd XT if the voltage is higher than 265VAC turn on the unit after the supply voltage is increased to the normal range 2 If the AC input is normal measure the voltage of electrolytic capacitor C on con...

Page 62: ...peration the complete unit will stop Replace outdoor control panel AP1 30 Module high temperature protection P8 During cooling operation compressor will stop while indoor fan will operate During heati...

Page 63: ...m blocked or the connector loosed 37 power protection L9 compressor stop operation and Outdoor fan motor will stop 30s latter 3 minutes latter fan motor and compressor will restart To protect the elec...

Page 64: ...nel AP1 please replace the outdoor units control panel AP1 45 The four way valve is abnormal U7 If this malfunction occurs during heating operation the complete unit will stop operation 1 Supply volta...

Page 65: ...62 Installation and Maintenance Service Manual If malfunction occurs corresponding code will display and the unit will resume normal until protection or malfunction disappears...

Page 66: ...s insufficient or too much refrigrant blockage of capillary and increase of suction temp improper running of compressor burning in or stuck of bearing damage of discharge valve malfunction of protecto...

Page 67: ...ard broken Malfunction diagnosis process Is the wiring terminal between the temperature sensor and the controller loosened or poorly contacted Start Insert the temperature sensor tightly Yes Yes Yes Y...

Page 68: ...e connection of PG motor control terminal is firm Turn on the unit again measure whether the output voltage on control terminal for PG motor is more than 50V within 1 min after the louvers are opened...

Page 69: ...the mainboard is defined abnormal Malfunction diagnosis process Start Is there jumper cap on the mainboard Is the jumper cap inserted correctly and tightly Replace the jumper cap with the same model...

Page 70: ...harges slowly The zero cross detectioncircuit of the mainboard is defined abnormal Malfunction diagnosis process Turn power off for 1minute the turn back on The unit returns to normal Conclusion U8 is...

Page 71: ...anual 5 Malfunction of detecting plate WIFI JF Start Is malfunction eliminated The end check if the connection wire are correctly connected Replace the detecting plate with the same model Replace the...

Page 72: ...er than 200V Fault with the voltage testing circuit on control panel AP1 Replace the control panel AP1 Measure the AC voltage between terminalL andN on wiring board XT power supply Voltage within 210V...

Page 73: ...resume to the range of 210VAC 250VAC Correctly connect the wires of compressor according to the electric wiring diagram and then turn on the unit Check the connection between the control board and th...

Page 74: ...d high temperature protection Is outdoor ambient temperature higher than 53 20 minutes after the complete unit is powered off Is heat dissipation of the indoor unit and outdoor unit abnormal Normal pr...

Page 75: ...ompressor stopping enough Fault diagnosis process No Yes No No Yes Yes Yes No Power on the unit Is stop time of the compressor longer than 3 minutes Restart it up after 3 minutes Does startup fail Are...

Page 76: ...sor connected correctly Is connection sequence right Is the connection made in clockwise direction Connect the wires correctly Replace the control panel AP1 If the fault is eliminated Replace the comp...

Page 77: ...utes after the complete unit is powered off Is the terminal FA for the electronic expansion valve connected correctly Connect the wires correctly Resistances between the first four pins close to the t...

Page 78: ...id the equipment operate normally before the failure occurs The AP1 voltage detection circuit is at fault Check wiring inside of the indoor and outdoor units Are wires broken Check the communication c...

Page 79: ...the compressor Replace the mainboard with the same model End Is the supply voltage too low with overload Is the indoor outdoor heat exchanger dirty or are the air inlet and outlet blocked The fan is a...

Page 80: ...hod for details Malfunction of compressor Compressor cant operate Refer to point 5 of maintenance method for details 9 3 Troubleshooting for Normal Malfunction 1 Air Conditioner Cant be Started Up 2 P...

Page 81: ...pipe Replace drain pipe Wrapping is not tight Water leaking from the pipe connection place of indoor unit Wrap it again and bundle it tightly 5 Compressor Cant Operate Possible causes Discriminating m...

Page 82: ...ervice Manual 10 Exploded View and Parts List 10 1 Indoor Unit The component picture is only for reference please refer to the actual product 09 12K 1 2 4 6 7 8 20 11 10 12 13 15 9 14 16 17 18 19 22 5...

Page 83: ...52022 1 12 Evaporator Support 24212179 24212179 24212179 1 13 Evaporator Assy 011001060162 011001060162 011001060162 1 14 Fan Motor 15012146 15012146 15012146 1 15 Wall Mounting Frame Sub assy 0125248...

Page 84: ...Bearing 26152022 26152022 1 12 Evaporator Support 24212179 24212179 1 13 Evaporator Assy 011001060162 011001060162 1 14 Fan Motor 15012146 15012146 1 15 Wall Mounting Frame Sub assy 01252484 01252484...

Page 85: ...and Maintenance Service Manual The component picture is only for reference please refer to the actual product 34 33 1 5 6 7 8 9 10 11 12 13 14 16 17 18 19 23 24 25 26 27 30 29 22 32 31 35 36 37 20 21...

Page 86: ...0207 011001000207 1 15 Cross Flow Fan 10352060 10352060 10352060 1 16 Fan Motor 1501214502 1501214502 1501214502 1 17 Motor Press Plate 26112511 26112511 26112511 1 18 Wall Mounting Frame 01362026 013...

Page 87: ...port 24212177 1 14 Evaporator Assy 011001000207 1 15 Cross Flow Fan 10352060 1 16 Fan Motor 1501214502 1 17 Motor Press Plate 26112511 1 18 Wall Mounting Frame 01362026 1 19 Connecting pipe clamp 2611...

Page 88: ...nce Service Manual The component picture is only for reference please refer to the actual product 42 41 43 44 45 15 16 18 17 31 33 35 36 37 39 40 1 2 3 4 5 6 7 8 9 10 11 12 13 14 19 20 21 22 24 23 26...

Page 89: ...r 15012145 15012145 15012145 1 21 Connecting pipe clamp 26112514 26112514 26112514 1 22 Drainage Hose 0523001405 0523001405 0523001405 1 23 Stepping Motor 1521240210 1521240210 1521240210 1 24 Crank 7...

Page 90: ...tion and Maintenance Service Manual 10 2 Outdoor Unit 09K The component picture is only for reference please refer to the actual product 15 14 13 12 6 5 4 3 2 1 7 8 9 10 18 17 19 20 21 22 23 25 27 11...

Page 91: ...1 11 Brushless DC Motor 1501308519 1501308519 1 12 Top Cover Sub Assy 000051060006 000051060006 1 13 Motor Support 01703104 01703104 1 14 Condenser Assy 011002060269 011002060269 1 15 Rear Grill 0147...

Page 92: ...Installation and Maintenance Service Manual The component picture is only for reference please refer to the actual product 12K 1 2 3 4 5 7 8 28 9 10 11 12 13 14 27 26 15 16 17 18 19 20 21 22 23 24 25...

Page 93: ...76010083 3 10 4 Way Valve Assy 030152060069 030152060069 1 11 Big Handle 2623343106 2623343106 1 12 Valve Cover 22243006 22243006 1 13 Cut off Valve 071302391 071302391 1 14 Cut off Valve 07130239 07...

Page 94: ...91 Installation and Maintenance Service Manual The component picture is only for reference please refer to the actual product 18 24K...

Page 95: ...53 26233053 1 15 Wiring Clamp 26115004 26115004 1 16 Rear Grill 01473043 01473043 1 17 Condenser Assy 011002060187 011002060187 1 18 Reactor 19 Clapboard Assy 01233153 01233153 1 20 Coping 01204900000...

Page 96: ...3 26233053 1 15 Wiring Clamp 16 Rear Grill 01475020 01475020 1 17 Condenser Assy 011002000244 011002000244 1 18 Reactor 19 Clapboard Assy 01235081 01235081 1 20 Coping 012049000007P 012049000007P 1 21...

Page 97: ...sps Left filter and right filer Open the panel Loosen the clasp shown in the fig and then pull the left filter and right filer outwards to remove them Push out the axile bush on horizontal louver Bend...

Page 98: ...IFI Electric box cover 2 Screw Detecting plate WiFi Panel Display Screws Front panel Panel rotation Groove 3 Remove panel 4 Remove electric box cover 2 and detecting plate WIFI 5 Remove front case sub...

Page 99: ...he power cord Remove the wiring terminal of power cord Lift up the main board and take it off electric box Cold plasma generator Grounding screw Indoor tube temperature sensor Electric box assy Main b...

Page 100: ...move the connection pipe clamp First remove the left side of evaporator from the groove of bottom shell and then remove the right side from the clasp on the bottom shell Remove 3 screws fixing evapora...

Page 101: ...lade and motor lift the motor and cross flow blade upwards to remove them 8 Remove motor and cross flow blade Motor clasp screws Remove 3 screws fixing motor clamp and then remove the motor clamp a Cl...

Page 102: ...e the screw fixing big handle slide out the big handle upwards to make the clasp of big handle separate from the groove of right side plate and then remove the big handle Remove the screws fixing top...

Page 103: ...p screws screws screws screws Screw off the screws that are locking the front cover Then take it off Front cover 4 Remove the front cover 5 Remove axial flow blade Remove the nut fixing axial flow bla...

Page 104: ...rews 1 screws 2 Remove the screws 1 fixing protective grille and then remove the protective grille Remove the screws fixing electric box assy pull out each wiring terminal lift the electric box assy u...

Page 105: ...ely to avoid damaging the valve due to high temperature Unsolder weld point of capillary Sub assy valve and outlet pipe of condensator Thenremove the capillary Sub assy Do not blockthe capillary when...

Page 106: ...orand remove the compressor 11 Remove clapboard sub assy liquid valve Compressor gas valve 12 Remove Compressor Remove the 2 screws fixing the gas valve Unsolder the welding spot connecting gas valvea...

Page 107: ...l 12K Procedure Steps 1 Remove big handle 2 Remove top cover top cover big handle valve cover Before disassamble Remove the screws fixing big handle valve cover and then remove them Remove the screws...

Page 108: ...en remove the front grille Remove connection screws connecting the front panel with the chassis and the motor support and then remove the front panel Remove the screws fixing protective grille and the...

Page 109: ...n remove the motor Remove the screws fixing motor support and then remove the motor support Remove the screws fixing clapboard and then remove the clapboard Remove the screws fixing electric box assy...

Page 110: ...the valve with capillary and condenser unsolder the welding joint connecting the gas valve and air return pipe remove the 2 screws fixing the gas valve to remove the gas valve Unsolder the welding joi...

Page 111: ...e cover up ward to remove it b a a 1 Remove top panel Remove handle valve top panel top panel the 3 screws connecting the top panel with the front panel and the right side plate and then remove the to...

Page 112: ...ve the panel 3 Remove left side plate and right side plate Remove the screws connecting the right side plate with the chassis the valve support and the electric box and then remove the right side plat...

Page 113: ...wiring terminals and then pull the electric box upwards to remove it Remove the 4 tapping screws fixing the motor disconnect the leading wire insert of the motor and then remove the motor Remove the 2...

Page 114: ...reproof electric box and then remove the fireproof electric box Fireproof electric box Since the piping ports on the soundproof sponge are torn easily remove the soundproof sponge carefully soundproof...

Page 115: ...and the condenser assy and then remove the 4 way valve assy Remove the 3 foot nuts fixing the compressor and then remove the compressor Remove the screws connecting the support condenser and condense...

Page 116: ...113 Installation and Maintenance Service Manual b Dissemble the chassis sub assy and condenser sub assy condenser sub assy chassis sub assy...

Page 117: ...it degree and Celsius degree Tf Tcx1 8 32 Ambient temperature Fahrenheit display temperature Fahrenheit Celsius Fahrenheit display temperature Fahrenheit Celsius Fahrenheit display temperature Fahrenh...

Page 118: ...llowing steps A Cut the pip Confirm the pipe length according to the distance of indoor unit and outdoor unit Cut the required pipe with pipe cutter B Remove the burrs Remove the burrs with shaper and...

Page 119: ...88 33 10 63 72 2 439 111 0 737 5 63 46 34 10 2 73 2 358 112 0 717 4 60 23 35 9 779 74 2 28 113 0 697 3 57 18 36 9 382 75 2 206 114 0 678 2 54 31 37 9 003 76 2 133 115 0 66 1 51 59 38 8 642 77 2 064 1...

Page 120: ...983 5 84 61 34 13 59 73 3 144 112 0 956 4 80 31 35 13 04 74 3 04 113 0 93 3 76 24 36 12 51 75 2 94 114 0 904 2 72 41 37 12 76 2 844 115 0 88 1 68 79 38 11 52 77 2 752 116 0 856 0 65 37 39 11 06 78 2...

Page 121: ...62 11 32 101 3 22 15 362 9 24 51 41 63 10 93 102 3 13 14 342 8 25 49 19 64 10 54 103 3 04 13 323 9 26 47 08 65 10 18 104 2 96 12 306 2 27 45 07 66 9 83 105 2 87 11 289 6 28 43 16 67 9 49 106 2 79 10...

Page 122: ...6 756 8669426 E mail gree gree com cn www gree com HONG KONG GREE ELECTRIC APPLIANCES SALES LIMITED Add Unit 2612 26 F Miramar Tower 132 Nathan Road TST Kowloon HK Tel 852 31658898 Fax 852 31651029 Fo...

Reviews: