


❏
3. Draw a line on the cowl using a Top Flite Panel Line Pen
1/4" [6.4mm] parallel to the cowl’s edge. Make two marks on
that line 1" [25mm] and another 3-3/4" [95mm] away from
the bottom of the firewall. Do the same for the other side of
the cowl.
❏
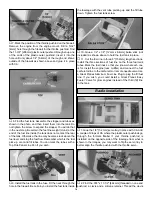
4. Position the cowl on the fuselage all the way to the 1/2"
[12mm] line and center the cowl ring with the engine
crankshaft. Drill a 1/16" [1.6mm] hole through the fiberglass
cowl and fuselage as shown on each mark. Make sure you
do not drill through the fuel tank. Hint: Tape the cowl to the
fuselage so it will not move as you drill the holes. Wipe the
line off with denatured alcohol.
❏
5. Remove the cowl. Wick some thin CA into the holes in
the fuselage. Install an extension on the carburetor’s needle
valve. Install the engine’s muffler. Use paper strips to mark
the location of the needle valve, engine glow plug access
and muffler. Remove the muffler and needle valve.
❏
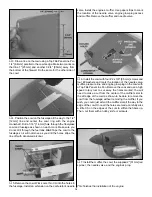
6. Install the cowl with four #2 x 3/8" [9.5mm] screws and
four #2 washers and mark the location of the needle valve,
muffler, pressure line, and engine glow plug on the cowl with
a Top Flite Panel Line Pen. Remove the cowl and use a high
speed rotary tool to cut away the holes marked. You will
need to make a cut from the center of the muffler’s slot to
the aft edge of the cowl as shown to be able to remove the
cowl from the fuselage without removing the muffler. If you
wish, you could just extend the muffler slot all the way to the
edge of the cowl. Once all the holes are made, carefully wick
a little CA on the edges of the cuts to stiffen the fibers up.
Then, cut them with a hobby knife or scissors.
❏
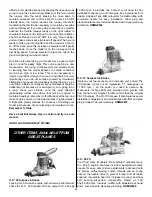
7. Install the muffler, the cowl, the supplied 2" [51mm] red
spinner, the needle valve, and the engine’s prop.
This finishes the installation of the engine.
19