


onto the rod approximately 18 full turns, slip the silicone
retainer on the rod and install the rod in the throttle outer
pushrod. Install the engine and attach the clevis on the
engine throttle arm. Make sure you have a free moving
linkage. Slip the retainer on the clevis.
❏
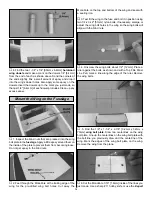
3. Locate three clevises, three retainers and three 0.074"
x 36" [914mm] threaded on one end pushrods. Thread a
clevis approximately 18 full turns onto each pushrod and
slip a silicone retainer half way onto each clevis. Insert a
pushrod into each one of the pushrod guide tubes.
❏
4. Connect a large nylon control horn on each clevis and
position the control horn on each control surface as shown.
Drill 3/32" [2.4mm] holes through the elevators and rudder
to accommodate the control horn’s screws. Wick some thin
CA into the holes. Install the elevator and rudder control
horns with six 2-56 x 5/8" [16mm] bolts and the control horn
back plates.
❏
5. Test fit the rudder, elevator and throttle servos. Depending
on the size of your servos you may have to slightly trim the
tray. Place the servos in the tray and mount them with the
hardware that came with the servos. Center the rudder
servo arm. If necessary, bend the pushrod slightly to align it
with the servo arm hole you want to use.
❏
6. Center the rudder and make a mark on the pushrod
where it meets with the servo arm hole you want to use.
Bend the pushrod 90 degrees up and install a FasLink on
the rudder pushrod as shown in the sketch. Cut away any
excess wire, leaving 1/16" [1.6mm] above the FasLink.
❏
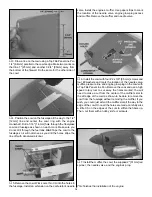
7. Center the elevator servo arm and elevators. Align one
of the elevator pushrods with the hole you want to use in the
servo arm and mark it where it meets the hole. Slip two
5/32" [4mm] wheel collars onto the pushrod. Center the
elevator that this pushrod controls. Bend the pushrod 90
degrees up at the mark and install a FasLink. Center the
other elevator and bend its pushrod as shown above to
mate with the first pushrod. Place the two wheel collars as
shown, put a drop of Great Planes Pro Thread Locking
Compound in the wheel collar screw hole and tighten the
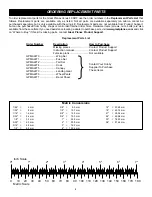
INCORRECT
CORRECT
HINGE LINE
17