❏ ❏
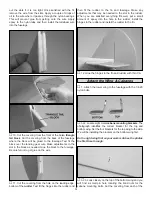
3. Look closely at the wheels. You will find that one
side of the wheel has four screw holes drilled in the rim. The
other side does not. Using silicone or 6-minute epoxy, glue
one of the flat wheel covers onto the side of the wheel that
does not have the holes in the rim.
❏ ❏
4. Screw a 6-32 set screw into a 3/16" [4.8mm] wheel
collar. Slide the wheel collar onto the axle, positioning it as
shown. Tighten the set screw against the axle.
❏ ❏
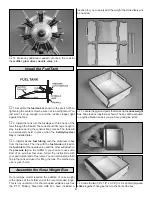
5. Slide the wheel onto the axle with the flat wheel
cover to the inside. Screw a 6-32 x 1/4" [6.4mm] socket head
cap screw into a 3/16" [4.8mm] wheel collar. Slide the wheel
collar onto the axle and then tighten the screw against the
flat spot on the axle.
❏ ❏
6. Attach the cup-shaped outer wheel cover to the
wheel with four #2 x 3/8" [9.5mm] screws. The holes in the
wheel cover align with the holes that are pre-drilled in the
wheel. Note: Tighten the screws snugly to the wheel cover.
Do not try to tighten the screws and the cover to the wheel.
❏
7. Repeat steps 2-6 for the left wheel.
❏
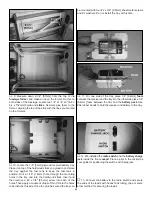
1. Cut the covering from the pushrod tube openings at
the rear of the fuselage. There are two located on the right side
and one located on the left. If you have trouble finding the
openings, slide a .074" x 36" [914mm] pushrod wire into the
tubes from inside of the fuselage, sliding it into the tube until it
pushes the covering away from the fuselage slightly. This is
where you should cut the covering away from the tubes.
❏
2. Locate three .074" x 36" [914mm] pushrod wires
threaded on one end. Thread a nylon clevis onto the
threaded end of each wire 20 full turns. Install a silicone
clevis retainer onto the clevis.
Install the Radio System
23


