❏
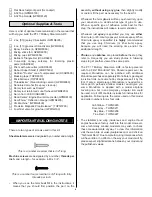
10. Install the four remaining brackets in the blind nuts at
the ends of the wing.
❏
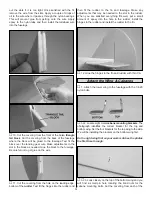
11. Place the top wing onto the “N” struts. Attach the top
wing to the “N” struts with 4-40 x 1/2" [13mm] phillips head
screws, #4 washers and 4-40 nylon lock nuts the same way
you installed the strut to the lower brackets.
❏
12. Set the fuselage on the firewall. Look at the relation
of the top wing to the bottom wing. Be sure the top wing is
parallel with bottom wing. Adjust the top wing as needed.
Then carefully set the fuselage back on the landing gear.
❏
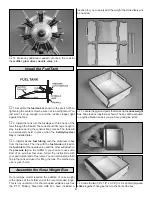
13. Without disturbing the top wing, push a T-pin into the
fuselage through each of the cabane mounting holes. Push
the pin hard to verify that the mounting holes are positioned
over the hardwood rails. If you do not find hardwood and
only hit balsa wood, check to see if you have mounted the
center cabanes properly. If you have the center cabanes
backwards they will not align over the hardwood rails.
❏
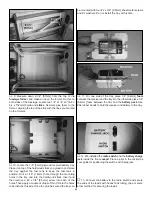
14. Drill a 5/64" [2mm] hole through each of the four
mounting holes in the center cabanes. When you drill these
holes you must be drilling into the hardwood rails located in
the fuselage.
❏
15. Install and then remove a #4 x 1/2" [13mm] sheet
metal screw into each of the four holes. Apply a couple
drops of thin CA into each of the holes to harden the
threads. After the glue has cured, permanently install the
screws into the fuselage.
Did you know?...The PT-17 Military Stearman gained a
reputation as a rugged airplane and a good teacher.
Officially named the Boeing Model 75, the plane was (and
still is) persistently known as the “Stearman” by many who
flew them. It was called the “PT” by the Army, “N2S” by the
Navy and “Kaydet” by Canadian forces. By whatever name,
more than 10,000 were built by the end of 1945 and at least
1,000 are still flying today worldwide.
This kit comes with a convenient carrying handle for the
fuselage and the struts. It is also useful during the remainder
of the construction process because, when installed, it will
allow you to turn the plane upside-down on the workbench
without flexing or bending the center cabanes.
❏
1. Locate all of the 1/8" [3mm] plywood parts of the
carrying handle.
❏
2. Glue the three parts of each set together as shown to
make a pair 3/8" [9.5mm] thick.
❏
3. Do the same with the remaining six parts, making two
pairs of each.
Build the Carry Handle
15


