background image

17

6

 Condensate Disposal

6.1 General requirements

When in condensing mode the Grant 
Vortex PRO boilers produce condensate 
from the water vapour in the flue gases. 
This condensate is slightly acidic with a 
ph value of around 3 (similar to vinegar). 
Provision must be made for the safe and 
effective disposal of this condensate.

Condensate can be disposed of 
using one of the following methods of 
connection:

Internal Connection (preferred option):

•  Into an internal domestic waste 

system (from kitchen sink, washing 
machine, etc.).

•  Directly into the soil stack.

External Connection:

•  Into an external soil stack
•  Into an external drain or gully
•  into a rainwater hopper (that is part 

of a combined system where sewer 
caries both rainwater and foul water)

•  purpose made soakaway.

All condensate disposal pipes 

must


be fitted with a trap - whether they are 
connected internally or externally to 
a domestic waste system/soil stack 
or run externally to a gully, hopper or 
soakaway.

6.2 Connections

Connections into a rainwater hopper, 
external drain or gully should be 
terminated inside the hopper / drain / 
gully below the grid level but above the 
water level.

Condensate disposal pipes should not 
be connected directly into rainwater 
downpipes or to waste / soil systems 
connected to septic tanks.

Condensate should not be discharged 
into ’grey water’ systems that re-use 
water used in the home (not including 
water from toilets).

It should be noted that connection of 
a condensate pipe to the drain may 
be subject to local Building Control 
requirements.

6.3 Pipework

Condensate disposal pipework must be 
plastic (plastic waste or overflow pipe is 
suitable).

Copper or steel pipe is NOT suitable 
and MUST NOT be used.

Condensate disposal pipes should 
have a minimum ‘nominal’ diameter 
of 22mm (

3

/

4

”) - e.g. use 21.5mm OD 

polypropylene overflow pipe.

Condensate disposal pipes must be 
fitted with a fall (away from the boiler) of 
at least 2.5° (~45mm fall per metre run).

Where it is not possible for the 
pipe to fall towards the point of 
discharge - either internally into 
a waste system or externally to a 
gully (e.g. for boilers installed in a 
basement), it will be necessary to 
use a condensate pump.

Condensate disposal pipes should 
be kept as short as possible and the 
number of bends kept to a minimum.

Pipes should be adequately fixed to 
prevent sagging, i.e. at no more than 
0.5 metre intervals.

6.4 External Pipework

Ideally, external pipework, or pipework 
in unheated areas, should be avoided. If 
unavoidable, external pipework should 
be kept as short as possible (less than 
3 metres) and 32mm waste pipe used 
to minimise the risk of ice blocking the 
pipe in freezing conditions.

The number of bends, fittings and joints 
on external pipes should be kept to a 
minimum to reduce the risk of trapping 
condensate.

For a boiler installed in an unheated 
area such as an outhouse or garage, 
all condensate pipework should be 
considered as an ‘external’.

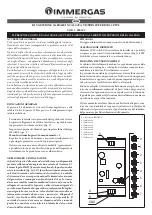
6.5. Condensate Soakaway

To keep external pipework to a 
minimum, locate the soakaway as close 
as possible to the boiler but ensure 
it is at least 500mm from building 
foundations and away from other 
services, e.g. gas, electricity, etc.

The condensate pipe may be run above 
or below ground level and can enter 
either the top or side of the soakaway 
tube. Refer to Fig.6-1.

Ensure that the drainage holes in the 
soakaway tube face away from the 
building. Backfill both the soakaway 
tube, and the hole around it, with 
10mm limestone chippings.

Only use a soakaway where the soil is 
porous and drains easily. Do not use 
in clay soils or where the soil is poorly 
drained.

Any damage due to condensate 
backing up into the boiler due to a 
high water table, in the case of a 
soakaway, or flooded drains when 
the condensate disposal is via a 
gully or soil stack, is not covered by 
the Grant product guarantee.

!

nOtE

!

nOtE

!

nOtE

!

CaUtiOn

Figure 6-1:

 Purpose made condensate soakaway

32mm waste pipe 

external to the building

Two rows of 3 x 12mm 

holes at 25mm centres and 

50mm from the bottom 

of the tube. Holes facing 

away from the property.

Backfill with 
10mm limestone 
chippings

Sealed 
end

100mm 
plastic tube

Cement seal

Ground level

2.5° fall

25mm

300mm

400mm min.

Summary of Contents for Combi 21e

Page 1: ...UK DOC 0089 Rev 1 0 November 2016 Grant UK Pro External Combi Combi 21e Combi 26e and Combi 36e Condensing Oil Boiler Range Installation and Servicing Instructions...

Page 2: ...only bio kerosene B30K that conforms to OPS24 IMPORTANT Under no circumstances should the boiler be used with bio kerosene without the above actions being taken first Date Commissioning engineer Tel...

Page 3: ...pection and Cleaning of Trap 18 7 Sealed Systems 19 7 1 System Models 19 8 Electrical 20 8 1 Connecting the Power Supply 20 8 2 Connecting the Controls Heating Only 22 8 3 Connecting the Controls Heat...

Page 4: ...ctly concerned with the surrounding text but of importance to the reader 1 1 How a Condensing Boiler Works During the combustion process hydrogen and oxygen combine to produce heat and water vapour Th...

Page 5: ...r lights Overheat reset button under black cap Expansion vessel Heating CH pump Hot water DHW pump IMPORTANT CABLE TO PLUG MUST BE SECURED IN CABLE CLAMP BELOW PANEL MAXIMUM CABLE LENGTH BETWEEN PLUG...

Page 6: ...Minimum recommended mains water inlet pressure bar 2 5 Condensate connection mm 22mm plastic pipe Flue diameter conventional 100mm 4in diameter Waterside resistance T 10 C mbar 28 5 26 0 Waterside re...

Page 7: ...the boiler is supplied with a combustion test point on the front cleaning door When this test point is used please note the following The test point is for CO2 and smoke readings only The boiler effic...

Page 8: ...d to BS 799 5 1987 and OFS T200 A galvanised tank must NOT be used A plastic tank may be used and must comply with OFS T100 Plastic tanks should be adequately and uniformly supported on a smooth level...

Page 9: ...ll pipe Sludge valve Shut off valve Shut off valve Level gauge Filter Fuel storage tank Pump see section 3 2 Pump see section 3 2 Fire valve Fire valve sensor Vent pipe Fill pipe Sludge valve Non retu...

Page 10: ...ertically as shown in Figures 3 3 and 3 4 To be used with a Tiger Loop system the burner must be fitted with an additional flexible fuel line a flexible fuel line 900mm and 3 8 to 1 4 BSP male adaptor...

Page 11: ...lows 1 Remove the plastic burner cover two screws 2 Remove and discard the blanking plug from the return connection of the pump and fit the By pass screw using a hexagonal key 3 Connect the return oil...

Page 12: ...izontal Rear Exit The flue must discharge away from the building Side Exit The flue should discharge towards the rear of the casing to prevent flue gases reentering the boiler casing through the air i...

Page 13: ...X Pro External Combi e must be in accordance with the following recommendations Building Regulations for England and Wales and the Building Standards for Scotland issued by the Department of the Envir...

Page 14: ...e use of a proprietary cleaner such as Betz Dearborn s Sentinel X300 or X400 or Fernox Restorer Full instructions are supplied with the products but for more details of Betz Dearborn s products view t...

Page 15: ...r to leave the pipe ends with a slight radius and free from any burrs or sharp edges Pipes to be used with these fittings should not be cut square using a hacksaw CAUTION A drain tap is provided at th...

Page 16: ...attached Arrangements for antisyphonage are not necessary If the hardness reading is found to be in the medium to very hard range the shaded area it is essential that some form of water conditioner o...

Page 17: ...ll towards the point of discharge either internally into a waste system or externally to a gully e g for boilers installed in a basement it will be necessary to use a condensate pump Condensate dispos...

Page 18: ...penings in both the sides and base of the casing These are designed to allow pipework to pass through the casing as required to suit the installation These openings can be used to allow the condensate...

Page 19: ...ion if required If thermostatic radiator valves are fitted to all radiators a system by pass must be fitted The bypass must be an automatic type Provision should be made to replace water lost from the...

Page 20: ...of the plug Refer to Sections 8 3 and 8 4 for details of controls wiring BEFORE making connections to the isolating plug 4 Replace the cover on the plug refit the two screws and ensure it is securely...

Page 21: ...ection boiler top bracket Limit Thermostat Earth post control panel chassis Service switch G Y G Y 2 C 8 2 Connecting the Controls Heating Only To control the central heating on off periods only and n...

Page 22: ...llows Connect the switched live output from terminal C of the programmable room thermostat to terminal L1 of the boiler isolation plug Fit a link between terminals L2 and L3 in the isolation plug Refe...

Page 23: ...External Combi boiler Refer to Figure 8 4 for connection details To connect the FM 2 receiver unit to the boiler proceed as follows 1 Remove the boiler front casing panel 2 All electrical wiring is ma...

Page 24: ...8 5 Connect the mains supply to the boiler isolation plug as follows refer to Figure 8 5 Permanent live to terminal L3 Neutral to terminal N Earth to earth terminal If an alternative two channel progr...

Page 25: ...trol panel in cross member Hinge down control panel front 3 From rear of control panel carefully feed the cable from the Frost thermostat through the upper grommet at the right hand end of the rear of...

Page 26: ...r balcony level 300 H From a surface or boundary facing the terminal 600 2500 J From a terminal facing the terminal 1200 K Vertically from a terminal on the same wall 1500 L Horizontally from a termin...

Page 27: ...r the VORTEX range of condensing boilers The internal flue and liner diameter for all combi models must be 100mm 4 in The maximum vertical height from the top of the boiler to the terminal for the Ora...

Page 28: ...9 6 Air Supply A permanent air supply must be provided to the burner sufficient to ensure proper combustion of fuel and effective discharge of combustion products to the open air The ventilation open...

Page 29: ...urn the handle and withdraw it forwards at the bottom The controls are shown in Figure 10 1 Figure 10 2 Vortex Pro Combi 21e boiler with front panel removed showing position of control panel Figure 10...

Page 30: ...he oil pump is running Note that the neon lights when the boiler is switched on but does not necessarily indicate the burner is firing 3 Fully open a hot tap and allow it to run for a few moments to v...

Page 31: ...ed to protect the system against the effect of corrosion 3 A suitable antifreeze should be used to prevent damage to the boiler in areas where electrical power failure can occur in winter months 4 Rep...

Page 32: ...side of the burner and reassemble in reverse order 10 7 Information for the User The User must be advised and demonstrated if necessary of the following important points How to start and switch off t...

Page 33: ...ch to Off isolate the electricity supply and close the fuel supply valve Allow the boiler to cool The data label on the inside of the case side panel will indicate the fuel used and the nozzle fitted...

Page 34: ...Baffles in Vortex Pro Combi 21e Figure 11 4 Turbulators in Vortex Pro Combi e boilers Figure 11 3 Baffles in Vortex Pro Combi 36e Important The ends of the turbulators must be vertical Turbulators Bo...

Page 35: ...The use of an ill fitting spanner will damage the nozzle and could lead to an incorrect flame pattern 9 Always check the electrode settings after replacing the nozzle see Figure 11 5 10 Refit the com...

Page 36: ...m Check Heating System water pressure Re fill system to increase pressure to between 0 5 and 1 0 bar If Burner Still Fails to Light Follow the BURNER NOT OPERATING procedure in Section 12 2 C For Hot...

Page 37: ...g voltage Check for 230V at the pump terminals to the CH pump but Check if CH pump is stuck pump is not working Check for Rotation of shaft impeller If stuck Rotate shaft manually to restart If still...

Page 38: ...no anti scale protection has been installed Refer to Section 5 for further details If plate heat exchanger is OK Check flow switch is correctly positioned the arrow on flow switch body must point in d...

Page 39: ...Burner Fault Finding B No Hot Water but Central Heating OK continued Is the DHW PUMP YES Check electrical connections at the pump indicator lit PCB is supplying voltage to Check for 230V at the pump...

Page 40: ...ow rate poor hot water Combi 26e 15 ltrs min maximum Combi 36e 18 ltrs min maximum Water Pressure Excessive pressure has a major Check standing and operating water pressure influence on flow rate 2 ba...

Page 41: ...ive coupling broken Check oil pressure regulator No No No No OK Repair or replace oil pump Replace coil and or stem valve Photocell sound Coil of solenoid sound Motor gives 50 Volts to white wire Repl...

Page 42: ...Riello RDB burner as used in the Grant VORTEX Pro Combi 21e 26e and 36e boilers and the associated parts list follows the figure 2 8 3 4 5 6 13 13 25 24 21 20 18 19 14 15 16 10 9 31 11 12 17 23 22 30...

Page 43: ...rode bracket 3006552 RBS29 21 Flexible hose 3007672 RBS36 6 Nozzle holder 3008642 RBS111 22 Tube 3008644 RBS113 7 Collar 3008643 RBS112 23 Pressure gauge connector 3008876 RBS138 8 High voltage lead 3...

Page 44: ...t and adhesive Known Hazards Irritation to eyes Precautions Avoid inhalation of vapour contact with eyes and prolonged or repeated contact with skin After handling always follow normal good hygiene pr...

Page 45: ...89 336 EEC 73 23 EEC 92 42 EEC In EU Countries The following information is provided to enable regulatory compliance with the European Union EU directives identified and any amendments made to these...

Page 46: ...roblem is not being caused by the heating system or its controls Consult the boiler handbook for guidance Free of charge repairs During the two year guarantee period no charge for parts or labour will...

Page 47: ...ed to settle for an hour before restarting the boiler Terms of manufacturer s guarantee The Company shall mean Grant Engineering UK Limited The boiler must be installed by a competent person and in fu...

Page 48: ...internal Hot Water pipework of the boiler The Heating pump will have a Black cable whilst the Hot Water pump will have a White cable To disconnect the plug Check that the power to the boiler is switc...

Page 49: ...on N A Flashes Red and Green Pump is operating but stopped Pump restarts by itself after fault has disappeared Undervoltage Voltage 160V OR Overvoltage Voltage 253V Check supply voltage is 195V V 253V...

Page 50: ...red load profile XL XL XL Daily electricity consumption Qelec 0 293 0 23 0 205 Annual electricity consumption AEC 65 4 50 5 45 2 Useful efficiency Seasonal space heating energy efficiency s 90 81 91 7...

Page 51: ...Notes 51...

Page 52: ...Notes 52...

Page 53: ...53...

Page 54: ...between 0 5 to 1bar If the heating system loses pressure on a regular basis then contact your Installer to investigate the cause Burner Lock out reset button If there is a burner malfunction a built i...

Page 55: ...ent in the primary store The burner will not fire and so the heat in the store will gradually be used up and the hot water temperature will reduce with time If a 2 channel programmer is fitted the Hot...

Page 56: ...ly to the boiler If required the fuel supply valve may be closed and the water and electrical supplies turned off at the mains To re start the boiler refer to the full lighting instructions above Figu...

Page 57: ...ing special text formats are used in this manual for the purposes listed below Warning of possible human injury as a consequence of not following the instructions in the warning Note text Used for emp...

Page 58: ...ise the System by adding Water 7 General Notes and Care of your System 7 Electricity Supply 7 Introduction 4 About your Boiler 4 Boiler Controls 4 About your Fuel 4 Lighting your Boiler 5 Turning off...

Page 59: ...bility with bio kerosene B30K Where necessary some or all of these items may have to be replaced with a bio kerosene compatible alternative c Check the suitability of the flue system with Grant UK d U...

Page 60: ...UK DOC 0089 Rev 1 0 November 2016 Grant UK Pro External Combi Combi 21e Combi 26e Combi 36e Condensing Oil Boiler Range User Instructions...

Reviews: