ENGLISH
23
c. If “Er6” occurs, please refer to the section of for details.
11.5 After measurement
1. Power off: Device will automatically shut off if left idle for more than 1 minute to extend battery life.
2. Clean the probe after each use to ensure an accurate reading and avoid cross contamination. (See the section
of Care and Cleaning for details.)
11.6 Temperature Taking Hints
1. The right ear reading may differ from the reading taken at the left ear. Therefore, always take the temperature
in the same ear.
2. The ear must be free from obstructions or excess earwax buildup to take an accurate reading.
3. External factors may influence ear temperatures such as:
• been lying on one ear or the other
• had their ears covered
• been exposed to very hot or very cold temperatures
• been recently swimming or bathing
In these cases, remove the individual from the situation and wait 20 minutes prior to taking a temperature.
4. For persons wearing hearing aids or ear plugs, remove the device and wait 20 minutes prior to taking
a temperature.
(Fig.9)
(Fig.10)
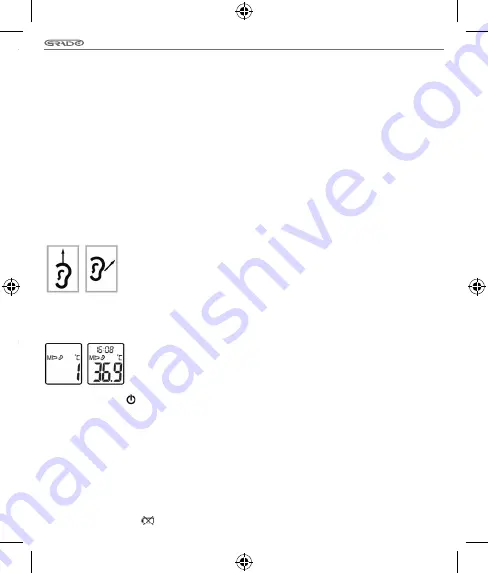
5. When using the thermometer on infants under age 1, pull the ear up making sure the
sensor faces the eardrum. (See Figure 9)
6. When using the thermometer on individuals over the age of 1, pull the ear back making
sure the sensor faces the eardrum. (See Figure 10)
7. Do not touch the probe window. A cotton swab and rubbing alcohol may be used to clean
the sensor window.
8. If thermometer is stored in a significantly different environment than testing location,
place it in the testing location for approximately 30 minutes prior to use.
11.7 Memory Mode
(Fig. 11)
(Fig. 12)
1. The Memory Mode can be accessed ether in ear mode or object mode:
- When the thermometer has been turned on and followed by Figure 3 or finished
testing, press and hold the Button for three seconds. The letter M will appear in
the center left corner of the display. (See Figure 8)
2. The thermometer will automatically memorize the last 10 temperature readings.
Each memory also records the measurement date/time/mode icon. Each time the
Button is pressed, the screen displays past readings that correspond with
a number 1-10. The number 1 reflects the most recent reading while the number 10
reveals the oldest reading stored in memory. (See Figure 9)
3. In the memory mode, ear mark or scan mark always exist. The user can press the TEST BUTTON to take new
measurements.
11.8 Selecting A Temperature Scale
1. Temperature readings are available in the Celsius (°C) or Fahrenheit (°F) scale.
2. With the unit off, press and hold the TEST BUTTON for 3 seconds to enter into unit changing mode.
3. Press and release TEST BUTTON to select the unit.
4. When the preferred unit on the display, press BUTTON to exit the unit changing mode.
11.9 Battery Replacement
1. Replace battery when “
” appears in the upper right corner of LCD display. (See Figure 11)
11.2 Get the room temperature
1.
When the thermometer has been turned on, room temperature will be shown on
the screen with icon. Room temperature, date and time will alternately display
every 3 seconds. (See figure 4)
2.
For room temperature, the thermometer should be placed on the table and avoid
the direct sunshine or air conditioner flow on.
3.
The room temperature can be reference after 5 minute later when taking
the temperature.
(Fig.5)
11.3 To measure ear temperature
1. To achieve accurate readings, make sure a new, clean probe cover is in place before each measurement. Place
a new probe cover on the probe firmly; making sure the probe and the inner portion of the probe cover fit
snugly. To ensure proper hygiene and to avoid contamination, a new probe cover should be applied for each user.
2. Press the TEST BUTTON, you can get the body temperature by ear measurement after hearing two
beep sounds.
(Fig.6)
Remarks:
a. Probe cover sign stand for taking the ear temperature with probe cover now and vice versa.
b. To avoid the risk of cross contamination, it is recommended that you always measure the ear temperature
with probe cover.
c. If you see as shown in figure 6 shows, it stand for the mode of taking the object temperature. You can press and hold
BUTTON and then press and hold the TEST BUTTON to switch the mode between ear mode and object mode.
3. Insert the probe along the ear canal as deep as possible into the ear as depicted in Figure 7. Then press the
TEST BUTTON once to start the measurement. A long beep will sound approximately 1 second after the TEST
BUTTON is activated. This signals the end of the process as results are displayed on the LCD screen.
4. The thermometer is ready for testing again once an ear mark displays on the LCD. A waiting period of 20
seconds between testing is recommended to avoid excessive cooling of the skin.
5. The thermometer will shut off automatically after 60 seconds of inactivity. To prolong battery life, press the
BUTTON to turn the unit off.
11.4 To measure object temperature
(Fig.8)
1. Eject the probe cover out firstly. Press the TEST BUTTON to turn on the thermometer, you can
take the object temperature after hearing two beep sounds. (see figure 5)
Remarks:
a. This mode shows the actual, unadjusted surface temperatures, which is different from
the body temperature.
b. If you see as shown in figure 3 shows, it stand for the mode of taking the ear temperature. You
can press and hold
BUTTON and then press and hold the TEST BUTTON to switch the mode between ear mode
and object mode.
Summary of Contents for RM355
Page 30: ...30 Note ...
Page 31: ...31 Note ...


