Maintenance
26
3A0232E
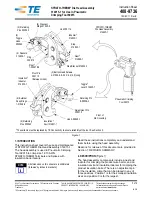
Replace External Mix Check Valve and O-Rings
See
beginning on page 44 for
available kits.
1.
Perform
2.
Remove retaining ring (710) and air cap
assembly (709) from head (701).
3.
Remove check valve assembly (703).
4.
Use two wrenches on flats of seal (703) and check
valve cap (706) to remove cap. Spring (705) and
ball (704) will fall out when cap is removed.
5.
Remove and inspect o-ring (717) and washer (718).
Replace if worn or damaged.
6.
Lubricate o-ring and install onto check valve
assembly (703).
7.
Install washer (718), ball (704), and spring (705)
into check valve seal (703) then install check valve
cap (706) onto check valve seal finger-tight.
8.
Use two wrenches on flats of seal (703) and check
valve cap (706) to torque check valve cap onto
check valve seal to 23-27 in-lb (2.6-3.1 N•m).
9.
Install check valve assembly into head. See F
for assembly orientation.
10. Install air cap onto head and tighten retaining
ring (710).
F
IG
. 16
702
701
717
703
704
710
709
706
705
718
NOTICE
To prevent distorting the end of the cap (706), do
not over-tighten the check valve assembly.