3
307-928
HOSE SAFETY
High pressure fluid in the hoses can be very dangerous. If the hose devel-
ops a leak, split or rupture due to any kind of wear, damage or misuse, the
high pressure spray emitted from it can cause a fluid injection injury or
other serious bodily injury or property damage.
ALL FLUID HOSES MUST HAVE SPRING GUARDS ON BOTH
ENDS! The spring guards help protect the hose from kinks or bends at or
close to the coupling which can result in hose rupture.
TIGHTEN all fluid connections securely before each use. High pressure
fluid can dislodge a loose coupling or allow high pressure spray to be
emitted from the coupling.
NEVER use a damaged hose. Before each use, check the entire hose for
cuts, leaks, abrasion, bulging cover, or damage or movement of the hose
couplings. If any of these conditions exist, replace the hose immediately.
DO NOT try to recouple high pressure hose or mend it with tape or any
other device. A repaired hose cannot safely contain the high pressure
fluid.
HANDLE AND ROUTE HOSES CAREFULLY. Do not pull on hoses to
move equipment. Do not use fluids or solvents which are not compatible
with the inner tube and cover of the hose. DO NOT expose Graco hoses
to temperatures above 180
F (82
C) or below –40
F (–40
C).
Hose Grounding Continuity
Proper hose grounding continuity is essential to maintaining a grounded
spray system. Check the electrical resistance of your air and fluid hoses
at least once a week. If your hose does not have a tag on it which speci-
fies the maximum electrical resistance, contact the hose supplier or
manufacturer for the maximum resistance limits. Use a resistance meter
in the appropriate range for your hose to check the resistance. If the resis-
tance exceeds the recommended limits, replace it immediately. An un-
grounded or poorly grounded hose can make your system hazardous.
Also, read FIRE OR EXPLOSION HAZARD, below.
MOVING PARTS HAZARD
The piston in the air motor, located behind the air motor plates, moves
when air is supplied to the motor. Moving parts can pinch or amputate
your fingers or other body parts. Therefore, NEVER operate the pump
with the air motor plates removed. KEEP CLEAR of moving parts when
starting or operating the pump. Before checking or servicing the pump or
any system component, follow the Pressure Relief Procedure on page
2, to prevent the pump from starting accidentally.
FIRE OR EXPLOSION HAZARD
Static electricity is created by the flow of fluid through the pump and hose.
If every part of the spray equipment is not properly grounded, sparking
may occur, and the system may become hazardous. Sparking may also
occur when plugging in or unplugging a power supply cord. Sparks can
ignite fumes from solvents and the fluid being sprayed, dust particles and
other flammable substances, whether you are spraying indoors or out-
doors, and can cause a fire or explosion and serious bodily injury and
property damage. Do not plug in or unplug any power supply cords in the
spray area when there is any chance of igniting fumes still in the air.
If you experience any static sparking or even a slight shock while using
this equipment, STOP SPRAYING IMMEDIATELY. Check the entire sys-
tem for proper grounding. Do not use the system again until the problem
has been identified and corrected.
Grounding
To reduce the risk of static sparking, ground the pump, object being
sprayed, and all other spray equipment used or located in the spray area.
CHECK your local electrical code for detailed grounding instructions for
your area and type of equipment. BE SURE to ground all of this spray
equipment:
1.
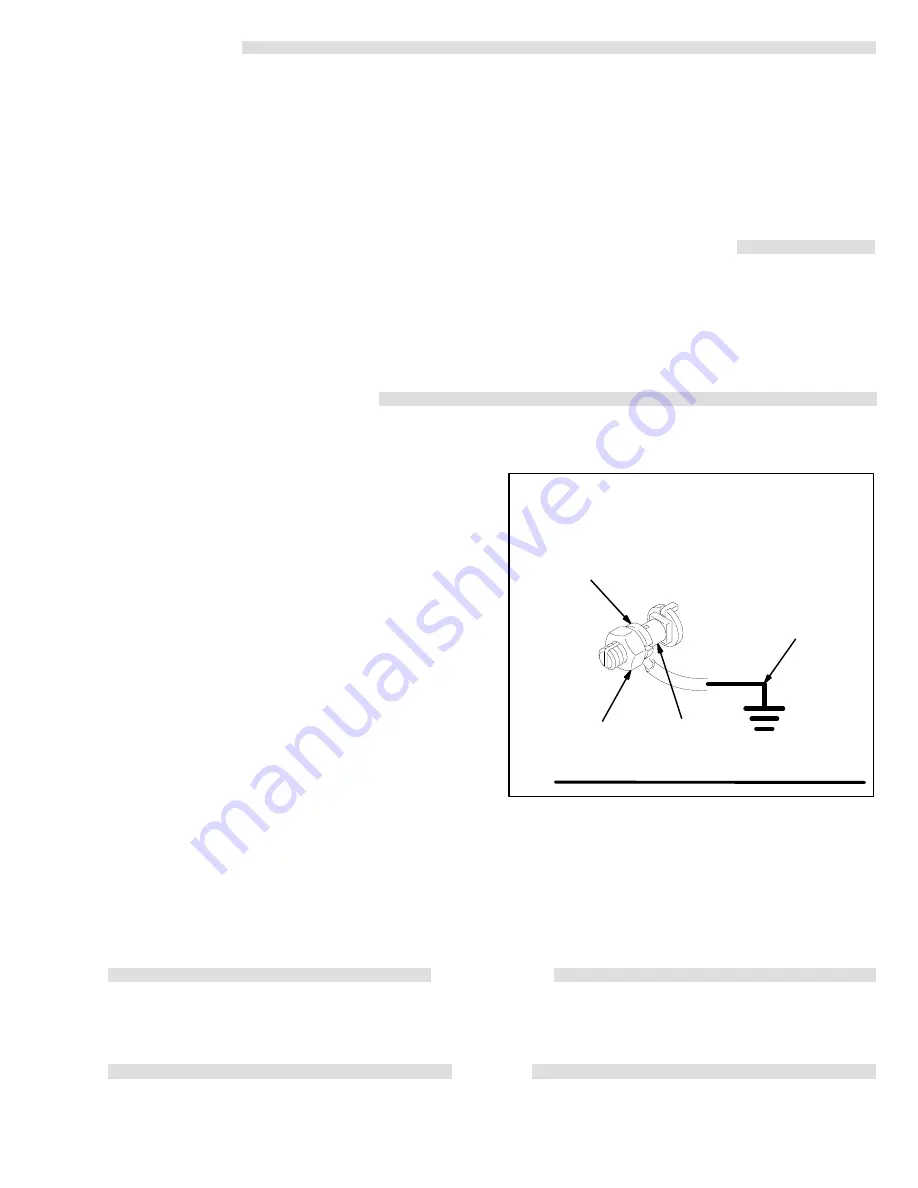
Pump: use a ground wire and clamp as shown in Fig 1.
2.
Air hoses: use only grounded air hoses.
3.
Fluid hoses: use only grounded fluid hoses.
4.
Heater (if used): refer to the Viscon
Heater manual, 307–805.
5.
Air compressor: follow manufacturer’s recommendations.
6.
Spray gun: grounding is obtained through connection to a properly
grounded fluid hose and pump.
7.
Fluid supply container: according to your local code.
8.
Object being sprayed: according to your local code.
9.
All solvent pails used when flushing, according to local code. Use
only metal pails, which are conductive, placed on a grounded sur-
face. Do not place the pail on a nonconductive surface, such as pa-
per or cardboard, which interrupts the grounding continuity.
10.
To maintain grounding continuity when flushing or relieving pres-
sure, always hold a metal part of the spray gun firmly to the side of a
grounded
metal pail, then trigger the spray gun.
To ground the pump:
To ground the pump, loosen the grounding lug locknut (W) and
washer (X). Insert one end of a 1.5 mm
(12 ga) minimum ground
wire (Y) into the slot in lug (Z) and tighten the locknut securely. See
Fig 1. Refer to page 19 to order a ground wire and clamp. Connect the
other end of the ground wire to a true earth ground.
Fig 1
W
X
Y
Z
0864
Flushing Safety
Before flushing, be sure the entire system and flushing pails are properly
grounded. Refer to Grounding, at the left. Follow the Pressure Relief
Procedure on page 2, and remove the spray tip from the spray gun.
Always use the lowest possible fluid pressure, and maintain firm
metal-to-metal contact between the spray gun and the pail during flushing
to reduce the risk of fluid injection injury, static sparking and splashing.
IMPORTANT
United States Government safety standards have been adopted under the Occupational Safety and Health Act. These standards – particularly the Gen-
eral Standards, Part 1910, and the Construction Standards, Part 1926 – should be consulted.
TERMS
WARNING
Alerts user to avoid or correct conditions that could
cause bodily harm.
CAUTION
Alerts user to avoid or correct conditions that could
cause damage to or destruction of equipment.
NOTE
Identifies essential procedures or helpful information.


