MDE-LEDI-1099V4.0
61
E
NG
LI
S
H
►
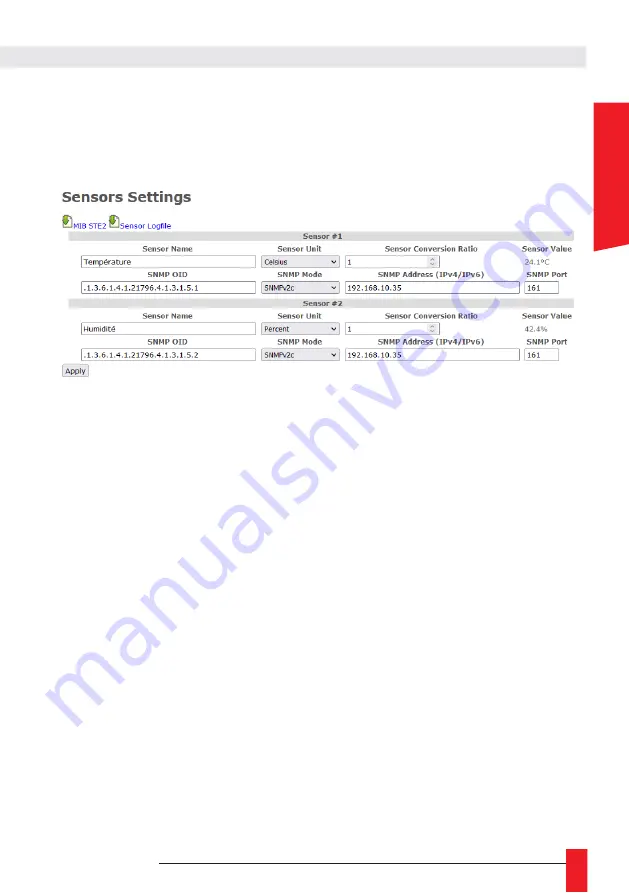
We will find at the top of the page, the SNMP MIB integrated in the product to retrieve more easily
the information of the SNMP STE2 sensor as well as a history of the data transmitted by the
different sensors.
Warning: Please refer to the documentation and in particular to the SNMP MIB of the SNMP sensor for
the configuration and installation.
Among the parameters that must be filled in to configure an SNMP sensor, there are :
►
Sensor name
: which makes it easier to identify the sensor and its data
►
Sensor Unit :
so that the display can indicate the correct unit with the data.
►
SNMP OID:
indicates the SNMP OID (register index) where to find the value you want to retrieve.
►
It can be a sequence of numbers separated by dots but in the case of the STE2, whose MIB is
integrated in the LEDI, we can use directly the string: STE2::SensorValue.x with x being the sensor
number on the STE2.
►
SNMP mode:
There are 3 versions (v1, v2c and v3) whose parameters can be configured in the
SNMP Settings Web Page (SNMPv1/2c community, SNMPv3 username/password. You can also
choose to disable the use of a sensor.
►
IP address and SNMP port
of SNMP sensor. A host name can be used for the sensor if it is
specified in the DNS. The default SNMP port is UDP port 161.
►
conversion ratio of the sensor data:
by default 1. The system is programmed to receive the data
on an integer which represents 10 times the real value (to have the tenth).
The STE2 works on this principle, so there is no need to change the value, but in the case of
another sensor that does not follow this rule, the input data can be adapted by dividing it by this
value.
►
Sensor value:
to check the correct configuration of the sensor, the most recent value returned by
the SNMP sensor and formatted for display (with its unit) will be shown.
If the sensor does not respond or is disabled, the sensor value will be set to "--".
A. Temperature display in the LEDI X Web Pages
With the Sensor option enabled on the LEDI and after the SNMP sensors have been properly set up in
the "Sensor Settings" web page, you must now select which sensor data to display on which display
and configure the desired display time.
For this purpose, new options are available in the LEDI X tabs of the LEDI Settings page:
Summary of Contents for LEDI
Page 10: ...10 MDE LEDI 1099V4 0 Outdoor clock wall mount...
Page 11: ...MDE LEDI 1099V4 0 11 ENGLISH LEDI POOL Wall mount LEDI WORLD Wall mount...
Page 16: ...16 MDE LEDI 1099V4 0 1 3 5 Ceiling Mounting with bracket for LEDI outdoor clock single face...
Page 18: ...18 MDE LEDI 1099V4 0 1 3 7 Ceiling Mounting with bracket for LEDI outdoor clock double face...
Page 20: ...20 MDE LEDI 1099V4 0 1 3 9 Ceiling Mounting with bracket for LEDI World...
Page 26: ...26 MDE LEDI 1099V4 0...
Page 34: ...34 MDE LEDI 1099V4 0 4 1 1 Configuration date heure...
Page 36: ...36 MDE LEDI 1099V4 0 4 2 LEDICA CLOCK 4 2 1 Settings hour minute 4 2 2 Advanced settings...
Page 37: ...MDE LEDI 1099V4 0 37 ENGLISH 4 2 3 Setting the calendar...


