87
Configure the sound
of the general door panel in EL501 mode, (see page 85).
module
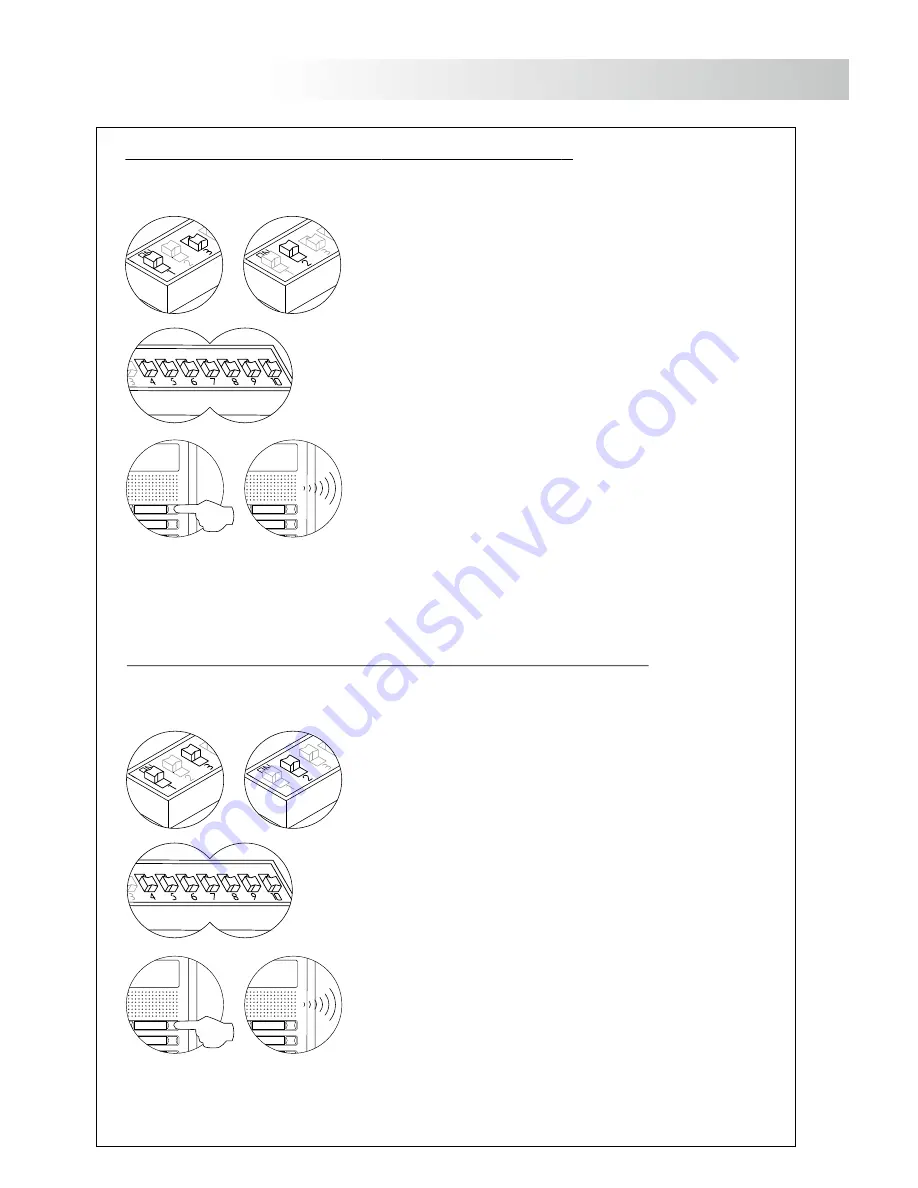
Locate the SW2 configuration dip switch of the general door
panel to program, placed at the upper left side (back) of the
sound module. With the switches 1 and 3 to OFF, set the switch
2 to ON: to show that the system is ready for programming,
the general door panel will reproduce a tone.
Pick up the monitor/telephone handset of the apartment to
program and press the door release push button until to
establish communication of audio with the general door
panel.
Press the general door panel push button that will call to this
monitor or telephone. At this moment the general door
panel will reproduce a tone. To finish the push button
programmation, replace the monitor/telephone handset;
to show that the push button has been succesfully
programmed, the general door panel will reproduce a tone.
Make a call to check that the push button has been succesfully programmed.
Repeat these steps to program the rest of push buttons.
Once the programming has been finished, set to OFF the programming
switch. If you don't, the general door panel will reproduce a tone to advise
that the system is still into programming mode.
G
eneral door panel (programming modes).
This programming mode allows to assign a monitor / telephone (programmed) to the push button of
the general door panel that it wishes to call.
Before the monitors/telephones of the inner door panel/s must be programmed, see the corresponding
monitor / telephone manual, (see page 74 for manual web link).
IMPORTANT:
Before programming the general door panel push buttons, switch off the
porter's
exchange (if exists).
Programming the push button (by call of monitor/telephone):
The general door panel permits the following programming modes:
O
Programming the push button (by call of monitor).
O
Programming the push button (with a backbone code).
O
Programming the push button (with a monitor/telephone code).
O
Programming the monitor/telephone.
P
rogramming the push buttons of the general door panel.
GENERAL DOOR PANEL INSTALLATION
88
GENERAL DOOR PANEL INSTALLATION
Define a backbone code to program with dip switches Sw2-4 to Sw2-
10. Set a code between 1 and 120. To set the code use binary
coding, (see page 86).
Press the general door panel push button that is wished has this
backbone code. At this moment the general door panel will
reproduce a tone, confirming that the push button has been
succesfully programmed.
Repeat these steps to program the rest of push buttons. Once the programming has been finished,
set to OFF the programming switch. If you don't, the general door panel will reproduce a tone to
advise that the system is still into programming mode.
Programming the push button (with a monitor/telephone code):
This programming mode allows to assign a monitor/telephone code to push button of the general
door panel.
Locate the SW2 configuration dip switch of the general door
panel to program, placed at the upper left side (back) of the
sound module. With the switches 1 and 3 to ON, set the
switch 2 to ON: to show that the system is ready for
programming, the general door panel will reproduce a tone.
Press the general door panel push button that is wished has this
monitor/telephone code. At this moment the general door
panel will reproduce a tone, confirming that the push button
has been succesfully programmed.
Repeat these steps to program the rest of push buttons. Once the programming has been finished,
set to OFF the programming switch. If you don't, the general door panel will reproduce a tone to
advise that the system is still into programming mode.
Define a monitor/telephone code to program with dip switches Sw2-4
to Sw2-10. Set a code between 1 and 120. To set the code use
binary coding, (see page 86).
Programming the push button (
):
with a backbone code
This programming mode allows to assign a backbone code to push button of the general door panel.
Locate the SW2 configuration dip switch of the general door
panel to program, placed at the upper left side (back) of the
sound module. With the switch 1 to ON and 3 to OFF, set the
switch 2 to ON: to show that the system is ready for
programming, the general door panel will reproduce a tone.
T-540 Plus SE
Tekna Plus SE


