


TCM transform function is a particular
function that owned by Godox:
TTL flash value transform into
power output value in M mode.
1.1
Set the flash trigger to TTL
mode and attach it to the
camera. Press the shutter for
shooting.
1.2
Long press the <
TCM
> button, and the flash value in TTL mode will be
transformed into power output value in M mode (The displayed minimum
value is the set Min. value).
1.3
Please refer to the C.Fn setting custom functions to see the flash models
which are compatible with TCM functions.
Note: Please choose the relevant models in TCM function in C.Fn custom settings
according to your own flash.
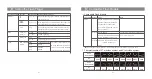
CH1
Zm/CH
MOD
A
B
C
D
E
ALL
--
TTL
--
--
--
CH1
Zm/CH
MOD
A
B
C
D
E
ALL
--
--
--
--
1/
128
1.
High-speed sync: setting the
SYNC in flash function setting to FP
on FUJIFILM camera until is
displayed on the flash trigger’s LCD
panel. Then, setting the camera
shutter.
2.
Second-curtain sync: setting the
SYNC in flash function setting to
REAR on FUJIFILM camera until
is displayed on the flash trigger’s
LCD panel. Then, setting the camera
shutter.
Shutter Sync Settings
Press the <
MENU
> button to enter C.Fn BEEP and press the
<
SET
> button. Choose ON to turn on the BEEP while OFF to
turn off it. Press the <
MENU
> button again to back to the
main menu.
Buzz Settings
1.
Press the <
MENU
> button to enter C.Fn SYNC and
press the <
SET
> button to choose IN or OUT. Press
the <
MENU
> button again to back to the main menu.
1.1
When choosing IN, this sync socket will enable
XProF to trigger flash.
1.2
When choosing OUT, this sync socket will send
trigger signals to trigger other remote control and
flash.
Sync Socket Settings
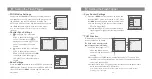
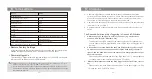
TCM Function
Setting the Flash Trigger
Setting the Flash Trigger
ZOOM Value Settings
Short press the <
Zm/CH
> button and the ZOOM value will
be displayed on the LCD panel. Choose the group and turn
the select dial, and the ZOOM value will change from
AUTO/24 to 200. Choose the desired value and short press
the <
Zm/CH
> button again to back to the main menu.
Note: The flash’s ZOOM should be set to Auto (A) mode before
responding.
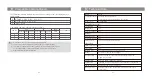
CH1
Zm/CH
MOD
Zoom 28
A
B
C
D
E
Zoom 24
Zoom 24
Zoom 24
Zoom 24
CH1
A
B
C
D
E
--
M
1
/16 + 0.3
--
--
--
Zm/CH
ALL
MOD
CH1
A
B
C
D
E
--
M
1
/16 + 0.3
--
--
--
Zm/CH
ALL
MOD
C.Fn
Ver 9.2
OFF
ON
CLEAR
MIN
LIGHT
STBY
BEEP
C.Fn
Ver 9.2
GROUP
LCD
SHOOT
SYNC
IN
OUT
CLEAR
- 38 -
- 37 -