

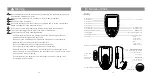


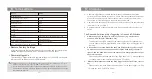


XProF
0-100m
2.4G
MSK
32
01-99
16
Large LCD panel, backlighting ON or OFF
90x58x50mm/80g
2413.0MHz-2464.5MHz
5dbm
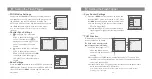
Restore Factory Settings
Synchronously press the two function button in the middle, and the restore factory
settings are finished until the “RESET” is displayed on the LCD panel.
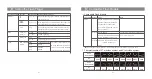
Technical Data
Attentions
1.
Unable to trigger flash or camera shutter. Make sure batteries are installed
correctly and Power Switch is turned on. Check if the transmitter and the receiver
are set to the same channel, if the hotshoe mount or connection cable is well
connected, or if the flash triggers are set to the correct mode.
2.
Camera shoots but does not focus. Check if the focus mode of the camera or lens
is set to MF. If so, set it to AF.
3.
Signal disturbance or shooting interference. Change a different channel on the
device.
The Reason & Solution of Not Triggering in Godox 2.4G Wireless
1. Disturbed by the 2.4G signal in outer environment (e.g. wireless base
station, 2.4G wifi router, Bluetooth, etc.)
→
To adjust the channel CH setting on the flash trigger (add 10+ channels) and
use the channel which is not disturbed. Or turn off the other 2.4G equipment in
working.
2. Please make sure that whether the flash has finished its recycle or caught
up with the continuous shooting speed or not(the flash ready indicator is
lighten) and the flash is not under the state of over-heat protection or other
abnormal situation.
→
Please downgrade the flash power output. If the flash is in TTL mode, please try
to change it to M mode(a preflash is needed in TTL mode).
3. Whether the distance between the flash trigger and the flash is too close or
not
→
Please turn on the “close distance wireless mode” on the flash trigger (
<
0.5m):
→
Please set
the C.Fn-DIST to 0-30m.
Model
Wireless Flash
Transmission range (approx.)
Built-in wireless
Modulation mode
Channel
Wireless ID
Group
Other
Display
Dimension/Weight
2.4G Wireless Frequency Range
Max. Transmitting Power of 2.4G Wireless
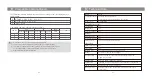
Firmware Upgrade
This flash trigger supports firmware upgrade through the Type-CUSB port. Update
information will be released on our official website.
USB
connection line is not included in this product. As the
USB
port is a Type-C
USB
socket, please use Type-C
USB
connection line.
As the firmware upgrade needs the support of Godox G2 software, please download
and install the "Godox G2 firmware upgrade software" before upgrading. Then, choose
the related firmware file.
- 46 -
- 45 -