background image

5.3 Installing the Cutter 

The Overview of the Cutter 


Preparation Steps 

Please see the Section 5.1 Preparation Steps to complete the preparation steps before installing the cutter. 
 

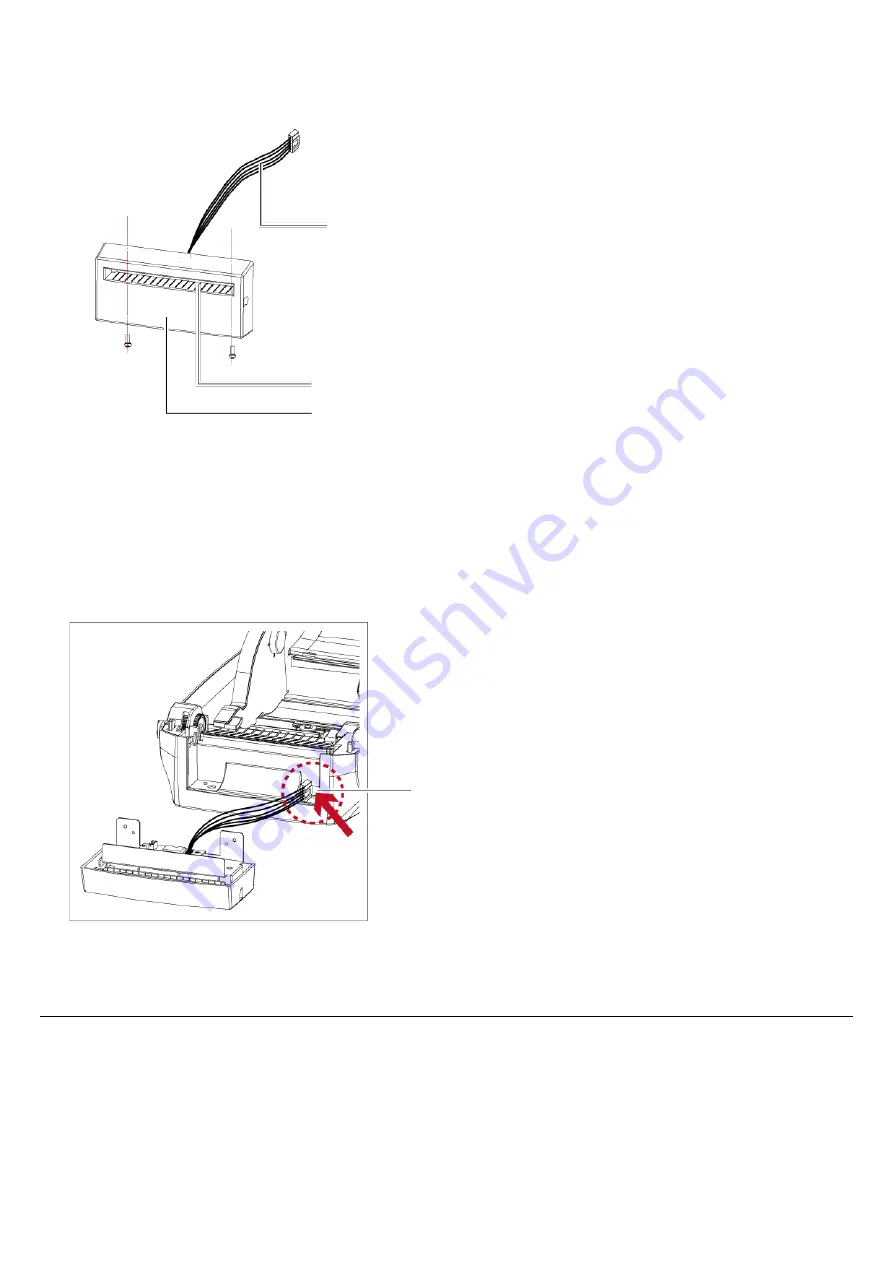
Installing the Cutter 

1.


Pass the connection cable through the slot of the printer. 


Note 

        * Remember to switch off the printer before installing the cutter. 

        * Do not use to cut adhesive labels! Glue residue will be left on the cutter blade and impair its functioning. The   


cutter has a blade life of 400,000 cuts when using paper liner which is 250μm thick and 76.2mm (3 inches) wide.


        * You can cut paper with a max. width of 118mm. 

        * With the cutter installed, set the stop position in Qlabel to 30, and the E value to 30. 


CONNECTION CABLE OF CUTTER


FEED-OUT SLOT


COVER


SLOT


Summary of Contents for RT800i Series

Page 1: ...RT800i SERIES BARCODE PRINTER USER MANUAL User Manual RT800i Series Version Ver E 6 Issue Date 2022 09 01 P N 920 015411 00 ...

Page 2: ...thernet 44 4 1 Installing the NetSetting software 44 4 2 The Interface of NetSetting 46 5 Accessories 53 5 1 Preparation Steps 53 5 2 Installing the Label Dispenser 55 5 3 Installing the Cutter 61 5 4 Cleaning Method 65 5 5 Installing the For RT860i 66 5 5 Installing the bluetooth module For RT833i RT863i 67 5 6 Installing the WiFi Module For RT860i 68 5 6 Installing the WiFi Module For RT833i RT8...

Page 3: ...y based on the standards EN55032 2012 AC 2013 Class A EN61000 3 2 2014 EN 61000 3 3 2013 and EN55024 2010 IEC 61000 4 2 2008 series The equipment also tested and passed in accordance with the European Standard EN55032 for the both Radiated and Conducted emissions limits TO WHICH THIS DECLARATION RELATES IS IN CONFORMITY WITH THE FOLLOWING STANDARDS IEC 62368 1 2014 IEC 60950 1 2005 2nd Edition Am ...

Page 4: ...e equipment to avoid electrical shock 6 For safety and warranty reasons ONLY qualified service personnel should open the equipment 7 Do not repair or adjust energized equipment under any circumstances Caution Danger of explosion if battery is incorrectly replaced Replace only with the equivalent type recommended by the manufacturer Dispose of used batteries according to the manufacturer s instruct...

Page 5: ...f the following items are included with your printer Package content and Logo style may vary per region RT800i Barcode Printer Label Stock USB Cable Quick Guide Ribbon Module Power Adapter Empty Ribbon Core Ribbon Ribbon Hubs For RT863i Power Cord AC Adapter ...

Page 6: ...TON FEED BUTTON TOUCH PANEL FRONT COVER COVER RELEASE CATCHES Pull catches for opening the printer cover CALIBRATION BUTTON FAN FOLD LABEL INSERT Feed slot for outside continuous labels PARALLEL PORT USB HOST ETHERNET PORT SERIAL PORT USB PORT PRINTER COVER POWER JACK ...

Page 7: ...ottom View Note Cut outs are not intended for wall mount use Please make sure that the machine and personnel protective measures in case you need to use the wall mount COVER OF THE MODULE CONNECTION JACKS ...

Page 8: ... PLATE Set of 2 LABEL SUPPLY HUB Set of 2 LABEL GUIDE Set of 2 RELEASE CATCH Release catch for opening the label supply hub RELEASE CATCH Release catch for closing the printer cover LABEL SENSOR MODULE LABEL SENSOR GUIDE TRACK PLATEN MODULE PLATEN PLATEN LOCKERS ...

Page 9: ...ism RIBBON REWIND MECHANISM PRINT HEAD RIBBON SUPPLY MECHANISM PAPER PRESS BAR NOTCH OF RIBBON SUPPLY WHEEL RIBBON SUPPLY WHEEL COVER The cover for Ribbon rewind mechanism NOTCH OF RIBBON REWIND WHEEL RIBBON REWIND WHEEL ...

Page 10: ...ce Open the printer cover by pulling the cover release catches on both sides of the printer and lift the printer cover Pull the catches toward the direction Pull the catches toward the direction COVER RELEASE CATCHES Pull the catches for opening the printer cover The printing mechanism is lifted up with the printer cover ...

Page 11: ... ribbon 2 Insert the ribbon hub into empty ribbon core and new ribbon Wind the ribbon around the empty ribbon core for 2 to 3 circles 3 A ribbon module is assembled as below A NEW RIBBON EMPTY RIBBON CORE RIBBON HUB Stick on empty ribbon core Insert the ribbon hub Wind the ribbon around the core A NEW RIBBON MODULE RIBBON SUPPLY RIBBON REWIND ...

Page 12: ...he left hand side of ribbon hub first Make sure the holder of ribbon hub is inserted into the notch Then place the right hand side of ribbon hub RIBBON SUPPLY MECHANISM NOTCH OF RIBBON SUPPLY WHEEL RIBBON SUPPLY WHEEL RIBBON SUPPLY MODULE Place Left side Place HOLDER NOTCH OF RIBBON SUPPLY WHEEL Place HOLDER NOTCH Right side ...

Page 13: ... ribbon supply module loading is completed Load the Ribbon on the Printer For Ribbon Rewind Module RELEASE CATCH Release catch for closing the printer cover Push Close the printer cover RIBBON REWIND MECHANISM COVER The cover for Ribbon rewind mechanism NOTCH OF RIBBON REWIND WHEEL RIBBON REWIND WHEEL ...

Page 14: ... rewind mechanism Please the left hand side of ribbon hub first Make sure the holder of ribbon hub is inserted into the notch Then place the right hand side of ribbon hub Open the cover Place Left side Place Right side Place RIBBON REWIND MODULE NOTCH OF RIBBON REWIND WHEEL HOLDER HOLDER NOTCH ...

Page 15: ...the ribbon until it has no wrinkles 4 Close the cover of ribbon rewind mechanism The ribbon loading is completed once the ribbon supply module and ribbon rewind module are assembled correctly RIBBON REWIND WHEEL Rotate backward Close the cover ...

Page 16: ... both hubs Adjust the label guide plates to fix the label width Remember to push the release catch when moving the label guide plates LABEL STOCK LABEL SUPPLY MODULE LABEL GUIDE Set of 2 RELEASE CATCH Release catch for opening the label supply hub Pull to open Place Close the plates LABEL GUIDE PLATE Set of 2 LABEL SUPPLY HUB Set of 2 LABEL GUIDE PLATE Set of 2 RELEASE CATCH Release catch for open...

Page 17: ...o close the printer cover 5 Press the FEED key and make sure the label is fed smoothly The label loading is completed now Note Please keeps the rack gear clean to ensure the smoothness of label holder Through the label guides LABEL GUIDE Set of 2 Close the printer cover RELEASE CATCH Release catch for closing the printer cover ...

Page 18: ... the printer is switched off 2 Connect the power cord to the AC adapter Connect the jack of the power adapter to the printer and connect the plug of the power adapter to the socket of the wall POWER CORD AC ADAPTER POWER ADAPTER JACK SLOT Plug Socket RT860i BARCODE PRINTER ...

Page 19: ...USB serial cable to the printer and host computer 4 Pressing the power button The Touch Panel LCD will lights up RT860i BARCODE PRINTER USB PORT USB CABLE PLUG PLUG PC SOCKET TOUCH PANEL LCD Pressing the power button ...

Page 20: ...STALLATION 2 The wizard will then ask you to make sure your USB and power cables are connected and that the power is turned on Then click NEXT 3 The next screen you will see is Install the GoLabel Software and Windows driver Click NEXT to continue Note If the Super Wizard program did not run automatically you can either turn on the Auto run setting for your CD DVD driver or double click the icon o...

Page 21: ...ou will see Installation completed Click NEXT to continue 5 You can also print a test label If don t print a test label the screen display as step 6 Note If you need more resources tools or reference documents you can also find them on Super Wizard CD Just click Other Choices on the Welcome Screen to access the files ...

Page 22: ...6 Once the installation is complete you can start to make and print labels with GoLabel or through the printer driver ...

Page 23: ... 1 Click OTHER CHOICES to next screen and select PRINTER DRIVERS 2 Click INSTALL SEAGULL SCIENTIFIC WINDOWS DRIVER to next screen and click NEXT 3 Select I accept the terms in the license agreement and click Next then click Finish to step 4 ...

Page 24: ...l printer drivers and click Next 5 With a USB connection search models such as the right diagram printer device Specify your printer model and click Next 6 Enter the printer name you can use default then click Next to display as right diagram Click Finish button to start installation ...

Page 25: ...7 Driver installation completed ...

Page 26: ...on you need to run the auto detection function for your media please see Section 3 4 Label Calibration and Self Test PAUSE PRINTING_FEED Button Pressing the FEED button during printing will interrupt printing and the LCD display message PAUSE When the FEED button is pressed again the printer resumes printing Example While a 10 label print job is running you press the FEED button to pause the print...

Page 27: ...s If the printer is on ready to print status the LCD screen should display the message Ready on the screen Use touch gestures to get around the main screen and other screen for setting Power on Tap the screen with your finger when you want to select on screen items such as settings icons RT8XXi VX XXX Ready Main Wizard Test ...

Page 28: ...nd Calibration for setting Tap Wizard Set up printer of Darkness Speed RT8XXi VX XXX Ready Main Wizard Test Printer Settings LCD Langua g Code Page Label Settings Devices Printer Control Recall Label RT8XXi VX XXX Ready Darkness Wizard Speed Media Type X Offset Y Offset Continuous RT8XXi VX XXX 自我測試 Self Test Page Test 主選單 Main Wizard Test Ready Main Wizard Test Main Calibration ...

Page 29: ...ions locked printer can not modify settings from GoLabel or any devices Unlock Lock Printer Settings Darkness Speed Sensor Select Media Type Auto Select Continuous Main Printer Settings Darkness Speed Sensor Select Media Type Auto Select Continuous Printer Settings LCD Langua g Label Settings Devices Printer Control Recall Label ...

Page 30: ...eration Preview Label function User can choose any labels to preview it before print it From the Ready page tap to Main page From the Main page tap Recall Label to Recall Label page Enter Standalone Y N Recall Label Country Code Clock Setting Database Setting Label Edit Main Wizard Test Ready Main Printer Settings LCD Langua g Label Settings Devices Printer Control Recall Label ...

Page 31: ...all Label Page the touch panel shown on all labels Tap up to choose labels Tap down to choose labels Tap Preview Label can see printing label Preview Label 預覽標籤 Recall Label Print out selected label Preview Label Recall Label Preview Label ...

Page 32: ...er set for a particular language Setting items for printing label ex Rotation Printing position offset Providing Buzzer Option Setting Smart Backfeed Serial Port Setting LAN Setting LCD Setting Clock Setting WiFi Setting and Bluetooth Setting Self Diagnose functions for printer ex Calibration Self Test page and Clear Memory Recall Label and preview label Main Printer Settings LCD Languag Label Set...

Page 33: ... items for LAN ex DHCP IP Address Subnet Mask Gateway Setting items for LCD ex off or on for Password function Correction Setting items for Clock ex Year Month Day Hour Minute and off or on for Visible function Buzzer Option Setting Programing Language Serial Port Setting LAN Setting LCD Setting Clock Setting Bluetooth Setting WiFi Setting Devic e Main Printer Settings LCD Languag Label Settings D...

Page 34: ...English Deutsch Français Español Italiano 簡體中文 繁體中文 Türkçe 日本語 Pусский Code Page 850 852 437 860 863 865 857 861 862 855 866 737 851 869 Windows 1252 Windows 1250 Windows 1251 Windows 1253 Windows 1254 Windows 1255 Windows 1257 Label Settings Rotation 0 90 180 270 X Offset 100 100 Y Offset 100 100 Start Offset 100 100 Devices Buzzer OFF ON Option Setting None Cutter Label Dispenser Applicator Prog...

Page 35: ...ck Setting Visible OFF ON Y M D H Min Printer Control Test Configuration Directory TPH Testing Dump Mode Sample Pattern Self test page Balance Select Memory 內部 外部 Clear Memory Label Format Graphic Bitmap Fonts Ture Type Fonts Asian Fonts ALL Calibration Reset to Default Wizard Darkness 0 19 Speed 2 3 Media Type Label with Gaps Label with Marks Continuous X Offset 100 100 Y Offset 100 100 ...

Page 36: ...ly print when you see the Ready status If there is any printers error the LCD screen will display the error screen to show the type of error You can fix the error according the notice or contact the supplier WARNING ICON ERROR ICON ERROR DESCRIPTION Main Wizard Test Ready Check Media Any support needed please contact your supplier ...

Page 37: ...starts to flash red release the FEED button The printer will now measure the label stock and store the label height 4 Once the printer has successfully measured the label stock it will print a self test label The contents of a self test printout are listed below Model Version USB ID setting Serial port setting MAC address of Ethernet port IP address setting Gateway setting Sub Mask setting Port st...

Page 38: ...ange using gap label to continuous or black mark labels Press Calibration button for 1 2 seconds it will make an auto sensing to calibrate the label s parameters Note Press Calibration button is equivalent to the auto sensing command S SENSOR that will cancel on printing job and make the Label Calibration immediately Press and hold about 1 2 seconds Press and hold about 1 2 seconds CALIBRATION BUT...

Page 39: ...edia Error 2 x 3 beeps No ribbon is installed and the printer displays an error Make sure that the printer is set to direct thermal printing mode The ribbon is finished or the label supply hub is not moving Replace the ribbon roll Media Error 2 x 2 beeps No paper is detected Make sure that the label sensor is positioned correctly If the sensor still does not detect the paper run the auto detection...

Page 40: ...to find file The printer prints the message File not found Use the X4 command to print all files Then check whether the files exist and whether the names are correct A file of the same name already exists The printer prints the message Duplicated Name Change the name of the file and try storing it again File System Full File Not Found Duplicated Name ...

Page 41: ...ing function printer will create a Folder LABELDIR and switch User Flash to Extended Memory automatically while user plugs an USB memory stick into a GoDEX printer Connect USB with the printer To connect PC and printer through USB Usage of Firmware Update Remove USB memory stick from printer and plug in it to a PC s USB port Copy a new version of Firmware xxxx bin to the Folder LABELDIR FW Remove ...

Page 42: ...n follow the steps in the first step choose whether or not Y N into the keyboard mode Scanner When plug in an USB scanner to the printer LCD touch panel will display Enter Standalone tap the Feed Key to entering Keyboard Mode operation Note The USB Host port on printer is not support USB HUB function The USB Memory Stick supports with FAT32 Disk Format and up to 32GB only The certified venders are...

Page 43: ...Tap Printer Control 3 It will show Printer Control setting items such as Configuration Directory TPH Testing Dump Mode Please select to Dump Mode STEP 2 Make sure pinter ready for print a label STEP 3 Send a label or commands which met problem to the printer STEP 4 Printer will print out a label with letters and numbers please take a picture on them and send us by email To cancel get out of the Du...

Page 44: ...ort It is available on product CD or can be downloaded from official website To install the NetSetting please follow below steps 1 Insert the product CD in the CD DVD drive and click OTHER CHOICES buttom 2 Select ETHERNET 3 Click Install Ethernet NetSetting Software installation screen as right diagram click Next 4 Specify the Installation Folder then click Next to installing ...

Page 45: ...5 Once the installation is completed you will see the NetSetting icon on your desktop as right diagram ...

Page 46: ...con to start the program you will see the start page as left diagram Click the magnifier icon to search the Godex printers which are connected via Ethernet port in you network environment as right diagram 2 There are six tabs on the top of interface which can configure different types of network settings But for the data security reason you need correct password to enter the configuration pages No...

Page 47: ...inter name Port number Gateway setting and the password for configuring the printer You can also set the printer s IP address ether by DHCP or by Static IP You can press Set button to apply the settings and ReGet button to refresh the setting values ...

Page 48: ...ened on printer The alertmessages are sent by SMTP Simple Mail Transfer Protocol or SNMP Simple Network Management Protocol You can set or change the configurations of SMTP and SNMP on this Alert Path Setting tab You can press Set button to apply the settings and ReGet button to refresh the setting values ...

Page 49: ...ication function you can decide which error cases need to be sent out to the operator Moreover the alert messages can be set to be sent by SMTP SNMP or both You can press Set button to apply the settings and ReGet button to refresh the setting values ...

Page 50: ...t or change the configurations of connected printer Most of key settings for the printer operation can be done by this setting page You can press Set button to apply the settings and ReGet button to refresh the setting values ...

Page 51: ...commands in Input Command window and press Send Command button the commands will be sent to the printer For some commands that will return response message the message will be displayed in Output Message window You can press Send Command button to send printer commands via Ethernet port and control the printer remotely ...

Page 52: ...need to update the printer firmware just specify the file location of firmware file and press Start Download Firmware button The printer firmware then can be updated remotely In addition to the firmware update you can press Recover To Factory Settings button to restore the printer configurations back to factory default ...

Page 53: ... any module 2 Open the printer cover and the printing mechanism Open the printer cover by pulling the release catches on both sides of the printer and lift the cover Please see the Section 2 1 for further information about Open the Printer 3 Remove the front cover Please pull upward to remove the front cover The printing mechanism is lifted up with the printer cover Pull upward Front cover ...

Page 54: ... and pull upward the platen 5 Ribbon loading Please see the Section 2 2 for further information about Loading the Ribbon 6 Label loading Please see the Section 2 3 for further information about Loading the Label Roll Module Release the clip CLIP PLATEN MODULE Pull up the platen module ...

Page 55: ...ront panel 2 Press the catches on the left and right sides of the platen downwards and then pass the connection cable through the slot of the printer Note A label liner thickness of 0 06 mm 10 and a weight of 65 g m2 6 are recommended The label dispenser will take labels up to a max width of 118 mm When using the label dispenser set the stop position printer command E to 13 PAPER SENSOR PAPER FEED...

Page 56: ...cover of the label dispenser and then tighten the screws 5 Close the printer cover and printing mechanism Then to turn the printer upside down Open the cover Tighten the screws Screw Hole Close the printer cover Push Push Release catch for closing the printer cover ...

Page 57: ...inter must be switched off when plugging the connector or the motherboard may be destroyed There are 2 jacks the lower jack for the label dispenser the upper jack for the cutter COVER OF THE MODULE CONNECTION JACKS Open the cover Plug JACK CONNECTOR OF THE CONNECTION CABLE Close the cover COVER OF THE MODULE CONNECTION JACKS CUTTER JACK LABEL DISPENSER JACK ...

Page 58: ...through the label guides And pull the label liner through the platen and the steel of the label dispenser Note With Label Dispenser the labels should be at least 25 mm high LABEL STOCK LABEL LINER THE FIRST LABEL Tear a label Through the label guides Through the platen and the steel STEEL PLATEN LABEL LINER ...

Page 59: ...feeding path of label and liner should be as shown in below graphic 4 Close the label dispenser and printer cover The installation is completed now Close the cover LABEL LABEL LINER LABEL STOCK PLATEN ROLLER ...

Page 60: ...le it passes through the label dispenser Note There is a paper sensor on the Label Dispenser module It will stop the printing if it is covered by label Remove the last printed label and the printer will then continue to print next label Press the feed key LABEL LABEL LINER PAPER SENSOR ...

Page 61: ... Remember to switch off the printer before installing the cutter Do not use to cut adhesive labels Glue residue will be left on the cutter blade and impair its functioning The cutter has a blade life of 400 000 cuts when using paper liner which is 250μm thick and 76 2mm 3 inches wide You can cut paper with a max width of 118mm With the cutter installed set the stop position in Qlabel to 30 and the...

Page 62: ...of the bottom barcode Printer 3 Place the platen back to the printer and lock the clips 4 Close the printer cover and printing mechanism Then to turn the printer upside down Tighten the screw Screw Hole Lock the clip CLIP Push Close the printer cover RELEASE CATCH Release catch for closing the printer cover ...

Page 63: ...ote The printer must be switched off or the motherboard may be destroyed There are 2 jacks the lower jack for the label dispenser the upper jack for the cutter COVER OF THE MODULE CONNECTION JACKS Open the cover JACK CONNECTOR OF THE CONNECTION CABLE Plug Close the cover COVER OF THE MODULE CONNECTION JACKS CUTTER JACK LABEL DISPENSER JACK ...

Page 64: ...s the FEED button to set the label position Note We advise against using inside wound label stock Labels should be at least 30 mm high When using the printer with the cutter you should set the stop position E to 30 Through the label guides Through the cutter Close the top cover Push Press the feed key RELEASE CATCH Release catch for closing the printer cover ...

Page 65: ...5 4 Cleaning Method 1 Remove the screws and cover 2 Wipe with a cotton swab or dry lint free cloth ...

Page 66: ...off before installing the bluetooth module Insert Bluetooth module into the slot Push the module till the indication line aligns to the edge of mainboard to avoid signal error Close the option cover Module not inserted parallel to the mainboard Module not completely inserted Power off and open the option cover ...

Page 67: ...5 5 Installing the bluetooth module For RT833i RT863i Step 1 Step 2 Step 3 Bluetooth Module ...

Page 68: ...odule message communication through LAN port please make sure WiFi module has been removed when you want to use LAN port Module not inserted parallel to the mainboard Module not completely inserted Power off and open the option cover Insert Bluetooth module into the slot Push the module till the indication line aligns to the edge of mainboard to avoid signal error Close the option cover ...

Page 69: ...5 6 Installing the WiFi Module For RT833i RT863i Step 1 Step 2 Step 3 ...

Page 70: ...ifespan of the print head Cleaning Steps 1 Switch off the printer 2 Open the printer cover 3 Remove the ribbon 4 To remove any label residue or other dirt from the print head see Red arrow please use a soft lint free cloth dipped in alcohol to wipe Note Weekly to clean the print head one time Recommended When cleaning the print head please note that if there is attached to metal or hard on soft cl...

Page 71: ...orrect There is no printed image on part of the label or the image is blurred Check the thermal print head for dust or other dirt Use the internal T command to check whether the thermal print head will carry out a complete print job Check the quality of the print medium The printed image is positioned incorrectly Check whether there is paper or dust covering the sensor Check whether the label stoc...

Page 72: ...d vertical directions TTF Fonts TTF Fonts Bold Italic Underline 0 90 180 270 rotatable Barcodes 1 D Bar codes China Postal Code Codabar Code 11 Code 32 Code 39 Code 93 Code 128 subset A B C EAN 8 EAN 13 with 2 5 digits extension EAN 128 FIM German Post Code GS1 DataBar HIBC Industrial 2 of 5 Interleaved 2 of 5 I 2 of 5 Interleaved 2 of 5 with Shipping Bearer Bars ISBT 128 ITF 14 Japanese Postnet L...

Page 73: ...le single characters 90 180 270 rotatable Bitmap fonts 8 times expandable in horizontal and vertical directions Barcodes 1 D Bar codes China Postal Code Codabar Code 11 Code 32 Code 39 Code 93 Code 128 subset A B C EAN 8 EAN 13 with 2 5 digits extension EAN 128 FIM German Post Code GS1 DataBar HIBC Industrial 2 of 5 Interleaved 2 of 5 I 2 of 5 Interleaved 2 of 5 with Shipping Bearer Bars ISBT 128 ...

Page 74: ...Shipping Bearer Bars ISBT 128 ITF 14 Japanese Postnet Logmars MSI Postnet Plessey Planet 11 13 digit RPS 128 Standard 2 of 5 Telepen Matrix 2 of 5 UPC A UPC E with 2 or 5 digit extension UCC EAN 128 K Mart and Random Weight 2 D Bar codes Aztec code Code 49 Codablock F Datamatrix code MaxiCode Micro PDF417 Micro QR code PDF417 QR code TLC 39 GS1 Composite Code Pages CODEPAGE 437 737 850 851 852 855...

Page 75: ...ort Type RJ45 Pin NO 1 2 3 4 5 6 7 8 TX TX RX NC NC RX NC NC USB Host Connector Type Type A Pin NO 1 2 3 4 VBUS D D GND Parallel Port Type Centronics Female Pin NO 1 2 3 4 5 6 7 8 9 10 11 12 13 14 15 16 17 18 BUZY SELECT ACK FAULTN LPT PERR DATA0 DATA1 DATA2 DATA3 DATA4 DATA5 DATA6 DATA7 LPT INTN STROB SELIN AUTO NC Pin NO 19 20 21 22 23 24 25 26 27 28 29 30 31 32 33 34 35 36 GND GND GND GND GND G...

Page 76: ... substituted by or following either one D database A Asia font C TTF font E Bit Mapped font F label form G graphic S serial file T text B Unicode Table Description Copy file from USB memory stick to Flash memory or vise versa Example MCPY F F D F MCPY D G F Move Syntax MMOV s o x d o x Parameter s source device of stored object D for USB memory stick F for internal Flash memory d destination devic...

Page 77: ...Install the Bluetooth module Note Methods for installing Bluetooth module please refer to Bluetooth module manual Step 3 A gray Bluetooth icon will be displayed in the main page after switching on the printer and it indicates that the printer has detected the Bluetooth module Ready Main Wizard Test ...

Page 78: ...a Bluetooth keyboard the printer will detect Bluetooth keyboard automatically as the figure indicates below Step 2 The indicator at the upper left corner of Bluetooth keyboard will flash blue when it has been detected Step 3 The indicator will stop flashing if the Bluetooth keyboard connects to printer properly Power Connect button ...

Page 79: ...Bluetooth Settings Device Bluetooth Settings OFF HID Mode Clear Bind Search Devices Setp5 Profile into HID Mode and then click Search Devices Main Profile Main Wizard Test Printer Settings LCD Languag Label Settings Devices Printer Control Recall Label Buzzer Option Setting Programing Language Serial Port Setting LAN Setting LCD Setting Clock Setting Bluetooth Setting WiFi Setting ...

Page 80: ...d figure right Step 7 Press ON button on the LED panel to create a connection between the printer and the Bluetooth keyboard and then the LCD panel will display Please Enter PIN Code Enter the PIN Code into the printer via the Bluetooth keyboard Note The PIN Code does not need to be entered if the SSP of the printer and the Bluetooth keyboard is set ON Waiting MAC Address Device Please Enter PIN C...

Page 81: ...oth as the figure below indicates The upper left corner of Bluetooth keyboard will stop flashing at this time If the current panel is switched to main menu the LCD panel will display Bluetooth and Keyboard icons as the figure below indicates OFF HID Mode Clear Bind Search Devices Ready Main Wizard Test Bluetooth Settings Profile ...

Page 82: ...Step 3 Select Device Step 4 Select Bluetooth settings Step 5 Set Profile into SPP Mode Bluetooth Settings Ready Main Wizard Test Main Printer Settings LCD Languag Label Settings Devices Printer Control Recall Label Device Buzzer Option Setting Programing Language Serial Port Setting LAN Setting LCD Setting Clock Setting Bluetooth Setting WiFi Setting OFF SPP Mode Clear Bind Search Devices Profile ...

Page 83: ...ach mobile phone Step 1 Open Setting manu of mobile phone and select Bluetooth Step 2 After selecting Open of Bluetooth mobile phone will automatically detect Bluetooth devices Select the desired device name After the connection is successfully created the mobile phone will display the matched device name as the figure below indicates ...

Page 84: ...he icon at the bottom right of Go APP Step 5 Select the desired device name and MAC Address Step 6 The icon at the bottom right of Go APP will turn blue when the mobile phone and Bluetooth are properly connected Device name and MAC Address ...

Page 85: ...lect Devices Step 4 Select Bluetooth settings Step 5 Set Profile into SPP Mode Ready Main Wizard Test Code Page OFF SPP Mode Clear Bind Search Devices Bluetooth Settings Main Profile Printer Settings LCD Languag Label Settings Devices Printer Control Recall Label Devic e Buzzer Option Setting Programing Language Serial Port Setting LAN Setting LCD Setting Clock Setting Bluetooth Setting WiFi Setti...

Page 86: ...ach Bluetooth device has its compatible software Step 3 Select the desired icon with the mouse and right click on the mouse to select Turn on Bluetooth The Bluetooth device now lights up in green Step 4 Right click on the mouse and select Search Devices Step 5 The detected device will display 00 1A FF XX XX XX Step 6 Right click on the mouse and select Get Device Name and the icon of the prinrter ...

Page 87: ...hing a connection as the right figure below indicates Step 8 Input the Bluetooth code 0000 default Note The Bluetooth code does not need to be inputted when the SSP mode of the Bluetooth setting in the printer and the PC is set Activated The icon of the printer lights up green when the connection between PC and the printer is sucessfully created ...

Page 88: ...ect Clear Bind you are allowed to change the setting after the connection is successfully created 3 PIN Code Code of printers and Bluebooth Please select Clear Bind you are allowed to change the setting after the connection is successfully created 4 Clear Bind It deletes connections of Bluetooth devices 5 Search Devices It scans Bluetooth devices when pressing the button It shows information of de...

Page 89: ...ower Step 2 Insert the Wireless Module Please follow the Wireless Module Installation Manual to insert the wireless module of RT863i Step 3 The screen will display a grey Wi Fi icon and this means the printer has successfully detected the wireless module Ready Main Wizard Test ...

Page 90: ...s Step 4 Select WIFI Settings Step 5 Select Search Devices Ready Main Wizard Test Code Page Device Main Wi Fi Settings WLAN Details Search Devices Printer Settings LCD Language Label Settings Devices Printer Control Recall Label Buzzer Option Setting Programing Language Serial Port Setting LAN Setting LCD Setting Clock Setting Bluetooth Setting WiFi Setting ...

Page 91: ... after a few seconds Step 7 Choose the assigned Wi Fi device then press the ON button Step 8 Click on Password Column Step 9 Insert Password and Click Search Devices WPA WPA2 Encryption Pre Share Key Pre Share Key Auth ON Search Devices ON ...

Page 92: ...ple it means the printer is connected to a Wi Fi device Step 10 Click on again and connect to AP Step 11 When Wi Fi module is successfully installed the printer will restart WPA WPA2 Encryption Auth Pre Share Key Ready Mai n Wizard Test ...

Page 93: ...Fi options It shows 5 devices at a time Highlighted item is the current connecting device 3 Up Down Click Up Down button to switch the connecting devices 4 Password It means the device needs password to connect 5 Signal Strength The more bars it shows the stronger the signal is it 6 Connecting Button The button to connect with devices Search Devices ON ...

Page 94: ...How to connect to a wireless access point through GoLabel Step 1 Open GoLabel V1 12 and click on the assigned printer model Ex RT863i Step 2 Press OK Step 3 Select Netsetting Step 4 Select Wi Fi Setting ...

Page 95: ...arameter button Step 2 Wait for three seconds and the printer will restart It may vary per condition Step 3 After the printer restart if the Wi Fi icon turns purple it means the printer is successfully connected to a Wifi device Ready Main Wizard Test ...

Page 96: ...s network through GoDEX WiFi tool 1 Turn on the printer connect printer and computer by USB cable 2 Start GoLabel 3 Generic Printer Setup 4 Select printer moedel Wi Fi supported models Quick setting only supports GoLabel 1 15K and Arm 7 FW1 100 Or Arm 9 FW2 00A or higher version ...

Page 97: ...5 Click WiFi Setting icon 6 Click Quick Setting icon ...

Page 98: ...7 Click the Search button ...

Page 99: ...8 Select server and click next button 9 Enter the password set on the server side and click the Setting button ...

Page 100: ...10 After the setting succeeded a prompt will pop up and the printer will restart 11 Select the Other tab and click the Get Data icon after selecting IP Settings ...

Page 101: ...12 After remembering the IP address open the Printer Settings window 13 select the Printer Interface tab fill in the IP address and click Save to complete the setting ...

Reviews: