background image


Appendix 

A. Troubleshooting 

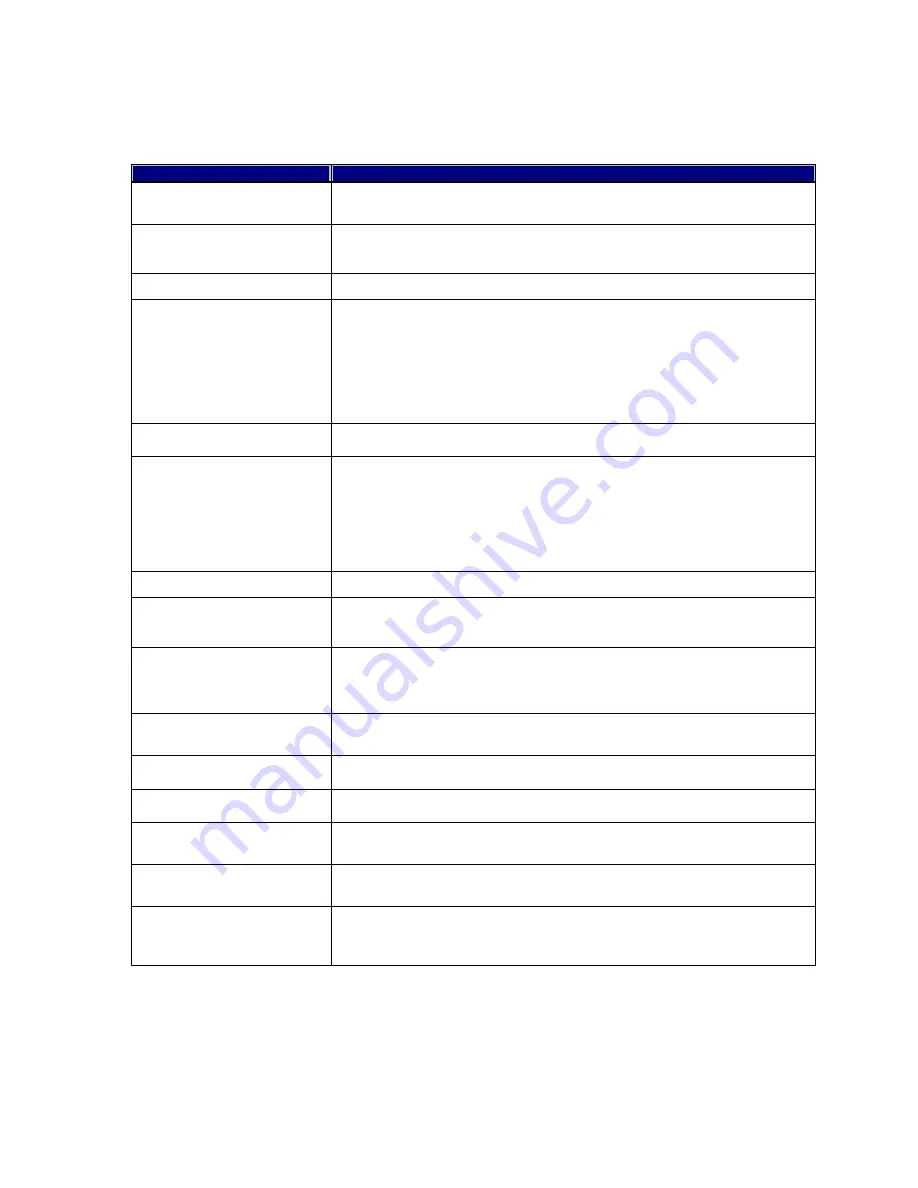
Problem 

Solution or Reason 

LED does not light (power 
switch already turned on). 


Check Power connector. 

Printing stops and LED turns 
red. 


Software setting or programming problem. 


Refer described on page 5. 


Perform a Label Gap Sensor Adjustment as described on page 14. 

Printing no stops or skip label 


Perform a Label Gap Sensor Adjustment as described on page 14. 

Printer seems to be working 
but nothing is printed. 

Direct Thermal Printing: 

Verify that the media is intended for direct thermal printing by testing if the 
paper is blackened by the heat from a hot object (+ 70°C/160°F or more). 
Check that the heat-sensitive side faces the printhead. 


Thermal Transfer Printing: 

Verify that the printer is loaded with thermal transfer ribbon and that the 
ink-coated sided faces the receiving face material. 

Label stuck. 


Remove the stuck labels and use soft cloth soaked with alcohol to clean 
the adhesive glue. 

Only part of the label is printed. 


Label or ribbon stuck on the printhead. 


Software problem. 


Margin setting incorrect. 


Printhead not completely locked. 


Make sure the ribbon is not wrinkled. 


Adjust the printhead pressure screws to increase the pressure. 


Check if using correct power source. 

Difficult to load label roll. 


Labels stuck in the printer. 

When printing out, some dots 
missing. 


Clean printhead with alcohol (If the label glue is stuck to printhead, apply 
alcohol to printhead, and wipe with soft cloth softly). 


Replace printhead. 

Printing position not correct. 


Check the gap sensor, it may be covered with dust. 


Perform a Label Gap Sensor Adjustment as described on page 14. 


Contact your label supplier, make sure they use qualified label material. 


Check the label guide, it may not be in the proper position. 

Label printing jumps to next 
label. 


Check the label height setting. 


Check the gap sensor, it may be covered with dust. 

Label printing not very clear. 


Clean the printhead as described on page 14. 


Check the printer darkness (density) setting. 

Paper is not properly cut. 


Check the cutter, it may be covered with paper dust in the blade holder 
shaft. 

Label peeling not working 
correctly. 


Check the printer strip sensor, it may be covered with dust. 


Check label installation. 

Printer not feeding when using 
narrow label. 


Decrease the pressure on the right hand side of the printhead, refer 
described on page 15. 

Garbage appears when 
printing length is over 16 
inches. 


Check if expanded SRAM (option) is installed. 


16 

Summary of Contents for EZ-4TK Plus

Page 1: ...P N 920 010611 03 Edition 3 AUG 07 EZ 4TTP 4TKP User s Manual ...

Page 2: ...may cause harmful interference to radio communications Operation of this equipment in a residential area is likely to cause harmful interference in which case the user will be required to correct the interference at his own expense EMS AND EMI COMPLIANCE STATEMENT FOR EUROPEAN USERS This equipment has been tested and passed with the requirements relating to electromagnetic compatibility based on t...

Page 3: ...G UP YOUR PRINTER 6 2 1 RS 232 SETTING 6 2 2 LOADING THE RIBBON 6 2 3 LOADING LABEL ROLL 7 2 4 TO CONNECT THE PRINTER TO AN INTERFACE 8 2 5 STRIPPER 9 2 6 CUTTER 12 2 7 SELF TEST 13 3 MAINTENANCE AND ADJUSTMENTS 14 3 1 CLEANING THE PRINTHEAD 14 3 2 LABEL GAP SENSOR ADJUSTMENT 14 3 3 ADJUSTING THE PRINTHEAD PRESSURE SCREWS 15 APPENDIX 16 A TROUBLESHOOTING 16 2 ...

Page 4: ...ution 1 2 General Specifications Specifications EZ 4TT Plus EZ 4TK Plus Resolution 203 dpi 300 dpi Print speeds 1 4 2 4 Print length 10mm 406mm 10mm 152mm Print width 25mm 104mm 25mm 108mm Media Thickness 0 06mm to 0 2mm Roll size Internal O D 4 External O D 10 on a 1 or 3 I D core Ribbon Max 110mm width 150 meters length I D 0 5 Memory Fonts Graphics Formats and Double byte characters storage Pro...

Page 5: ...as caused damages to the printer itself than this is not covered as part of the product warranty 1 4 Printer Parts Part Description 1 Front Cover 2 Front Locking Tenon 2 EA left right 3 Dust Cover for Interface Panel 4 Fan Fold Media Entry 5 Back Locking Tenon 2 EA left right 6 Back Cover 7 Ribbon Rewind Spindle 8 Ribbon Supply Spindle 9 Core Guide 10 Label Roll Stand 2 EA 11 Printhead Pressure Ad...

Page 6: ... fonts download Red solid Out of media ribbon Red flashing Upgrading firmware Orange Firmware damaged refer described on page 13 Thermal transfer printing only Buzzer indicator Beep sound Meaning 1 times Power on 2 times Paper out Paper jam 3 times Ribbon end 4 times Printhead assembly is unlocked 5 ...

Page 7: ...n supply spindle part 8 and the rewind spindle part 7 see figure 2 2 2 3 Install a new ribbon onto the supply spindle and install a empty paper core onto the rewind spindle see figure 2 2 3 4 Put back the supply spindle and the rewind spindle 5 Press the two printer locks part 12 to loosen the printhead assembly and turn it over 6 Pass the front edge of the new ribbon through the printhead assembl...

Page 8: ...er and back cover 2 Install a label roll onto the roll core part 14 3 Put back label roll into the core guide see figure 2 3 1 4 Press the printer locks part 12 to loosen the printhead assembly 5 Turn over the printhead assembly Pass the front edge of the label through the gap sensor and overstride the Rubber roller see figure 2 3 2 6 Adjust the label guide to fit the label size 7 Put back the pri...

Page 9: ...stride the Rubber roller 6 Adjust the label guide to fit the label size 7 Put back the printhead assembly and fasten it 8 Close the front cover and back cover 9 Push feed button part 16 to feed out label Fig 2 3 4 The media setting for laying down printing 1 Open the front cover and back cover 2 Hold the open end the apron of the Core Guide lift it up about 5 mm then turn it round 180 degree and s...

Page 10: ...igure 2 5 1b 7 Power on the printer The LED turns red and beeps 4 times 8 Press the paper feed button a few times until the liner paper appears under the stripper roller 9 Press the stripper arm down to off position Hold the labels while pulling at the liner so it becomes tight then adjust the edge of the first label is under the gap sensor 10 Press the stripper arm down to on position 11 Close th...

Page 11: ...Fig 2 5 3 Fig 2 5 4 Fig 2 5 5 10 ...

Page 12: ...r The strip bracket bar is used for strip function If you don t need to use strip function you may take out the strip bracket bar and keep to safe place Please follow these steps to install the strip bracket bar Although the stripper function can support a label as short as 18 mm high we suggest that the minimum label height be more than 25 mm 11 ...

Page 13: ...djustable opening showed as arrow A on the cutter 2 The paper jam may cause the cutter work improperly power off the printer 3 Use M3 Hex Key insert into the opening A and turn clockwise The blade of cutter should be opened then remove the paper inside the cutter 4 After the paper jam problem is eliminated power on the printer at this moment the cutter will regress automatically to cutting positio...

Page 14: ... software when the printer does not perform as you expect To get in the dump mode follow the steps as below 1 Load the continue paper 2 Hold down the feed button when powering on 3 Release the feed button after the printer stop 4 The printer will automatically adjust the label gap sensor firstly and then print DUMP MODE BEGIN 5 To end the Dump mode press the feed button The printer will print out ...

Page 15: ...ering the Auto sensing mode as described below 1 Load the paper 2 Hold down the feed button when powering on 3 Release the feed button after the printer stop then the printer will entering the Auto sensing mode 4 The printer will automatically adjust the label gap sensor and media feed according to the characteristics of the media After that the printer goes into the dump mode 5 Press the feed but...

Page 16: ...e two screws on the top of the printhead assembly With different paper material or ribbon material you may need to adjust the printhead pressure by turning these two screws to decrease or increase the pressure If the pressure between the right and left sides of printer is not balanced please readjust these two screws 15 ...

Page 17: ... Adjust the printhead pressure screws to increase the pressure Check if using correct power source Difficult to load label roll Labels stuck in the printer When printing out some dots missing Clean printhead with alcohol If the label glue is stuck to printhead apply alcohol to printhead and wipe with soft cloth softly Replace printhead Printing position not correct Check the gap sensor it may be c...

Reviews: