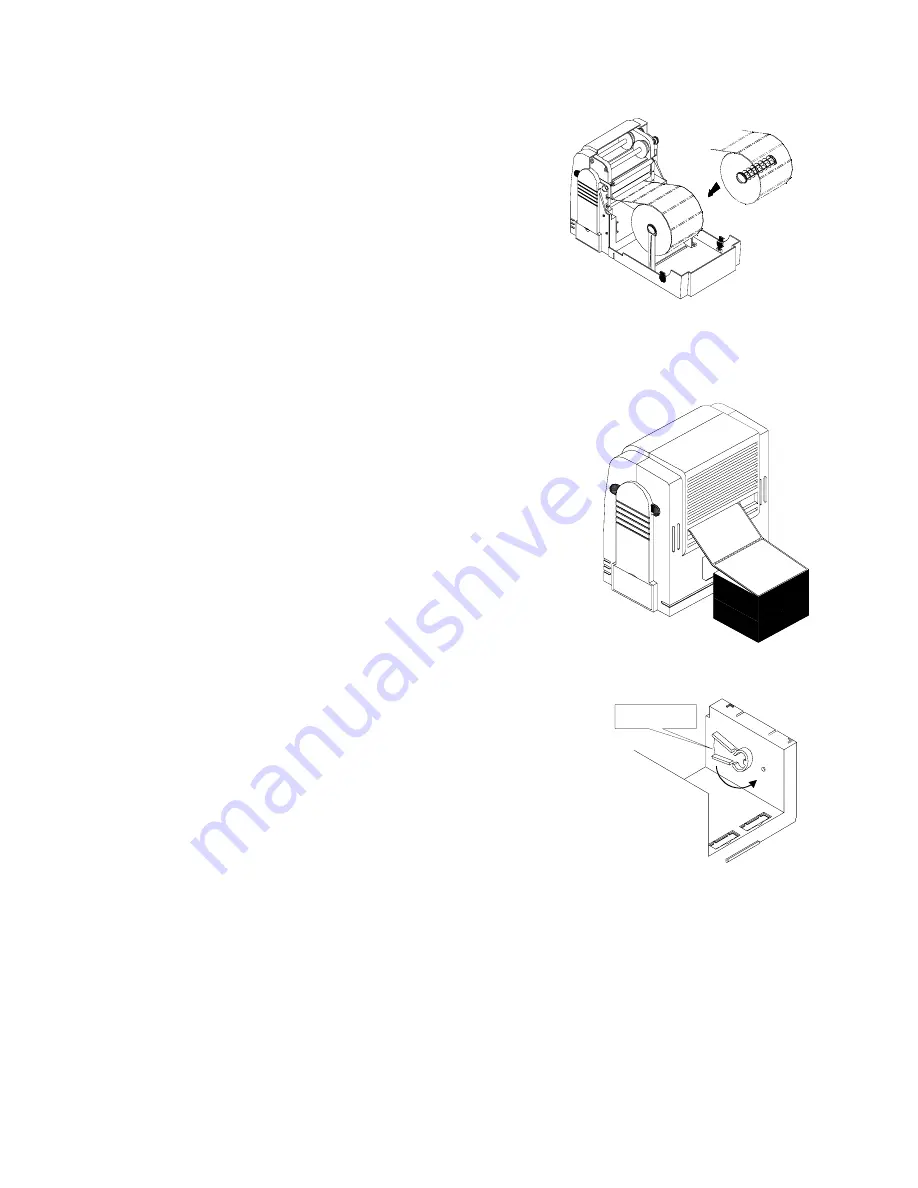
B. Load large label roll
1.
Open the front and back cover.
2.
To load a label roll onto the roll core (part 14).
3.
Remove the label roll stands (part 10). Vertically place the
two stands along the left side and right side of the back
cover (see Fig. 2.3.3).
4.
Place the large-size label roll on the stands (see Fig. 2.3.3).
5.
Press the printer locks (part 12) to loosen the printhead
assembly.
6.
Turn over the printhead assembly. Pass the front edge of the
label through the gap sensor and overstride the Rubber
roller (see figure 2.3.2).
7.
Adjust the label guide to fit the label size.
Fig. 2.3.3
8.
Put back the printhead assembly and fasten it by pressing down from the top.
9.
Close the front cover.
10. Press the feed button (part 16) to feed labels.
Fan-fold type media setting
1.
Open the back cover.
2.
Take out the two Big Label Roll Stands (part 10)
3.
Insert the paper into the Fan-fold Media Entry (part 4) of the back
cover.
4.
Push and release the printer locks (part 12) to open the printhead.
5.
Turn over the opened printhead assembly. Pass the front edge of
the label through the gap sensor and overstride the Rubber roller.
6.
Adjust the label guide to fit the label size.
7.
Put back the printhead assembly and fasten it.
8.
Close the front cover and back cover.
9.
Push feed button (part 16) to feed out label.
Fig. 2.3.4
The media setting for laying down printing
1.
Open the front cover and back cover.
2.
Hold the open end (the apron) of the Core Guide, lift it up about 5
mm then turn it round 180 degree and snap in the little hole.
3.
Follow the above steps to adjust another Core Guide.
4.
Press the printer locks (part 12) to open the printhead.
5.
Turn over the opened printhead assembly. Pass the front edge of
the label through the gap sensor and overstride the Rubber roller.
6.
Adjust the label guide to fit the label size.
7.
Put back the printhead and fasten it.
8.
Close the front cover and back cover.
9.
Lay the printer down.
10. Push feed button (part 16) to feed out label.
LIFT UP AND TURN
ROUND 180 DEG.
Fig. 2.3.5
2-4. To Connect the Printer to an Interface
1.
Be sure the power is switch off.
2.
Plug in the power adapter to the printer power jack.
3.
Connect the printer to an interface (parallel or serial port).
4.
Load the label and ribbon (if need).
5.
Power on, the printer will beep one time and the LED is green. If the LED is red, and beep over one
times, refer the page 5 to solve problems.
8


