Globe GSP30B Instruction Manual Download Page 9

Page 9

9.  The time will be displayed as military time with time separators between the hour, minute and seconds.  If the 

time is correct, press the Enter key.  If not correct, key in the new time (hour, minute, seconds) and press the 

Enter key.

10. After the date and time have been entered, press the Mode key. Display will show 19001-000 ENT or CLR
11. Press the Mode key three times to return to normal operation.

NOTE: To make sure that the date and time is correct, power off the scale and then power on the 

scale to view the “Clock Check” screen.

Entering Shop Name And Address (optional)

1.  Make sure the scale is plugged in, turned on, and there is nothing on 

the weigh platter.

2.  Key in 9000 and press the Mode key.  The display will show:  P00   

PROGRAM

3.  Key in 5 and press the ENTER key.  Display will show: P06 STORE
4.  Key in 111111 and press the PLU key. Display will show: P06 STORE
5.  Press the Enter key.  Display will show: P06-00 NO. 0000 >No<
6.  Press the Enter key. Display will show P06-01 NAME >ED
7.  Press the Edit key.  Display will show 13001-0000 ENT or CLR.
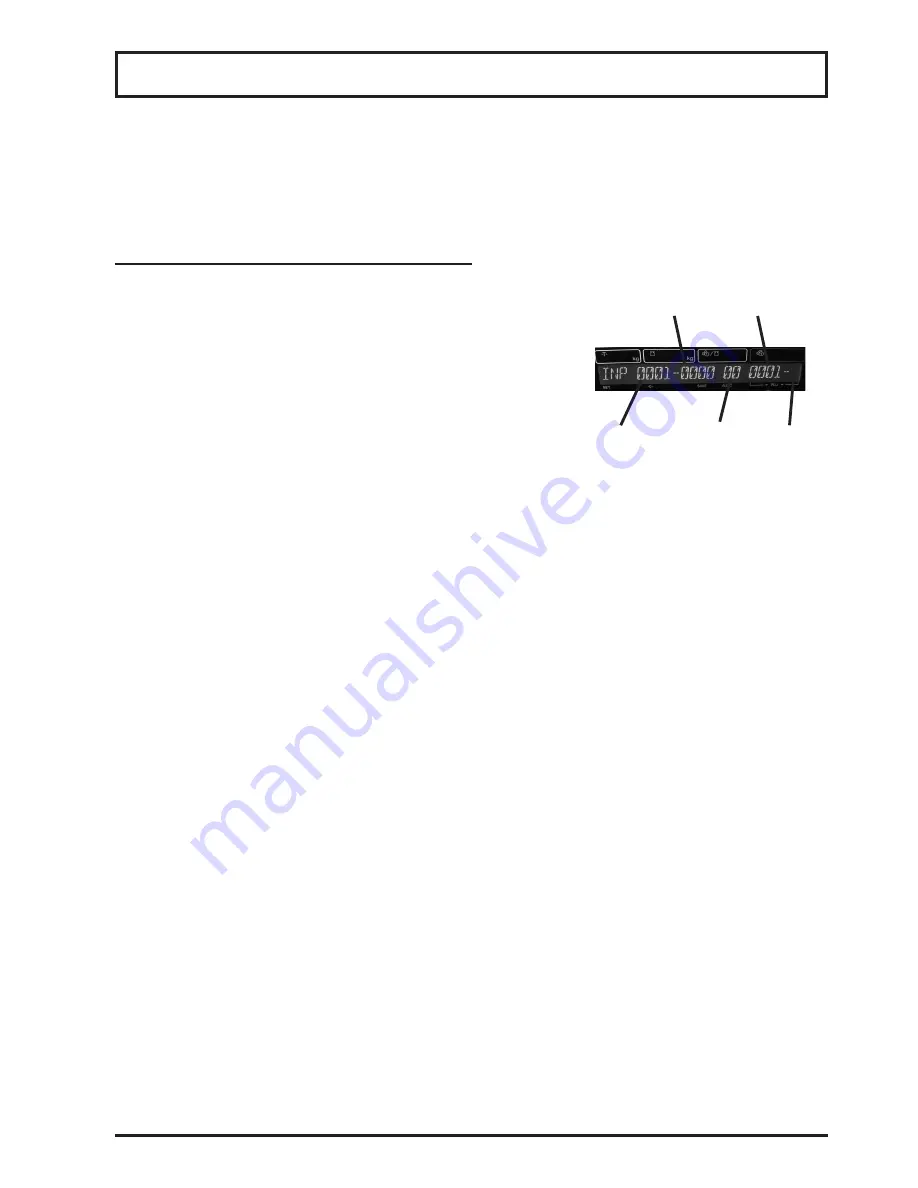
8.  Press the Enter key. Display will show INP 0001-0000-00  

See Figure 9-1.

9.  Use the Scale Set-Up keysheet to key in the store name 

(48 character maximum).

NOTE: Only one character of the store name will display at a time.  Use the right arrow key on the 

Scale Set-Up


keysheet to cycle through the letters of the store name.

NOTE:


To enter one of the symbols (not a letter), select the symbol key. If the symbol needed is on the 

top of the symbol key, select the shift key then the appropriate symbol key. 

NOTE: To delete a character that is not needed, press the Back Space key or arrow keys and Char 

Delete key.

10.  After the store name has been entered, press the Mode key. Display will show 19001-0000 ENT or CLR

NOTE: Press Enter to save or CLR to cancel. 

11.  Press the Enter key. Display will show: P06-00 NO. 0001 >No<
12.  Press the down arrow on the Scale Set-Up keysheet two times. Display will show: P06-02 ADDRESS >ED
13.  Press the Edit key. Display will show INP 0001-0000-00 
14. Use the Scale Set-Up keysheet to key in the store address (this includes the street address, city, state, and zip) 

(48 character maximum).

NOTE: To enter one of the symbols (not a letter), select the symbol key. If the symbol needed is on the 

top of the symbol key, select the shift key then the appropriate symbol key.

15.  After the store name has been entered, press the Mode key. Display will show 19001-0000 ENT or CLR

NOTE: Press Enter to save or CLR to cancel.

16.  Press the Mode key three times to return to normal operation.

Line

Number

Total

Character

Number

Current

 Position

Font

Size

Current

Character

Initial Scale Set Up

Figure 9-1

Summary of Contents for GSP30B

Page 1: ...tment at 937 299 8625 and ask for contact information for your local service company Model Serial IMPORTANT SAFETY NOTICE Visit our website for information on additional products available from Globe...

Page 2: ......

Page 3: ...1 LABELS 15 CASSETTE SET UP FOR SAFE HANDLING E12 LABELS 16 CASSETTE SET UP FOR INGREDIENT E13 LABELS 17 OPERATING INSTRUCTIONS PLU S Manual Label Print 19 Automatic Label Print Weighed Items 19 Autom...

Page 4: ......

Page 5: ...operation the general safety tips below must be followed DISCONNECT the scale from the power source unplug before servicing or opening ONLY trained and qualified service personnel should attempt repa...

Page 6: ...Check the level indicator to make sure the scale is level If the machine is not level weighing may not be accurate To adjust the machine to a level position rotate the four adjustment feet until the l...

Page 7: ...7 3 8 Insert the paper under the slot on the winding bobbin See Figure 7 3 9 Pull up on the stopper lever then slide it inwards to secure the label roll 10 Make sure the label paper is against the edg...

Page 8: ...e follow these steps to make sure that the current date and time is displayed 1 Make sure the scale is plugged in turned on and there is nothing on the weigh platter NOTE The Clock Check screen will d...

Page 9: ...r of the store name will display at a time Use the right arrow key on the Scale Set Up keysheet to cycle through the letters of the store name NOTE To enter one of the symbols not a letter select the...

Page 10: ...PLU is a weighing price item Key in 1 if the PLU is a fixed price item NOTE For weighing price items proceed to step 13 For fixed price items proceed to step 18 13 Press the Enter key Display will sho...

Page 11: ...r the POS point of sale number If the PLU number is to be in the barcode simply press the Enter key If the POS number is to be in the barcode key in the POS number 5 digit maximum and press the Enter...

Page 12: ...preset function key to switch between upper and lower level Setting Up Cassette Preset Functions Keys NOTE Up to seven cassette s can be programed Each cassette contains the label spec and label forma...

Page 13: ...stored on each preset key The Lower Level preset function key is used to switch between upper and lower level Refer to Operating Instructions Function Keys 7 Key in 2 for the preset function key flag...

Page 14: ...show the selected key with the preset function key flag just keyed in NOTE Two values can be stored on each preset key The Lower Level preset function key is used to switch between upper and lower le...

Page 15: ...play will show B11 04 FMT No 001 10 Press the End key Display will show B11 CASSETTE 11 Press the down arrow key on the Scale Set Up Keysheet one time Display will show B12 LABEL SPEC 12 Press the Ent...

Page 16: ...Enter key Display will show B11 04 FMT No 002 10 Press the End key Display will show B11 CASSETTE 11 Press the down arrow key on the Scale Set Up Keysheet one time The display will show B12 LABEL SPEC...

Page 17: ...the Scale Set Up Keysheet three times Display will show B11 04 FMT No 001 9 Key in format number 003 and press the Enter key Display will show B11 04 FMT No 003 10 Press the End key Display will show...

Page 18: ...Page 18 SAMPLES of all available labels for the GSP30B SAMPLE ONLY Standard GSP30B Label E11 SAMPLE ONLY Safe Handling GSP30B Label E12 SAMPLE ONLY Ingredient GSP30B Label E13...

Page 19: ...ight was not programmed for the PLU and it is needed do one of the following steps a Place the empty container on the weigh platter and press the tare key or b Enter the tare amount and press the tare...

Page 20: ...n the display will go off 4 Press the Mode key to return to normal operation Unit Price Used to print labels without the use of a PLU 1 Place product on the scale 2 Enter the unit price and press the...

Page 21: ...he PLU and press the PLU key or press one of the PLU preset keys 2 If the PLU is a fixed price item continue with step 3 If the PLU is a weighed item place the product on the receiving tray so a total...

Page 22: ...h a mild cleaner Never use volatile or caustic liquids Cleaning the Print Head 1 Dip a cotton swab into the thermal print head cleaning solution provided with the scale Isopropyl rubbing alcohol can a...

Page 23: ...platter 1 The machine is set in automatic mode Press the AUTO MANU preset key to switch the scale back to manual mode The AUTO indicator will go out of view Labels will not come out when print key is...

Page 24: ...ght of the container can be programmed into the PLU so that the container weight will automatically be deducted each time the product is weighed NOTE There are three different ways to manage the Tare...

Page 25: ...that the data will be stored in e g Data 01 02 03 ect Press the PLU key Display will show B27 02 SCALE TO USB NOTE Scale will pause After about five seconds backup will begin 10 Press the down arrow k...

Page 26: ...B00 SETUP 4 Key in 27 and press the Enter key Display will show B27 FILE SAVE LOAD 5 Press the Enter key Display will show B27 01 USB TO SCALE 6 Press the Enter key Display will show B27 01 01 I P SEL...

Page 27: ......

Page 28: ...ISE This warranty is given only to the first purchaser from a retail dealer No warranty is given to subsequent transferees This warranty does not cover product failures caused by failure to maintain n...

Reviews: