CHAPTER 2 – INSTALLING A NEW CABINET
13. You should now see the video image displayed on the external monitor. You will also see the following
dialog box displayed:
Figure 22
– Confirming Display Settings
14. Press the
Tab
key to select
Yes
, and then press
Enter
. This will save the setting.
15. If you do not see the image in the external monitor, check the S-Video cable, and check that the external
monitor is set to receive video from the S-Video input.
16. Turn the cabinet power OFF, and unplug the keyboard from the computer.
17. Turn the cabinet power ON. The game can now be viewed on the external monitor.
Checking and Setting the Computer Clock
The game computer is shipped from the factory with the correct date set. If this date becomes lost or
corrupted, you may be unable to install software upgrades. Perform this procedure only if you suspect that the
computer clock is set incorrectly:
1. Turn the cabinet power OFF. Plug the PS/2 keyboard into the purple-colored PS/2 port on the back of the
computer. Turn the cabinet power ON.
2. With the cabinet powered ON, and the game running, press the Windows
Start
key on the keyboard
(between the
Ctrl
and
Alt
keys). This will launch the Windows Start menu:
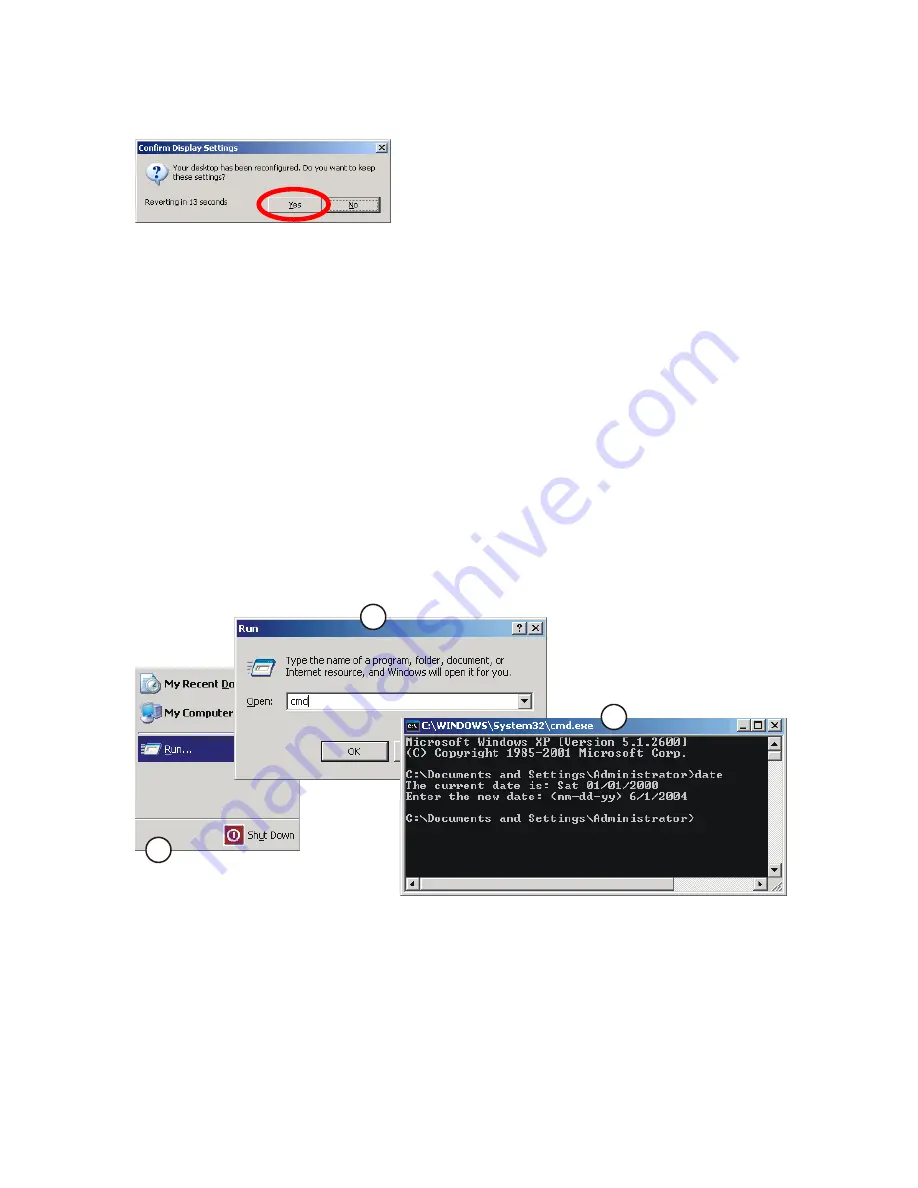
1
2
3
Windows Start Menu
Run Dialog Box
Terminal Window
Figure 23
– Changing the Date on the Computer
3. Use the cursor keys to select
Run...
, and press
Enter
. This will launch the Run dialog box.
4. Type
cmd
into the dialog box and press
Enter
. This will launch a terminal window.
5. Type
date
and press Enter. The current date will display.
6. If the date is correct, type
exit
to close the window and return to the game.
18
GLOBAL
VR
040-1201-01 Rev. C 5/28/2004


