


5
Ä
SUGGESTION
Ã
To avoid scratching your new airplane, do not unwrap the pieces until they are
needed for assembly. Cover your workbench with an old towel or brown paper, both to protect the aircraft
and to protect the table. Keep a couple of jars or bowls handy to hold the small parts after you open the
bags.
Ä
NOTE
Ã
Please trial fit all the parts. Make sure you have the correct parts and that they fit and are
aligned properly before gluing! This will assure proper assembly. Since the Skyraider is hand made from
natural materials, every airplane is unique and minor adjustments may have to be made. However, you
should find the fit superior and assembly simple.
If you should find a part missing or have questions about assembly, please call or write to the address below:
Customer Service Center
18480 Bandilier Circle
Fountain Valley, CA. 92728
Phone: (714) 963-0329
Fax: (714) 964-6236
E-Mail: [email protected]
PARTS REQUIRED
WING ASSEMBLY
HINGING THE AILERONS
q
{2} Wing Halves with Ailerons
q
{1} Plywood Dihedral Brace
q
{6} C/A Hinges
q
{4} 8mm x 15mm x 20mm Wood Blocks
q
{8} 2.5mm x 12mm Wood Screws
q
{2} Precovered Servo Hatches
q
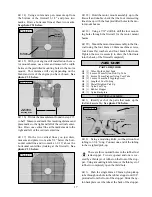
1) Locate the three precut hinge slots in the trail-
ing edge of each wing half and the leading edge of
each of the two ailerons.
q
2) Test fit the six C/A hinges into the hinge slots
in each aileron. Each hinge should be able to be in-
serted far enough into the aileron so the centerline of
the hinge is flush with the leading edge of the aileron.
If the hinges cannot be inserted deep enough, use a
modeling knife and cut the hinge slots deeper. See
figure # 1 below.
Figure # 1
q
3) When satisfied with the fit of the hinges in
the ailerons, remove them and test fit the hinges into
the trailing edge of the wing halves. The centerline
of each hinge should be flush with the trailing edge
of the wing halves. If they are not, perform the same
technique as done in step # 2 above.
q
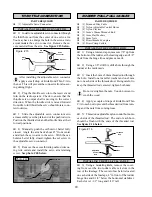
4) Test fit the ailerons to the wing halves, mak-
ing sure the ailerons engage each hinge completely.
Push the ailerons tight up against the trailing edge of
the wing halves. Move the ailerons up and down to
ensure they move smoothly. The gap between the
leading edge of the ailerons and the trailing edge of
the wing halves should be no more that 1/32”.
q
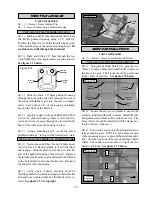
5) Apply 6-8 drops of Kwik Bond Thin C/A to
the exposed area of both sides of each hinge. Allow a
few seconds between drops for the C/A to wick into
the hinge. See figure # 2 below.
INSTALLING THE AILERON SERVOS
q
6) Locate the two aileron servos, two 12” aile-
ron extensions, one Y-Harness and Dubro heat shrink
tubing that you purchased separately.
Be careful not to use too much C/A at one time
as the excess C/A may run down the length of
the hinge line. Once cured, the ailerons may be stiff
and difficult to move. This is normal. Gently move
the ailerons up and down about five to ten times to
free them up.
Figure # 2
Modeling Knife
Hinge Slot
Apply C/A
Here


