


7
8
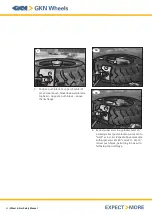
8. Raise the vehicle and rotate the wheel assembly
so that the valve is at the top. If the tire is tube-
type, completely deflate it by removing the valve
core housing. Re-insert the valve core and
inflate the tire again to the recommended
operating pressure. Be sure to stand clear of
the tire during inflation.
58 |
Wheel & Rim Safety Manual
5
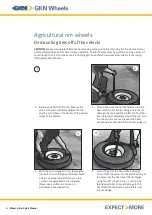
5. Starting at the top, use tire irons to lift the
outer bead up and over the rim flange, then
down into the rim well. Be careful not to pinch
the tube in this operation.
6
6. After getting the first section of the bead
into the rim well, place one hand against that
section to hold it, and then pry the remainder
of the bead over the flange with the tire iron in
the other hand.
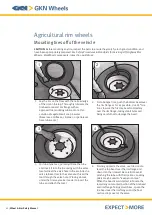
7. With the valve stem at the bottom, lower the
jack until the tire is centered on the rim.
Centering the tire and rim assembly is extremely
important to prevent broken beads. Using an
extension hose with an in-line air gauge and
clip-on chuck (with the valve core removed),
inflate the tire to seat the beads. DO NOT
EXCEED 35 PSI (240 kPa). It is essential to stand
clear of the tire while inflating it. Check to see
that both beads are seated all the way around
the tire.
For tubeless tires, mounting depends on how
well the tire’s shape has been maintained. If the
beads are in or near their molded position, they
can be seated by inflating the tire, through the
valve spud. Where the beads have been
squeezed together, the use of an inflator ring
(either horizontally or vertically) will be required
to provide a seal between the tire bead and rim.


