background image

2.  Definitions and abbreviations

In this manual the following definitions and abbreviations are used: 

PI

Provisioning Interface of the gnTel platform, https://provisioning.gntel.nl

Customer code

Code in the PI, identifying a gnTel customer

Phone account

Account code of the SIP Account of a phone, as allocated in the PI.
This code consists of the Customer code + 3 unique digits for each
account.

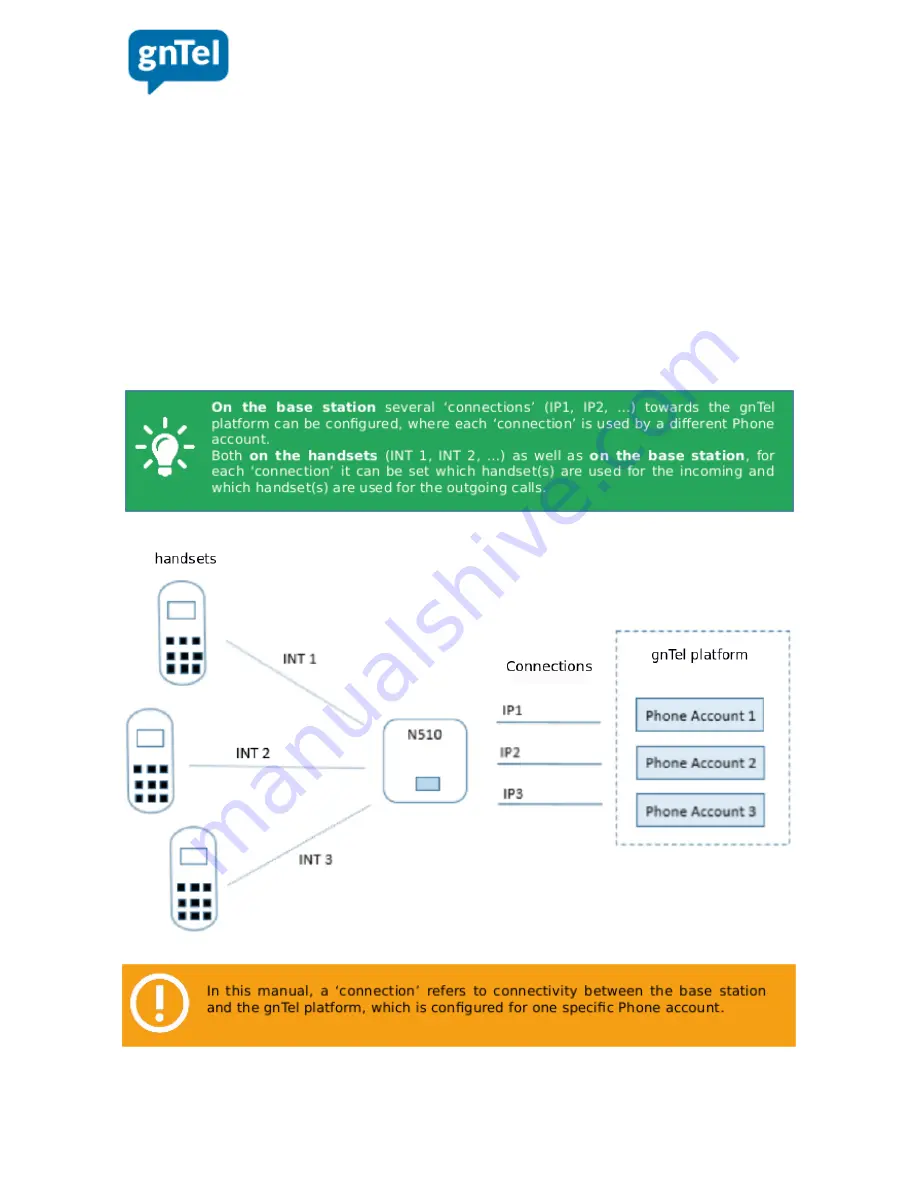
Connection

In the base station ‘connections’ are configured and are coupled one-to-
one to Phone accounts. 

Both for incoming and outgoing calls, the administrator may or may not configure each handset 
to be used for any ‘Connection’.   

Configuration manual for Gigaset DECT phones on the gnTel platform   -    version final 1.0    -    May 2017  3

Summary of Contents for N300A IP

Page 1: ...PRO Firmware versions 42 207 N300A resp 42 240 N510 Configuration manual for Gigaset DECT phones on the gnTel platform version final 1 0 May 2017 Configuration manual for Gigaset DECT phones on the gnTel platform version final 1 0 May 2017 1 Configuration manual for Gigaset DECT phones on the gnTel platform ...

Page 2: ...k Presentation of missed calls and receipt of voicemails 16 9 Change PIN of base station 16 1 Introduction This configuration manual describes the settings which ensure good compatibility between the Gigaset base stations the handsets and the gnTel platform This manual can be used for at least the following types of base stations N300A IP and N510 IP PRO The screenshots of Gigaset webinterface pag...

Page 3: ...nt code of the SIP Account of a phone as allocated in the PI This code consists of the Customer code 3 unique digits for each account Connection In the base station connections are configured and are coupled one to one to Phone accounts Both for incoming and outgoing calls the administrator may or may not configure each handset to be used for any Connection Configuration manual for Gigaset DECT ph...

Page 4: ...al navigation button on the handset b Navigate to the tools icon and click on it c Scroll to System and click on it d Scroll to Local network and cllick on it e Enter the System PIN default setting is 0000 and click on OK f Now read the local IP address of the handset 2 Enter the IP address in the address bar of the browser of the PC and press Enter 3 The PC will now show a login screen choose a l...

Page 5: ...ter The web interface 2 Click the tab Settings section Management subsection Firmware Update click the button Update firmware The base station now checks if its firmware is up to date If a more recent firmware version is available it will be downloaded and installed 5 Reset to factory defaults For example when calling from or towards the dect handsets appears to be impossible a last resort can be ...

Page 6: ...factory defaults but also to configure new connections see chapter Definitions and abbreviations For each new connection the Configuration Assistant can be used 1 Click the tab Settings section Telephony The Overview of connections is shown 2 For the connection that now needs to be configured click Edit 3 It is now possible to change the name of the connection to be configured Then clck Start Conf...

Page 7: ...e available select No and then click Next 5 Select the country Netherlands and click Next 6 Select the provider gnTel and click Next Configuration manual for Gigaset DECT phones on the gnTel platform version final 1 0 May 2017 7 ...

Page 8: ...wn indicating that registration was succesfull The next screen gives the possiblity to enter additional Phone account related data 9 In the field Phone number it is possible to enter 1233 default number for access to voicemail within gnTel More information on voicemail can be found in the section Configuring and using voicemail 10 Choosing Yes will imply this connection to be used for outgoing cal...

Page 9: ...n made using the Configuration Assistant can be verified and altered manually Click Settings section Telephony the Overview of connections is shown Behind the connection that needs to be altered click Edit After Authentication name and after Username the Phone account should be entered Now click Show advanced settings General data of your Service Provider see screenshot Configuration manual for Gi...

Page 10: ...N is not used then after STUN enabled the option No should be ticked If changes have been made these can be effectuated by clicking Set This is also the location where a connection can be deleted Configuration manual for Gigaset DECT phones on the gnTel platform version final 1 0 May 2017 10 ...

Page 11: ...an be done from the web interface and also from the handsets i Call flow setting from the web interface Login using the web interface see chapter The web interface and go to Settings Telephony Number Assignment In the next screen see screenshot the following items can be set or changed for each handset name of the handset defaults are INT 1 INT 2 INT 3 for each handset for outgoing calls either ch...

Page 12: ... No be offered on this handset When these choices have been made click Save now it is possible to do the same for another handset When the incoming call flow settings for all handsets are as desired press the disconnect button with red handset on it several times to return to the starting screen c Ringtones Press the central navigation button on the handset navigate to the tools icon go to the sec...

Page 13: ...creenshot Codecs In the web interface go to Settings Telephony Audio Click Show advanced settings Now for each connection it is possible to select which codecs are allowed In most cases it is sufficient to allow the codecs G 711 a law and G 729 Configuration manual for Gigaset DECT phones on the gnTel platform version final 1 0 May 2017 13 ...

Page 14: ... warm transfer 1 On the handset press Ext Call button with horizontal dash below the display on the left 2 Type the number to which call transfer is needed 3 Press the connect button with the green handset on it 4 If the call is answered announce the proposed call transfer 5 Press the R button or press the button with the red handset For call transfer towards a different handset using the same tel...

Page 15: ...ssette tape go to the second option Network Mailboxes Now the configured connections are shown IP1 IP2 Click on the connection of which the settings have to be verified or altered Status On or Off Network Mailbox 1233 Programming the handset to make pressing the digit 1 be the initiation of a call to 1233 is done as follows central navigation button voicemail icon cassette tape go to Set Key 1 Now...

Page 16: ...on Phone account For activating or deactivating these messages the follwoing settings apply In the web interface go to Settings Messaging Message Notification Missed calls and voicemails Only missed calls Only voicemails No missed calls and no voicemails 9 Change PIN of base station The system PIN that is needed for login using the web interface see chapter The web interface can be changed by foll...

Page 17: ...on button navigate to the tools icon go to the seventh option in the list System and click OK now go to the seventh option in the list System PIN and click OK Now first the old PIN must be entered and then one time the new PIN Configuration manual for Gigaset DECT phones on the gnTel platform version final 1 0 May 2017 17 ...

Reviews: