background image

17

First steps

Gigaset DE310 IP PRO / en / A31008-M2218-L101-3-7619 / starting.fm / 20.03.2012

V

e

rsion 2, 27.0

5

.2010

Setting up the device (for the first time)

Your device will start 

automatically

 as soon as it is connected to the mains power supply. 

Please be aware that the device is powered by PoE (Power over Ethernet). This means that 
it is supplied with power as soon as it is connected to an Ethernet switch with PoE-func-
tionality.

The first time you use the device, an installation wizard will start automatically and guide 
you through the necessary installation steps. 

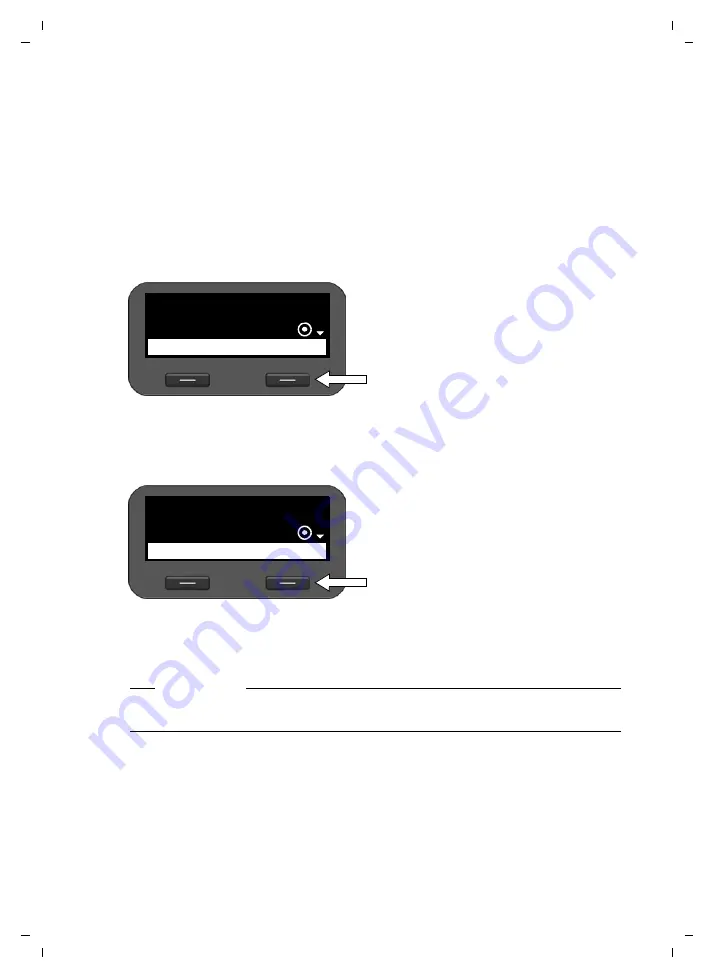
Configuring language and time zone settings

When you have made your selection, press the end key 

I

 to return to the last entry 

screen. You can correct your selection if necessary.

¤

Use the navigation key to select the 
required language. To do this, press 
up or down on the navigation key 

q

.

Further information about the navi-
gation key can be found on 

£

page 44

.

¤

Press the display key under 

§OK§

 to 

confirm your selection. 
You can also use the OK function on 
the navigation key (by pressing 

in 

the centre of the key).

¤

Use the navigation key to select the 
required time zone.

¤

Press the display key under 

§OK§

 to 

confirm your selection. 

¤

Select your Language

OK

Deutsch

Select Time Zone

OK

(GMT) GMT, Dublin, 

Please note

The date and time are automatically set by a time server. You can select a time server 
using the Web configurator or deactivate this function (

£

page 96

).

Summary of Contents for de310 ip pro

Page 1: ...1 Gigaset DE310 IP PRO en A31008 M2218 L101 3 7619 cover_front_Kelvin fm 20 03 2012 Version 2 27 05 2010 ...

Page 2: ...en en A31008 M2218 L101 3 7619 cover_front_Kelvin fm 20 03 2012 Version 2 27 05 2010 ...

Page 3: ...Sound Performance HDSP Make phone calls with brilliant sound quality u Phone functions for the professional user Use the call divert conference call automatic ringback call reject and Do Not Disturb DND functions u Multiple directories Manage your personal directory with up to 200 entries Use an LDAP directory or online directories on the Internet u Network connection Connect your telephone to the...

Page 4: ...Message Centre Open call and message lists page 50 7 Do Not Disturb key Do Not Disturb DND function page 26 8 Navigation key Scroll through lists and entries In idle status page 44 È Open redial list page 32 Confirm or start action select entry page 44 Z Open directory page 35 9 End call back key End reject call cancel function go back one menu level press briefly return to idle status press and h...

Page 5: ...is muted page 26 Call is being made via the speaker Flashing Incoming call page 21 ô Headset connected page 16 ó Ringer deactivated page 52 Ñ Do Not Disturb function is activated page 26 Telephone in conference call page 29 Õ Secure connection page 25 Ô HDSP quality connection page 25 Ã New messages on the network mailbox The number is displayed to the right page 49 Missed calls page 32 Other icon...

Page 6: ...eeding 20 Making calls 21 Calling 21 Receiving incoming calls 24 Ending a call 25 Using functions when making a telephone call 25 Making a call to multiple participants 27 Setting up call divert CD 31 Using the call lists 32 Viewing entries 32 Dialling a number from a list 34 Copying an entry from the call list to the directory 34 Deleting an entry or list 35 Using directories 35 Using the local d...

Page 7: ...iguring the phone on a PC 65 Starting the Web configurator 65 Understanding the Web configurator menu tree 67 Running the setup assistant 68 Configuring phone settings via the Web configurator 73 Network and connectors 73 Telephony 83 Messaging 91 Services 92 Function keys 95 System settings 95 Checking the status of the phone 105 Appendix 107 Caring for your telephone 107 Contact with liquid 107 ...

Page 8: ...ditions in your particular environment e g doctor s surgery Do not install the phone in a bathroom or shower room The phone is not splashproof Do not use your phone in environments where there is a risk of explosion e g auto paint shops If you give your phone to a third party make sure you also give them the user guide Remove faulty telephones from use or have them repaired by our Service team as ...

Page 9: ...roviding you with an additional LAN con nection in your network 3 DECT bases for connection to DECT handsets 4 Ethernet switch Supports Quality of Service QoS 100 Mbit or Gigabit Ethernet and PoE Power over Ethernet 5 Phone system e g Gigaset T500 PRO Forms Internet telephony ISDN or S2M connections Analogue devices can be con nected A network connection is established using Ethernet 6 Acts as a g...

Page 10: ...RO Your PC is connected directly to the phone providing you with an additional LAN con nection in your network 2 Acts as a gateway to the Internet for the connected devices Routes VoIP calls from the phone to the Internet 3 The SIP provider transfers calls from the Internet and establishes a connection with the standard telephone network In this scenario you must manually configure the VoIP accoun...

Page 11: ...nection to the phone Ethernet cable for connecting a PC Wall bracket and Tool for fixing the handset retainer when mounting the device on the wall Optional Power adapter for connecting the phone to the mains power supply if required with three different plug in modules Europe Great Britain USA The device is powered by PoE Power over Ethernet if it is connected to a switch with PoE functionality pa...

Page 12: ...age 103 If this results in opera tional changes to your phone a new version of this user guide or the necessary amend ments are published on the Internet at www gigaset com pro Select the product to open the relevant product page for your telephone where you will find a link to the user guide To find out what version of firmware is currently loaded on your phone see page 105 Warning u Never expose...

Page 13: ...cting the receiver 1 Insert the connector which can be found on the longer straight end of the connection cable into the connection port on the bottom of the phone 2 Place the straight part of the cable in the cable recess provided 3 Insert the other jack on the connection cable into the port on the receiver 1 2 3 ...

Page 14: ...rios section on page 7 for an overview of the different options 1 Attach one end of the Ethernet cable to the right hand LAN port on the rear of the phone 2 Attach the other end of the Ethernet cable to a LAN port on your network Eth ernet switch or on the router itself Please exclusively use a shielded cable for the connection Warning If you connect your Gigaset DE310 IP PRO to a PoE capable Ethe...

Page 15: ...outer The Ethernet cable supplied is intended for this connection Do not use this cable to con nect the telephone to the local network page 12 1 Connect an Ethernet cable to the left hand LAN port on the rear of the phone 2 Connect the other end of the Ethernet cable to a LAN port on the PC 2 1 Please note You can operate and configure your Gigaset DE310 IP PRO using this or any other PC withinthe...

Page 16: ...erent plug in modules for Europe Great Britain and the USA First attach the appropriate plug in module to the power supply unit 1 Slide the required plug in module into the recess on the underside of the power sup ply unit until it clicks into place 2 To remove the plug in module again press on the button marked Push and pull the plug in module out of the power supply unit 1 Connect the power adap...

Page 17: ... mm ø Drill two dowel holes and insert dow els You can use the wall bracket as a drilling template Thread the cables through the cable guides on the back of the bracket and screw it to the wall Remove the handset retainer from the cradle using the tool provided and replace it with the ridge point ing upwards Attach the phone to the wall bracket by first hooking it onto the hooks at the bottom and ...

Page 18: ... M2218 L101 3 7619 starting fm 20 03 2012 Version 2 27 05 2010 Connecting a headset You can connect a headset via the RJ9 connector of your Gigaset DE310 IP PRO Connect the cable for the headset to the RJ9 connector on the phone ...

Page 19: ...ngs When you have made your selection press the end key I to return to the last entry screen You can correct your selection if necessary Use the navigation key to select the required language To do this press up or down on the navigation key q Further information about the navi gation key can be found on page 44 Press the display key under OK to confirm your selection You can also use the OK funct...

Page 20: ...ate way and DNS server u If the network uses IP protocol version 6 IPv6 IP addresses automatically select IPv6 as Network Type The connection is then estab lished automatically IP addresses statically the device IP address the address prefix length and the DNS server IP address If there is still no network connection you will then be asked whether you wish to config ure the connection manually Sel...

Page 21: ...r network that provides VoIP accounts for your device or You have registered with a VoIP provider e g via your PC and set up a VoIP account The device searches the network for a provisioning file and checks whether VoIP accounts already exist If the telephone has existing VoIP accounts these accounts are configured automatically You can now make calls with your phone via the Internet If the teleph...

Page 22: ...vices such as other Gigaset telephones you should first read the section entitled Using the phone on page 42 If you have any questions about using your phone please contact our Customer Care team page 109 Information on is located here Operating the phone via the keypad and display menu page 42 Operating the phone via the PC page 48 Making calls page 21 Setting up and using directories page 35 Set...

Page 23: ...he call is shown while the call is in progress Instead of putting the receiver to your ear A Press the speaker key to make a call via the speaker B Press the headset key to make a call via the headset You can also switch at any time during the call Throughout the whole of this section the c icon can always represent either A or B When entering the phone number Û Press the display key to delete inc...

Page 24: ...ly and easily using the Web configurator page 99 or the phone s display menu page 35 To dial a number proceed as follows Z Open the directory using the navigation key s Or use the display menu Contacts Directory q Scroll through the list to the required name c Lift the receiver The default number is dialled page 37 Black Susan Options View Please note You can also dial a phone number from the dire...

Page 25: ...on is displayed To save numbers from a list in the directory see page 32 Viewing call lists and dialling numbers Open the required call list È Open the redial list using the navigation key t E Open the list of missed calls in the Message Centre Or use the Calls display key The last most recent call or dialled phone number is shown on the display Call Press display key to show the call lists q Sele...

Page 26: ...ge Press the display key to remove a tick and to deactivate the ringback Receiving incoming calls You hear the ringer and the speaker key A flashes Deactivating the ringer Silence Press the display key to deactivate the ringer You can then decide whether to accept or reject the call Rejecting a call Reject Press the display key or the end key I to reject the call Thedisplayshowsthecaller snumber w...

Page 27: ...e of the receiver speaker kit or headset during a call You can adjust the volume of the ringer while the phone is ringing H To decrease the volume press the left side of the key and to increase the vol ume press the right side of the key Each time you press the key the volume will increase or decrease by one level The last setting is saved when you change the ringer volume Use the display menu to ...

Page 28: ...r the caller via the speaker Deactivating speaker mode during a call c Lift the receiver Continue the call via the receiver Do not disturb You can activate the Do Not Disturb DND function if you do not want to receive any calls and you do not want the phone to ring You can still make calls when this function is activated G Press the Do Not Disturb key Press the same key again to deactivate the fun...

Page 29: ...all of the VoIP accounts configured on your phone or just for certain accounts Select Services All Calls anonymous Accounts for which anonymous calling is permitted are marked with a tick q Select the required entry Change Press the display key to tick the box Press the display key again to remove the tick Making a call to multiple participants Initiating a consultation call During a call you want...

Page 30: ...speaking to one participant and a second is on hold this may be because you have accepted a waiting call or have placed one caller on hold J Press the consultation key to swap from one caller to the other Initiating a consultation call with a third participant Add Part Press the display key Both participants are placed on hold Enter the phone number for the third participant Dial Press the display...

Page 31: ...icipant Dial Press the display key The number is dialled As soon as the participant answers they are automatically connected to the conference call The participants in the conference are listed on the display Removing a participant from the confer ence call q Select the participant Remove Press the display key to end the conference for the highlighted participant Add Part Press the display key to ...

Page 32: ...tion Use this function to ensure that the connection is actually established L Press the transfer key The call is placed on hold Enter the phonenumber forthe participantto whomyouwant totransferthe call Dial Press the display key The number is dialled When you call the third participant you can wait for them to answer and speak to them for instance to tell them you are forwarding a call Then press...

Page 33: ...d on your telephone q Select the required account OK Press the display key to confirm the selection q Select when the call divert is to apply OK Press the display key to confirm the selection All Calls All calls are diverted No Answer Calls are diverted if no one accepts the call within several rings When Busy Calls are diverted if your line is busy Off No calls are diverted Enter the phone number...

Page 34: ...at were accepted Missed Calls Calls that were not answered If the list contains entries that you have not yet viewed the display shows the icon and the number of new entries You can also access the list via the Message Centre page 50 Please note You can also manage the call lists via the Web configurator page 101 q Select list OK Press the display key to open the selected list Thecallsaredisplayed...

Page 35: ...ctory If the caller has activated CLIP Calling Line Identification Presentation the caller s phone number is identified The caller can then be identified by this number if he or she is already saved in the directory Prerequisite The feature is activated for the VoIP account Displaying detailed information View Press the display key The information available is displayed with the phone number as a ...

Page 36: ...iew š 2 30 q Scroll through the list to the required name View Press the display key to show the entry q Select the number if multiple numbers are available c Lift the receiver Or Dial Press the display key The number is dialled 1 Black Susan Dial 01 04 11 09 30 Back q Scroll through the list to the required name Options Press the display key q Select the Copy to Directory entry OK Press the displ...

Page 37: ... the action again OK Delete Entry Back Please note u The local directory can also be accessed via the Web configurator page 99 u The default directory is the local directory This is the directory that you can open with the Z key and the directory to which entries are saved using the Copy to Directory function u You can set a different directory as the default directory via the Web configurator pag...

Page 38: ...tered all the data Editing entries q Scroll through the list to the required name View Pressthedisplaykey Theentryis shown as in the figure on page 35 Options Black Susan View An entry consists of First Name and Name 2 x Phone Home 2 x Phone Mobile 2 x Phone Office Enter the name and the phone num bers For information on entering text page 43 q Scroll from line to line First Name Save Peter Û q Sc...

Page 39: ...play key q Select Delete Entry OK Confirm the selection Or View Delete Press the display keys in sequence Yes Confirm the deletion Deleting the entire list Options Press the display key q Select Delete List Yes Confirm the deletion Dialling a number from the directory q Scroll to the required entry c Lift the receiver The default number of the directory entry is dialled page 37 q Scroll to the req...

Page 40: ...an open the LDAP directory in idle status via the display menu Contacts LDAP Directory Or Z Press and hold navigation key s Searching for and displaying an entry Dialling from the LDAP directory Enter the name or first few letters For information on entering text page 43 The search will automatically start as soon as you stop inputting characters All matching entries are displayed The search field...

Page 41: ...ed on the Internet u Private NetDirectory Some providers offer users the option of creating and managing a personal online directory on the Internet You can use the personal online directory on your phone Prerequisite You enter the data for the provider of your personal online directory in the Web configurator page 92 You must create and manage your personal online directory using your PC s Web br...

Page 42: ...a new search Enter the surname and city of the subscriber you are looking for For informationonenteringtext page 43 q Scroll from line to line Search Press the display key to start the search If several entries are found for the city a list is displayed so that you can narrow down the location search q Select city OK Start search Please note The City field is not available in the private directory...

Page 43: ...splayed Refining a search Refine Press the display key Specify your search request in the various fields Surname FirstName Category Name City or Street Search Press the display key to restart the search Displaying entry details q Scroll to the required entry View Press the display key The entry contains the available phone num bers Dialling a number q Select the number Lift the receiver OK Name Se...

Page 44: ... the functions on your phone particularly the menu functions In idle status icons on the display indicate the status of your phone page 3 In addi tion the time is displayed Use the display keys to activate the phone s functions and to navigate through the menu Different functions are available depending on the operating situation These functions are displayed at the bottom of the screen Example So...

Page 45: ...ntry mode Press the hash key The text entry mode will change Moving the cursor r Press the navigation key briefly moves the cursor one character at a time Press and hold the navigation key moves the cursor word by word q Press the navigation key moves the cursor line by line The cursor stays in a horizontal position Entering special characters Press the star key The table of special characters is ...

Page 46: ...lists Depending on the operating situation OK Yes Save Select or Change Copy a number that has been entered or is shown in the display into the directory Press briefly Navigate to the line above below Press and hold Scroll up down the list one line at a time In input fields Move the cursor up down line by line Press briefly Move the cursor to the left right one character at a time Press and hold M...

Page 47: ...will return to the previous menu level You can revert to idle status from the main menu Reverting to idle status You can revert to idle status from anywhere in the display menu as follows Press and hold the end key I Or Do not press any key After 3 minutes the display will automatically revert to idle status Settings that have not been saved by selecting the display keys OK Yes Save or Change or t...

Page 48: ...e Settings Audio Settings Ringer Settings Volume means Press the centre of the navigation key to open the main menu Navigate up down using the navigation key q until the Settings submenu is selected Press the display key OK to confirm your selection Continue to navigate through the menu using the navigation and display key until you reach the Volume submenu OK Audio Settings Back OK Ringer Setting...

Page 49: ...ng page 27 Active Ringbacks page 24 Voice Mail page 49 Contacts Directory page 35 You can choose any name LDAP Directory page 38 Online directories page 39 The name of these menu entries depends on Web configurator settings page 92 Settings Date Time page 51 Audio Settings Ringer Settings Volume page 52 Melodies page 53 Anon Call Silencing page 53 Advisory Tones page 54 Audio Resource page 54 Disp...

Page 50: ...the password is user but this can be changed Click on OK In User mode the following functions are available u Manage your contacts in the local directory and dial numbers directly page 99 u View your call lists page 101 u Forward incoming calls to another phone number page 88 u Block individual phone numbers and or all anonymous calls page 90 u Decide on the assignment of the directory key page 95...

Page 51: ...e à icon The number of messages is displayed to the right You can also access your network mailbox via the Message Centre page 50 The E key flashes if a new message has been received on the network mailbox and the Ó icon is displayed Playing voice mails Play recorded messages via the display menu Voice Mail Play recorded messages via the Message Centre E Voice Mail Delete Press the display key to ...

Page 52: ...ge types A new entry is classed as anything that has been received since the corresponding list was last opened You use the Web configurator to specify which message types can be accessed via the Message Centre page 91 Opening the Message Centre You open the Message Centre with the E key Select Press the display key to display the voice mail or missed calls list Voice mails page 49 missed calls pa...

Page 53: ... Please note The address of a time server on the Internet or the local network is saved on your phone The date and time are taken from this time server provided that the phone is connected to the network and synchronisation with the time server is activated Manual settings are overwritten in this case The settings for the time server should be made via the Web configurator page 96 Date format r Se...

Page 54: ...an adjust the volume while the phone is ringing using the H key Each time you press the key the volume will increase or decrease by one level The last setting is saved Time format r Select the time format On 24 hour format Off 12 hour format Time Enter the time in four digit format e g 0715 for 07 15 Time display for this setting in 24 hour format 07 15 Time display for this setting in 12 hour for...

Page 55: ... All Calls if you want to set the same melody for all accounts OK Press the display key to confirm the selection All of the melodies from the resource direc tory are displayed At the top right hand corner of the screen you can see which VoIP account you are edit ing or All Calls q Choose the melody The selected melody is played at the set volume Select Press the display key to confirm the selectio...

Page 56: ...ng ring tones You can rename or delete ring tones which have been loaded via the Web configurator page 102 Settings Audio Settings Audio Pool q Select Key Tones or Confirma tions Change Press the display key to activate or deactivate the selected func tion Change Back Key Tones All available ring tones are listed You can only change those which you loaded your self q Select the desired ring tone O...

Page 57: ...e backlight for the display can be set to one of three levels If the display backlight is deactivated it can be reactivated by pressing any key or by an incoming call In this situation pressing the key has no further function Settings Display Backlight r Select the required brightness level Your setting is activated immediately so that you can check it and correct it if necessary Save Press the di...

Page 58: ...ew the display texts in different languages Settings Language r Select the required contrast level 1 5 Your setting is activated immediately so that you can check it and correct it if necessary Save Press the display key to save the set tings Value Save Back Level 1 The current language is indicated by a w q Select the required language Select Press the display key to activate the selected languag...

Page 59: ...nd all of your individual settings are deleted or reset to the factory settings You need the administrator password before you can use this function page 97 Settings Reset Enter the administrator password OK Press the display key The password is verified If the password is correct you must now confirm the operation Yes Press the display key The device is reset to the factory settings Resetting via...

Page 60: ...etwork connection is not established automatically you will initially not be able to access the Web configurator If this is the case you will have to establish the network con nection manually via the display menu u If your device is assigned a static IP address your network administrator must tell you the IP address of your device You then assign this address to your phone page 59 u If your netwo...

Page 61: ...settings are automatically configured They are displayed and cannot be changed Please note To get access to network configuration you need to enter the administrator password The default setting is admin q Select Network Type OK Press the display key to confirm the selection q Select the IP protocol that is used in your network IPv4 or IPv6 Select Press the display key to confirm the selection IPv...

Page 62: ...network while the last part is specific to each device In subnet mask 255 255 0 0 only the first two parts are reserved for the network prefix Enter the subnet mask that is used by your network Standard Gateway Enter the IP address for the standard gateway through which the local network is con nected to the Internet This is generally the local private IP address for your router e g 192 168 2 1 Yo...

Page 63: ...xadecimal figures from 0 to FFFFFF that are separated by a colon e g 2001 b021 189 0 205 5dff fe6b 87 The IP address comprises a prefix and an interface identifier The length of the prefix usually 64 bits is determined by the Prefix Length value q Select IP Address Type OK Press the display key to confirm the selection q Select Auto Configuration if your device receives the IP address via a DHCP s...

Page 64: ...NS server cannot be reached Once all the settings are complete press the display key Back to save the configura tion settings VLAN tagging A local network can be divided into logical subnetworks so called VLANs Virtual Local Area Network standard IEEE 802 1Q Multiple VLANs share a physical network and its components e g switches Data packets of a VLAN are not forwarded to another VLAN VLANs are of...

Page 65: ...lt LAN Port only If you operate the phone and the PC within the same VLAN LAN and PC Port If you operate the phone and the PC within different VLANs OK Press the display key to confirm the selection Enter the VLAN Identifier and confirm with OK Value range 1 4094 r Define the priority for the different services and confirm with OK Values 1 7 OK Press the display key to confirm the settings VLAN Se...

Page 66: ...Service assignments according to IEEE 802 1p Once all the settings are complete press the display key Back to save the configura tion settings LAN port For Voice VLAN Priority and Data VLAN Priority select the priorities you want for the transfer of voice and data PC port For VLAN Priority select the priority you want for the transfer of PC data 0 No priority Best Effort 1 Background services e g ...

Page 67: ...he firsttime page 18 Starting the Web configurator You will need the IP address for your phone You will find this via the phone s display menu in the LAN settings Settings Local Network page 59 Accessing the Web configurator Launch the Internet browser on your PC Enter the IP address in the browser s address field Example The login screen appears Select the appropriate language Select the desired ...

Page 68: ...nching the Web configurator In administrator mode If you have not set up a VoIP account yet the setup assistant screen will appear page 68 If you have already set up a VoIP connection select the function that you wish to use u Use the Settings tab to set or change individual functions on your phone page 73 u Open the Status tab to obtain information about the status of your phone page 105 Please n...

Page 69: ...ne Systems page 79 QoS Settings page 80 VoIP Settings page 81 Security Settings page 82 Telephony Connections page 84 Audio page 86 Ring Tones page 88 Call Divert page 88 Dialling Plans page 89 Do Not Disturb page 90 Voice Mail Services page 91 Messaging MWI Light page 91 Services Online Directory page 92 LDAP page 94 Function Keys page 95 System Date and Time page 96 Security page 97 Display page...

Page 70: ...ave completed the fields on a screen click on Next If you want to go back a screen to change something click on Back Use Cancel to close the setup assistant Make sure that you have the registration data for your VoIP provider to hand before you begin the configuration Click on Next to begin the configuration Configuring a VoIP account You have the following options for configuring a VoIP account A...

Page 71: ...er concerned Click on No if automatic configuration is not permitted and then click on Next The Profile Download screen will appear Click on Next to start the configuration Select your Country and click on Next Select your Provider and click on Next The most important configuration settings will now be loaded Click on Next The next step is for you to enter Personal provider data Configuration with...

Page 72: ...xt Network provider data The phone needs to know its public address in order to receive caller voice data The SIP protocol recognises the following options u The phone requests the public address from a STUN server on the Internet Simple Transversal of UDP over NAT STUN can only be used with asymmetric NATs and non blocking firewalls u The phone does not direct the connection request to the SIP pr...

Page 73: ...g is required for example for querying and controlling certain network mailboxes via digit codes or for remote operation of the local voice mail Select whether the setting should be made automatically If you select No you must deter mine the setting for the DTMF transfer yourself Send Settings for DTMF Transmission To send DTMF signals via VoIP you must define how the key codes are to be converted...

Page 74: ...inish configuring the VoIP account Completing configuration The data for the configured VoIP account is displayed To change the settings click on Back If you want to configure another VoIP account check the relevant box In this case the Web configurator will return to the start screen when you press Next Configuring a VoIP account Click on Finish to end the setup assistant Click on Next to configu...

Page 75: ...uch as call divert and dialling plans and set up blacklists and voice mail services u Messaging page 91 Configure the Message Centre MWI for your device u Services page 92 Create settings for using directories u System page 95 Change the basic settings on your phone e g date time or display settings You can also restart the system or add new firmware Network and connectors Only available in admini...

Page 76: ...setting is selected all further settings are configured automatically They are displayed and cannot be changed If you selected Static as the address type you must create the following settings IP Address Enter an IP address for your phone This IP address allows your phone to be reached by other subscribers in your local network e g PC The IP address comprises four individual groups of numbers with...

Page 77: ... mask 255 255 0 0 only the first two parts are reserved for the network prefix Enter the subnet mask that is used by your network Standard Gateway Enter the IP address for the standard gateway through which the local network is con nected to the Internet This is generally the local private IP address for your router gateway e g 192 168 2 1 Your phone requires this information to be able to access ...

Page 78: ...FF that are separated by a colon e g 2001 b021 189 0 205 5dff fe6b 87 The IP address comprises a prefix and an interface identifier The length of the prefix usually 64 bits is determined by the Prefix Length value Prefix Length The prefix length stipulates how many bits of the IP address are used for the network prefix Enter the prefix length that is used in your network Preferred DNS Server Enter...

Page 79: ...to separate the data traffic of different services Internet telephony Internet TV and to define different priorities for the data traffic You can operate your phone and a PC connected to your phone s PC port in two different VLANs You enter the VLAN identifiers VLAN tag here You get them from your network operator Select Warning If you operate the PC and the phone in different VLANs you cannot lon...

Page 80: ...omponents You can define the priority for voice and data separately In the case of a local network with a lot of data traffic you can achieve better quality phone connections by giving a high priority to voice data Range of values and their Class of Service assignments according to IEEE 802 1p Saving settings Click on Save to save your settings on the LAN Settings screen Warning If you enter an in...

Page 81: ...mmunication data HTTP Port Enter the number for the port to be used for communication by the HTTP server The default setting is 80 HTTPS Port Enter the number for the port to be used for secure connections by the HTTP server The default setting is 443 HTTP Connection Type Select which connections can be established Automatic logout min Enter the time minutes after which an HTTP connection should a...

Page 82: ...h specific prioritisation procedures are defined You can specify different QoS values for SIP and RTP packets SIP packets Session Initia tion Protocol contain the signalling data while RTP Real time Transport Protocol is used for the voice transfer Settings Network and Connections QoS Settings Enter your chosen QoS values in the SIP ToS Diffserv 0 63 and RTP ToS Diffserv 0 63 fields Value range 0 ...

Page 83: ...ward incoming calls and voice data to one the intended phone If you click on No the phone uses the ports specified in SIP port and RTP port SIP port Specify the local communication port that the phone should use to send and receive signalling data Specify a number between 1024 and 49152 The default port number for SIP signalling is 5060 RTP port Specify the local communication port that the phone ...

Page 84: ...server to be digitally identified via SSL Secure Sockets Layer Operating a server with SSL requires a server certificate both for one way authentication server to the client and for two way authentication between client and server A server certificate has to be downloaded onto your device so that the device can carry out authentication The Server Certificates and CA Certificates lists contain all ...

Page 85: ...ections u Audio Voice quality page 86 On this screen you can optimise the voice quality of your VoIP connections u Ring tones page 88 This is where you select different ring tones for your VoIP connections only available in user mode u Call divert page 88 On this screen you can define options for call divert and activate or deactivate this function u Dialling plans page 89 The Dialling Plans scree...

Page 86: ...nnections Setting up a new connection via Auto Configuration If you want to set up a new connection and your provider allows automatic configura tion for the account click on Start When the process is complete the connection is displayed in the list Connections for the Gigaset DE310 IP PRO The following information is shown for each configured connection Name Provider Name or number of the VoIP co...

Page 87: ...name of your choice or the phone number for this connection Click on Start Profile Download to load a provider profile An assistant opens to guide you through the next steps Select your Country and in the next step your Provider If your provider is not in the list select Other Provider Click on Finish The selected provider profile is loaded Entering personal provider data Now enter your personal l...

Page 88: ... your VoIP calls is determined by the codec used for the transmission To increase the quality more data must be transmitted Depending on the bandwidth of your Internet connection this can then lead to problems with the volume of data espe cially if two VoIP calls are made simultaneously so that the transmission no longer takes place smoothly The following settings allow you to adjust your Gigaset ...

Page 89: ...ice codecs are supported by your phone Silence suppression Silence suppression means that no data packets are sent during a pause in speaking This means a lower data volume but call participants may interpret it as an interruption to the connection Select No if you do not want silence suppression The default setting is Yes Saving settings Click on Save to save your settings on the screen G 722 The...

Page 90: ...n the screen Call divert For each configured VoIP account you can automatically forward incoming calls to another phone number Settings Telephony Call Divert Specify for each VoIP account in which cases a call should be diverted Enter the Phone Number to which calls are to be forwarded Click on Save to save your settings on the screen Please note You can upload further ring tones from the PC to yo...

Page 91: ...er Enter a name for this dialling plan in the Comment field Click on Add to add the rule to the list Click on Delete to delete a rule from the list Select Active if you want to activate the rule Area codes Save the complete area code with international code for the area in which you are using the phone In general you must always dial the area code for VoIP calls even for local calls To avoid havin...

Page 92: ... be used None if you do not use an access code With numbers from Directory Call lists With All numbers Saving settings Click on Save to save your settings on the Dialling Plans screen Do not disturb DND Block individual phone numbers and or all anonymous calls You will then be unavailable for these calls your phone will not ring Settings Telephony Do Not Disturb Select Yes to activate the Do Not D...

Page 93: ...e the network mailbox Click on Save to save the settings Messaging Only available in administrator mode The Messaging menu provides the option to configure the behaviour of the Message Centre key MWI Message Waiting Indication MWI light The Message Centre allows you to access your voice mails missed calls e mails and missed alarms at the press of a key E page 50 This key flashes if a new message h...

Page 94: ...e Internet Also specify which service you want to use Settings Services Online Directory The available provider directories are displayed Select the providers whose online directories you want to use by selecting the check boxes under Select If you select the Automatic look up option when a call comes in the online service automatically looks up the name of the caller in the online directory This ...

Page 95: ...yellow pages supplied on the Internet by the provider entered above Private NetDirectory directory managed by yourself if enabled by your provider You can enable one two or all three services Enter a name for each of the selected services in the Name of directory field This is the name under which the directory will be displayed on your device page 39 Choose whether to allow Automatic look up in e...

Page 96: ...rs can be used to specify criteria for searches for specific objects in the directory e g all users whose first name starts with A or all users whose post code begins with a specific number and who have not set the display name attribute etc LDAP Name Attributes Defines which information should be delivered as the search result for the search by name e g surname only sur name and first name etc LD...

Page 97: ...page 35 LDAP corporate directory page 38 Online directory page 39 This entry is only shown if an online directory is configured page 92 In this case the service name is displayed here System settings You can create the following settings in the System menu u Define the date and time or time server u Change the security passwords for administrator and user identification page 97 u Display set brigh...

Page 98: ...he required time server in the Time Server field The most recent synchronisation carried out with the time server is shown Entering the date and time manually Select No for Automatic adjustment of system time with time server Enter the Date and Time Time format ss mm Date format dd mm yyyy If you have changed the date format in the System Display menu enter the date here as well in the mm dd yyyy ...

Page 99: ...ity On this screen you can change the passwords for administrator identification and user identification For security reasons you should always do this after getting started with your device and then at regular intervals Enter the old password Enter a new password in the field below and repeat it in the Confirm New Password field Saving settings Click on Save to save the settings on this screen De...

Page 100: ...ur required setting Saving settings Click on Save to save the settings on this screen Device Language Language for the display screens Web Interface Language Language for the Web configurator Tone Scheme Different countries have different conventions for ringer settings e g for the dialling tone the busy tone etc Select the country of the ringer schedule you want to use Date Format The format that...

Page 101: ... on the phone symbol next to the number The number is dialled via the phone s handsfree function Click on to end the call or to interrupt the dialling Searching for an entry In the search field in the top right enter a name or part of a name and click on the mag nifier symbol å All entries beginning with the entered string are displayed Creating a new entry Click on the button to create a new entr...

Page 102: ...ion 2 27 05 2010 Displaying an entry Click on the arrow U in front of the name to display the entry in full Click on the arrow V in the top left to hide the contact details and return to the list Editing the entry Click on to edit the entry Deleting the entry First click on and then on to delete the entry Black BlackSusan ...

Page 103: ... display menu page 32 Black Susan Tim Brown Forster Fred unknown White Phil 012222222222 Date Time Time of the call conference call Use V Wto sort the list in ascending descending order according to date Line VoIP account used to make the call Outgoing call made by you Accepted call Missed call Caller Name if known and number of the caller Call participant End the call conference call with this pa...

Page 104: ...a Name for the ringer and click on Store Rebooting and resetting to factory settings Only available in administrator mode You may have to reboot your phone in certain operational situations for instance to save changes you have made Settings System Reboot and Reset Click on OK next to Reboot to reboot the system All phone settings can be reset to the Factory settings This deletes all settings list...

Page 105: ...PC to phone Use the Browse button to select the file you want from your PC s file system or enter the complete path name of the file in the Transfer data from PC to device field Click on Restore Updating firmware Only available in administrator mode Firmware updates are available from the Gigaset website www gigaset com pro so you can ensure your phone is always up to date You can find the current...

Page 106: ...d the new firmware Updating manually Download the new firmware from the Internet onto your PC and then open the firmware update screen Select No for Automatic check for software updates and or Automatic check for pro file updates Click on Browse and select the file from the file system on your PC Click on Load to start the update process When the firmware update is started the device first checks ...

Page 107: ...m start assigning an IP address etc are recorded in the system log This screen shows the system log The events are displayed with the Date Time and Message This information may be useful in the event of problems involving Customer Care Click on Reload to update the display Click on Delete all entries to delete the entries SIP protocol Status SIP Protocol SIP logging stores information about the se...

Page 108: ...ick on Start Every incoming or outgoing data packet to or from your phone is recorded Click on Stop to stop recording To save the PCAP file pcapdump pcap click on Store and select a directory in the file system on your PC where the file should be stored Please note u The information is recorded in a ring buffer that has limited storage capacity If the buffer is full the first packets will be overw...

Page 109: ...own in a dry warm place for at least 72 hours not in a microwave oven etc 4 Do not switch on the device again until it is completely dry When it has fully dried out you will normally be able to use it again In rare cases contact with chemical substances can cause changes to the telephone s exterior Due to the wide variety of chemical products available on the market it was not possible to test all...

Page 110: ...ernet PoE IEEE 802 3af class 3 Power consumption standby 4 6 W Environmental conditions in opera tion 0 C to 45 C 10 to 95 relative humidity Language codecs G 711 μ law a law G 722 G 726 G 729AB iLbc Quality of Service QoS RSVP DiffServ RFC2474 RFC2475 VoIP protocols SIP RFC3261 RFC2543 RTP VoIP security SRTP RFC3711 TLS RFC2246 SIPS Internet protocols IPv4 RFC0791 IPv6 RFC2460 Further protocols S...

Page 111: ...e Authorisation Voice over IP telephony is possible via the LAN interface IEEE 802 3 Depending on your telecommunication network interface an additional modem could be necessary For further information please contact your Internet provider This device is intended for use worldwide Use outside the European Economic Area with the exception of Switzerland is subject to national approval Country speci...

Page 112: ...m Environmental management system Gigaset Communications GmbH is certified according to the interna tional standards ISO 14001 and ISO 9001 ISO 14001 Environment Certified since September 2007 by TüV SÜD Management Service GmbH ISO 9001 Quality Certified since 17 02 1994 by TüV Süd Management Service GmbH Disposal Allelectricalandelectronic products shouldbe disposedofseparatelyfrom the municipal ...

Page 113: ...licenses translations html u The source text including copyright notices for the free software is available on the Internet at www gigaset com opensource For more information and Internet links to the source text of the free software see the Online Support pages on the Internet at www gigaset com uk service or www gigaset com customercare Use of the free software included with this product that go...

Page 114: ...nd that you know you can do these things To protect your rights we need to impose restrictions that forbid anyone to deny you these rights or to ask you to surrender the rights These restrictions translate into certain responsibilities for you if you distribute copies of the software or if you modify it For example if you distribute copies of such a program whether gratis or for a fee you must giv...

Page 115: ...retion offer warranty protection in exchange for a fee 2 You may modify your copy or copies of the Program or any portion of it thus forming a work based on the Program and copy and distribute such modifications or work under the terms of Section 1 above provided that you also meet all of these conditions a You must cause the modified files to carry prominent notices stating that you changed the f...

Page 116: ...istribute corre sponding source code This alternative is allowed only for non commercial distribu tion and only if you received the program in object code or executable form with such an offer in accordance with sub section b above The source code for a work means the preferred form of the work for making modifica tions to it For an executable work complete source code means all the source code fo...

Page 117: ...bute the Program at all For example if a patent licence would not permit royalty free redistribution of the Program by all those who receive copies directly or indirectly through you then the only way you could satisfy both it and this Licence would be to refrain entirely from distribution of the Program If any portion of this section is held invalid or unenforceable under any particular circum st...

Page 118: ...reserving the free status of all derivatives of our free software and of pro moting the sharing and reuse of software generally NO WARRANTY 11 BECAUSE THE PROGRAM IS LICENSED FREE OF CHARGE THERE IS NO WARRANTY FOR THE PROGRAM TO THE EXTENT PERMITTED BY APPLICABLE LAW EXCEPT WHEN OTHER WISE STATED IN WRITING THE COPYRIGHT HOLDERS AND OR OTHER PARTIES PROVIDE THE PROGRAM AS IS WITHOUT WARRANTY OF A...

Page 119: ...uld also get your employer if you work as a programmer or your school if any to sign a copyright disclaimer for the program if necessary Here is a sample alter the names This General Public Licence does not permit you to incorporate your program into propri etary programs If your program is a subroutine library you may consider it more useful to permit linking of proprietary applications with the ...

Page 120: ...assword to log in Automatic redial Several attempts to call are made automatically when the line is busy The number is adjustable B Block dialling Enter the complete phone number and correct it if necessary Then pick up the receiver or press the speaker key to dial the phone number Broadband Internet access See DSL Buddy Subscriber with whom you exchange brief messages on the Internet in real time...

Page 121: ... voice packets are received There are different codecs with differing degrees of com pression for instance Both parties involved in the telephone connection caller sender and recipient must use the same codec This is negotiated between the sender and the recipient when establishing a connection The choice of codec is a compromise between voice quality transmission speed and the necessary bandwidth...

Page 122: ...s you can specify that the IP address for the phone is never changed Displayed name VoIP provider feature You can specify any name that is to be shown to the other party during a call instead of your phone number DMZ Demilitarised Zone DMZ describes a part of a network that is outside the firewall A DMZ is set up as it were between a network you want to protect e g a LAN and a non secure network e...

Page 123: ...ixed IP address DynDNS Dynamic DNS DNS is used to assign domain names and IP addresses For dynamic IP addresses this service is now enhanced with Dynamic DNS This permits the use of a network compo nent with a dynamic IP address as a server on the Internet DynDNS ensures that a service can always be addressed on the Internet under the same domain name regardless of the current IP address E ECT Exp...

Page 124: ...t are too big are split into smaller packets fragments before they are transferred They are put together again when they reach the recipient defrag mented Full duplex Data transmission is a mode in which data can be sent and received at the same time G G 711 a law G 711 μ law Standard for a codec G 711 delivers a very good voice quality that corresponds to that in the ISDN fixed line As there is l...

Page 125: ... the USA and Japan national standards were previ ously more frequently supported H Headset Combination of microphone and headphone A headset makes using speaker mode more convenient Headsets that can be connected to the telephone via a cable are available HTTP proxy Server via which network subscribers can process their Internet traffic Hub Connects several network subscribers in one infrastructur...

Page 126: ... pro tocols e g LAN Internet On the Internet domain names are usually assigned instead of IP addresses DNS assigns the corresponding IP address to the domain name The IPv4 IP address has four parts decimal numbers between 0 and 255 separated by full stops e g 230 94 233 2 The IP address is made up of the network number and the number of the network sub scriber e g phone Depending on the subnet mas...

Page 127: ...bits per second Unit of the transmission speed in a network MRU Maximum Receive Unit Defines the maximum user data volume within a data packet MTU Maximum Transmission Unit Defines the maximum length of a data packet that can be carried over the network at a time Music on hold Music is played while you are making a consultation call or callswapping The waiting participant hears music while on hold...

Page 128: ...ainst unauthorised use When the PIN is activated a number combination has to be entered to access a protected area Port Data is exchanged between two applications in a network across a port Port forwarding The Internet gateway e g your router forwards data packets from the Internet to the port that the data is intended for This allows servers in the LAN to offer services on the Internet without yo...

Page 129: ...ice quality is better i e fewer delays less echoing less crackling R RAM Random Access Memory Memory in which you have reading and storage rights Items such as melodies and screen pictures are saved in the RAM after you have loaded them onto the phone via the Web configurator Registrar The registrar manages the network subscribers current IP addresses When you reg ister with your VoIP provider you...

Page 130: ... a service available to other networksubscribers clients The term can indicate a computer PC or an application A server is addressed via the IP address domain name and port SIP Session Initiation Protocol Signalling protocol independent of voice communication Used for establishing and ending a call It is also possible to define parameters for voice transmission SIP address See URI SIP port Local S...

Page 131: ...is a superordinate transport protocol Transmission rate Speed at which data is transmitted in the WAN or LAN The transmission rate is meas ured in data units per unit of time Mbit s Transport protocol Controls data transport between two communication partners applications See also UDP TCP TLS U UDP User Datagram Protocol Transport protocol Unlike TCP UDP is a non session based protocol UDP does no...

Page 132: ...ed and transmitted via the telephone network but via the Internet or other IP networks VoIP provider A VoIP SIP or gateway provider is an Internet service provider that provides a gateway for Internet telephony As the phone works with the SIP standard your provider must support the SIP standard The provider routes calls from VoIP to the telephone network analogue ISDN and mobile and vice versa W W...

Page 133: ...gurator 101 missed calls 32 opening 23 outgoing calls 32 redial 23 saved information 33 transferring entry to directory 34 Call Manager 80 Call recording 91 Call records 91 Call swap 28 Call transfer 30 blind 30 secure 30 Call waiting 27 accepting call 28 activating deactivating 28 rejecting call 28 Caller name on display 24 picture on display 24 Caller picture 24 Calling Line Identification 27 33...

Page 134: ...g 37 displaying 36 40 editing 36 37 Directory key programming 95 Directory LDAP 38 94 dialling a number 38 searching for an entry 38 Directory local 35 deleting 37 entry 35 opening 36 Directory net 39 displaying entry details 41 opening 39 personal 39 public 39 refining search 41 search results 41 searching for a name 40 searching for a number 40 transferring entry to directory 41 Display 42 98 ba...

Page 135: ... 17 Internet telephony configuring 19 68 IP address 58 auto configuration 61 76 dynamic 59 74 finding 48 65 IPv4 60 74 IPv6 61 76 prefix 61 76 static 58 59 61 74 76 IP protocol 58 59 74 IPv4 58 IPv6 58 K Kensington lock 14 Key conference 2 29 consultation 2 27 display 2 Do Not Disturb 2 26 end 2 headset 2 Message Centre 2 23 50 mute 2 26 navigation 2 44 speaker 2 26 transfer 2 30 volume 2 25 L LAN...

Page 136: ...b configurator 73 wired 58 Network configuration default setting 18 Network mailbox 49 91 new message 49 Network provider data 70 Network type 59 61 Number dialling from call list 34 dialling from LDAP directory 38 dialling from the directory 99 entering via keypad 21 searching for in directory 99 selecting from the directory 37 showing on display 24 transferring to local directory 21 O On hold 27...

Page 137: ... Web configurator 48 65 Setting the language 56 setting up for the first time 17 Setting up the device via the display 17 Settings creating via Web configurator 73 Settings via display menu advisory tones 54 date and time 51 display backlight 55 display contrast 56 display language 56 ringers 52 Setup assistant 68 closing 72 Silence suppression 87 Silences 87 SIP address 69 SIP logging 105 SIP pro...

Page 138: ... 49 Voice quality 80 87 VoIP account automatic configuration 69 configuration via provider profile 69 DTMF transfer 71 entering login data 85 entering registration data 72 manual configuration 69 personal provider data 72 85 selecting 21 setting up 68 standard 21 VoIP status 105 Volume for ringer 52 Volume key 2 25 W Web configurator 65 accessing 48 65 changing password 97 login screen 48 65 menu ...

Page 139: ...Gigaset DE310 IP PRO en A31008 M2218 L101 3 7619 cover_back fm 20 03 2012 A31008 M2218 L101 3 7619 ...

Reviews: