


- 33 -
System Hardware Installation
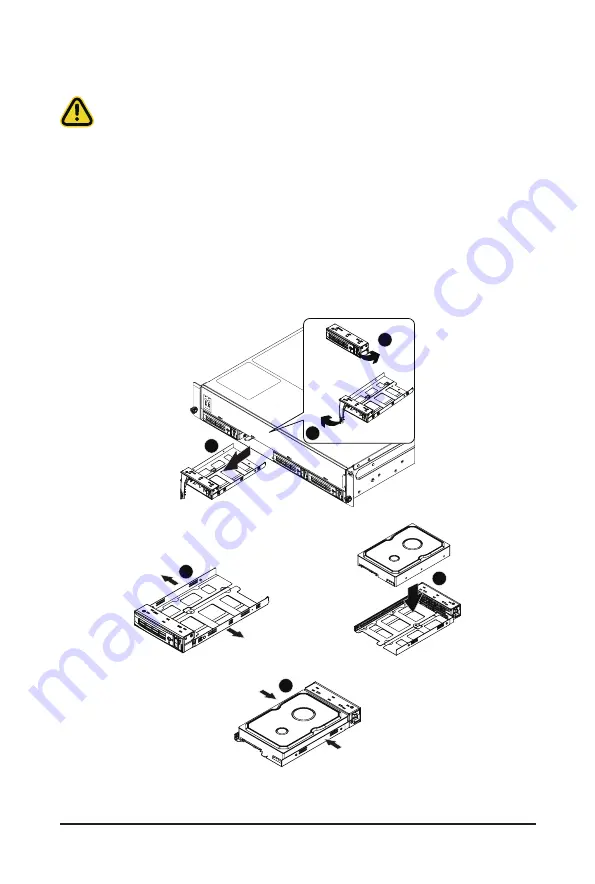
3-7 Installing the Hard Disk Drive
Read the following guidelines before you begin to install the Hard disk drive:
• Take note of the drive tray orientation before sliding it out.
• The tray will not fit back into the bay if inserted incorrectly.
• Make sure that the HDD is connected to the HDD connector on the backplane.
Follow these instructions to install a 3.5" hard disk drive:
1. Press the release button.
2. Extend the locking lever.
3. Pull the locking lever in the direction indicated to remove the 3.5" HDD tray.
4. Pull the sides of the HDD tray in the direction indicated.
5. Slide the hard disk drive into the HDD tray.
6. Push the sides of the HDD tray back in the direction indicated to secure the hard disk drive in place.
7. Reinsert the HDD tray into the slot and close the locking lever.
Press
Pull
1
2
3
4
5
6
Summary of Contents for G242-P31
Page 16: ...Hardware Installation 16 This page intentionally left blank ...
Page 27: ... 27 System Hardware Installation 4 2 3 1 6 ...
Page 41: ... 41 System Hardware Installation ...
Page 42: ...System Hardware Installation 42 GPU Signal Cable ...
Page 45: ... 45 System Hardware Installation System Main Power Cable MB Bo om Power Connector ...
Page 48: ...System Hardware Installation 48 GPU Signal Cable MB Bo om Power Connector ...
Page 50: ...System Hardware Installation 50 This page intentionally left blank ...
Page 54: ...Motherboard Components 54 This page intentionally left blank ...
Page 65: ... 65 BIOS Setup 5 2 6 PCI Subsystem Settings ...
Page 69: ... 69 BIOS Setup 5 2 6 2 PCI Express GEN 2 Settings ...
Page 79: ... 79 BIOS Setup 5 2 14 Intel R I350 Gigabit Network Connection ...