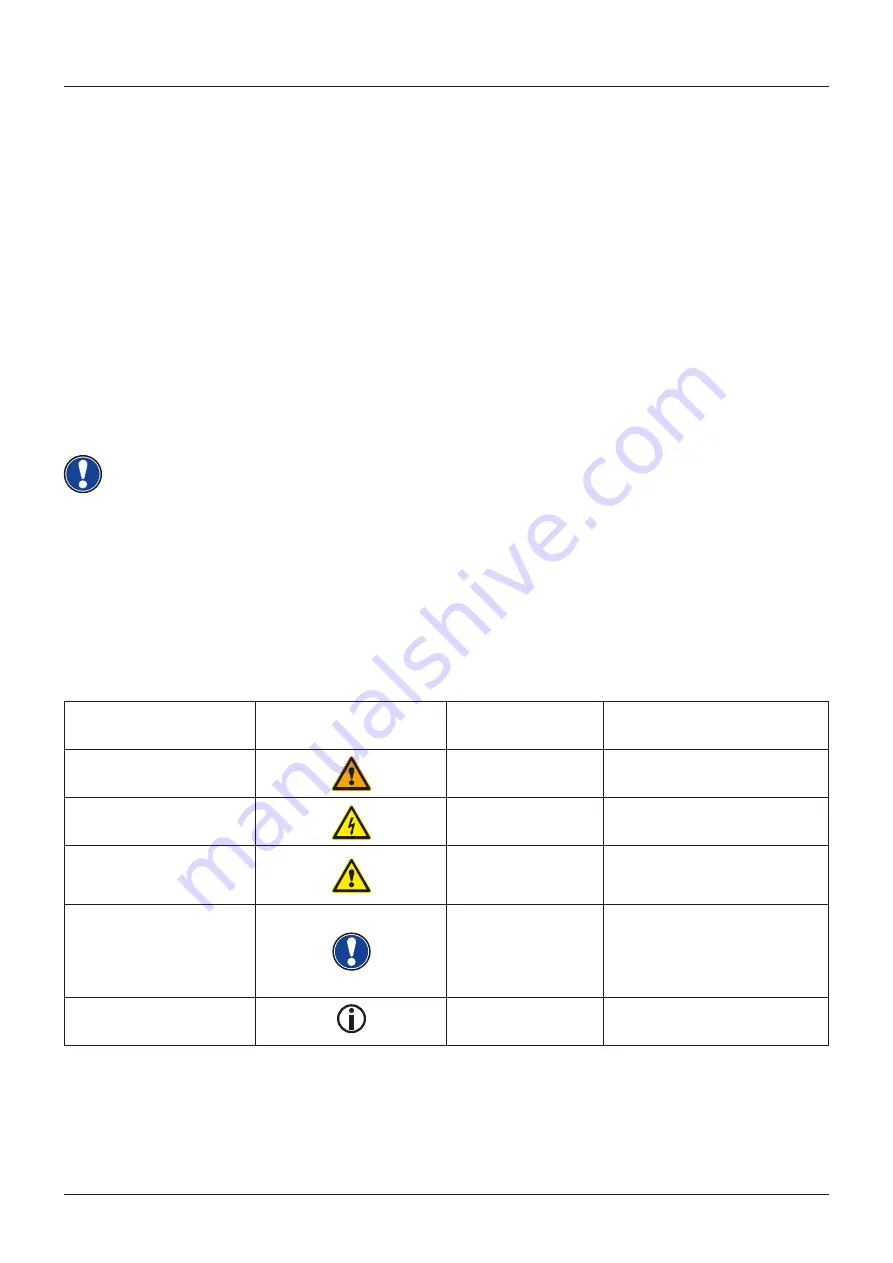
Gewa UP380G User Manual Download Page 5

5

Level of danger

Symbol

Importance

Definition

Severe injury

WARNING

Severe to fatal injuries if 

disregarded

Severe injury through 

electric shock

WARNING

Additional symbol for danger of 

electric shock

Slight injury and property 

damage

CAUTION

Slight injury and / or property 

damage can occur if the safety 

instructions are disregarded.

Note

NOTE

Crucial information 

concerning the handling of 

the device

Tip

TIP

Application tips

SAFETY INFORMATION

KEY


Dear Customer,


Thank you for choosing a digital piano from GEWA music! 


You have chosen a high-quality digital piano that will give you an impressive sound 

experience and lots of fun. 


Additional functions extend the capabilities of your digital piano far beyond piano 

playing.


Your safety is very important to us! 


Please read the safety information carefully and pay close attention to it. Retain this 

manual and hand it over to the respective user. 

1


SAFETY INFORMATION


The manufacturer is not liable for personal injury or property damage resulting from 

improper use of the device!


Only use your digital piano as directed!

1.1


KEY


The following symbols are used in this operating manual to identify hazards and notes.

NOTE

Summary of Contents for UP380G

Page 1: ...UP380G UP380G WK Bedienungsanleitung User manual Mode d emploi Manual de instrucciones www gewakeys com Read these operating instructions before use and observe the safety information Keep the instruction manual for future reference ...

Page 2: ...Manufacturer GEWA music GmbH Werkstraße 1 08626 Adorf GERMANY www gewamusic com Version 1 0 Last update 11 04 2019 ...

Page 3: ...ing on 17 5 2 DEMO function 17 5 3 Sound selection 18 5 3 1 Sound combination Dual Sound 19 5 3 2 Sound combination Split Sound 20 5 3 3 Sound combination 4Hand Mode 21 5 4 Effects 22 5 4 1 Reverb 22 5 4 2 Chorus and other effects 23 5 5 Metronome 24 5 6 Player 25 5 6 1 USB Player 25 5 6 2 Lessons 26 5 6 3 DEMO function 26 6 FUNCTIONS MENU 26 6 1 Table of Settings 27 6 2 General Settings 28 6 2 1 ...

Page 4: ...gistrations 38 8 RECORDER AND PLAYBACK 39 8 1 Recording songs 39 8 1 1 Recording with metronome support 39 8 2 Playing back recordings 40 8 3 Editing recordings 40 8 4 Loop 40 9 KEYBOARD USER CALIBRATION 41 9 1 Entering the calibration mode 41 9 2 Creating a user calibration 41 9 3 Comparing factory and user calibration 42 9 4 Saving and deleting the user calibration 42 9 5 Exiting the calibration...

Page 5: ...osing a digital piano from GEWA music You have chosen a high quality digital piano that will give you an impressive sound experience and lots of fun Additional functions extend the capabilities of your digital piano far beyond piano playing Your safety is very important to us Please read the safety information carefully and pay close attention to it Retain this manual and hand it over to the respe...

Page 6: ...he digital piano must be placed on securely fastened and weight suitable stable and level floors or platforms 1 3 IMPROPER USE EXAMPLES Use outdoors or in rain Use in damp rooms Connection to incorrect supply voltage or improperly installed electrical power supplies Use in close proximity to electrical or electronic equipment such as stereos televisions radios or mobile phones These devices may ca...

Page 7: ...ano Never pour water or liquids on to the digital piano or keyboard Never clean the digital piano with a wet cloth Never plug in or pull out the mains plug with wet hands Never pull on the cable it can cause damage If liquid accidentally gets into the digital piano immediately unplug the power Then have your digital piano checked by your GEWA service representative WARNING Unusual circumstances Tu...

Page 8: ...l unplug the appliance from the mains 1 5 CE MARK CE MARK This device complies with EU directive requirements Directive 2014 53 EU EN55020 2007 A11 2011 EN55024 2010 EN55032 2012 EN61000 3 2 2014 EN61000 3 3 2013 EN301489 17 V2 2 1 EN301489 17 V3 2 0 EN62479 2010 EN300328 V2 1 1 The conformity with the regulations listed above is confirmed by the CE sign on the device The declaration of conformity...

Page 9: ...Description Pcs 1 Keyboard 1 1A Music desk 1 1B Rollable keyboard lid 1 2 Rear panel 1 3 Pedal board 1 4 Left side panel 1 5 Right side panel 1 6 Power cable 1 7a Phillips screw M6 x 16 3 7b Phillips screw M6 x 30 6 8 Phillips wood screw 3 5 x 30 10 9 Headphone hanger 1 10 Quick Start Guide 1 11 Adjustment screw 1 not shown Cable clips 2 ...

Page 10: ...into the pedal board 3 2 By using the phillips screws 7b connect the side panels 4 and 5 to the pedal board 3 3 Then attach the rear panel 2 with phillips wood screws 8 4 Now place the keyboard 1 onto the base from above The metal guides of the side panels have to slide into the respective groove and the counterpart Make sure that the angels of the side panels are guided into the millings of the k...

Page 11: ... 1 It should slide easily into the socket Then plug the power cable 6 into the power socket which is also located on the underside not shown 9 Set up the music desk as shown below 3 1 OPENING THE KEYBOARD LID Please make sure to always use both hands to open or close the lid To open the lid please follow below drawing In the opposite way the lid can then be closed again CAUTION ASSEMBLY INSTRUCTIO...

Page 12: ... Indicator ASSEMBLY INSTRUCTIONS GETTING TO KNOW YOUR INSTRUMENT CONTROLS CONSOLE USE WITH A KEYBOARD STAND It is also possible to use a keyboard stand instead of the supplied rack In this case place the keyboard stand on level ground and position the piano centrally on top If possible the speakers on the bottom of the piano should not be covered or partly touched by the stand For the connection w...

Page 13: ...e reverb on off and when longer depressed enters the edit mode 8 Chorus and other effects Turns the Chorus and other effects on off and when longer depressed enters the edit mode 9 User settings In this section you can save and reload your individual settings 10 Sound selection switches These switches allow you to select and play the different sounds on your GEWA digital piano 11 Power On Off This...

Page 14: ... which means the simulated dampers are only lifted slightly so that the sustaining notes are decaying faster than with the pedal fully depressed Piano Pedal left side When the Piano or Una Corda Pedal is being operated the Gewa Piano simulates shifting the keyboard action slightly to the right The altered striking line of the imaginary piano hammers results in a differently colored tone and a slig...

Page 15: ...aker A1 USB IN OUT Connect a USB stick or another USB device here A2 Headphone sockets Connect one or two sets of headphones here B Pedal cable socket Connect the pedal cable here B Diagram A Diagram B A1 A2 GETTING TO KNOW YOURINSTRUMENT KEYBOARD CONNECTIONS ...

Page 16: ...ocket if you want to use your digital piano with an external stand C3 LINE OUT L R This connection is split into the stereo channels L eft and R ight Using 6 3mm jack cables you can connect these outputs to a receiver e g an amplifier or a recorder page 43 C4 MIDI IN OUT Connect MIDI devices here pages 36 and 37 C5 USB B Connection Connect your digital piano with your PC via this connection page 4...

Page 17: ...o is now ready for use 5 2 DEMO FUNCTION The DEMO function provides a fantastic overview of the various sounds of your digital GEWA digital piano This is how to activate the DEMO song function NOTE TIP 1 Press the soft button that is assigned to Player in the display 2 Use the upper lower cursor keys to navigate to the Demo Menu It is highlighted in black when selected 3 Now press the right cursor...

Page 18: ...h Organ 1 Acoustic Bass Clavi Bright Grand 1 E Piano 1 Strings Church Organ 2 Bass Cymbal Vibraphone Mellow Grand 1 FM Piano Slow Strings Draw Bar Organ Finger E Bass Marimba Mellow Grand 2 Wurly Pizzicato Jazz Organ 1 Fretless Bass Celesta Upright Piano Choir Jazz Organ 2 Picked Bass French Accord Rock Grand Slow Choir Mellow Organ Nylon Guitar Harpsichord Pop Choir Steel Guitar Synth Strings OB ...

Page 19: ...aneously This is how you adjust the Dual Mode 4 Press the Menu softbutton Navigate through the following settings and adjust them as desired by using the cursor keys Balance Here you can change the volume ratio between the two selected sounds 2_Octave Shift With this function you can transpose the second sound up or down by 1 2 or 3 octaves 2_Pedal Here you can decide whether the Damper Pedal shou...

Page 20: ...it Point Here you can define the point where the keyboard is to be split Alternatively you can define the Split Point by holding the K Sense softbutton while pressing the desired key on the keyboard Balance Here you can change the volume ratio between the two selected sounds L_Octave Shift With this function you can transpose the sound chosen for the left side of the split keyboard up or down by 1...

Page 21: ...keyboard zone page 18 3 Start playing You will hear one sound for each zone as described If you want to make further adjustments proceed as follows 4 Press the Menu softbutton Navigate through the following settings and adjust them as desired by using the cursor keys Split Point Here you can define the point where the keyboard is to be split Balance Here you can change the volume ratio between the...

Page 22: ...se the reverb effect proceed as follows 1 Press the Reverb button to activate or deactivate the effect When the reverb effect is active the respective LED lights up When pressing the softbutton the reverb type is briefly displayed Changes of this effect are adopted immediately You can make further adjustments to the reverb effect as follows 2 Hold down the Reverb button until the Reverb Menu opens...

Page 23: ...ff When the effect is active the respective LED lights up When activating deactivating the chorus and other effects functions the corresponding effect is briefly displayed The change of effects is adopted immediately You can make further adjustments to the effects as follows 2 Hold down the Effect button until the Effects Menu opens up Navigate through the following settings and adjust them as des...

Page 24: ...as follows 3 Hold down the Metronome button until the Metronome Menu opens up Navigate through the following settings and adjust them as desired by using the cursor keys Tempo Here you can choose the desired metronome speed Beat Rhythm Here you can select one of the subsequent classic metronome time signatures or one of the accompanying drum beats OPERATION METRONOME Classic Metronome 1 4 2 4 3 4 ...

Page 25: ...h point the playback is at in a bar below the file name 5 Press the Play Stop button to stop the playback To adjust the USB player further proceed as follows 6 Press the Menu softbutton The following settings appear Play Mode Different modes of playing back songs are available here Single Only the chosen song is played back once Repeat The chosen song is played back in an infinite loop Repeat All ...

Page 26: ...lues as desired All changes are adopted immediately When you enter one of the submenus the left softbutton is mostly dedicated to the Reset function Press this softbutton to reset the currently chosen setting to factory default 4 Use the Exit softbutton to leave the menu NOTE NOTE FUNCTIONS MENU 5 6 2 LESSONS This menu grants access to the pieces you can save to your digital piano in a particular ...

Page 27: ...vel 20 bis 2 Sympathetic Resonance 0 20 Temperament Equal Pythagorean Pure Major Pure Minor Mean Tone Werckmeister Kirnberger Root Note C B User Key Calibration keyboard recalibration USB Player according to file Load Song according to file Load Lesson Book according to file Load Registration according to file Save Song USB Destination according to file Int Song according to file Save Registration...

Page 28: ...enu 6 2 2 KEY TRANSPOSE If you need to adjust to the key another musician is playing in you can simply achieve this by transposing your digital piano In order to do so proceed as follows 1 Enter the General Settings Menu page 28 and navigate to the submenu Key Transpose 2 Use the right left cursor keys to transpose as far as desired while checking on the keyboard 3 Use the Exit softbutton to leave...

Page 29: ...he LINE IN port in the ratio to the overall volume of the piano In order to do so proceed as follows 1 Enter the General Settings Menu page 28 and navigate to the submenu Input Volume 2 Use the right left cursor keys to set the desired volume 3 Use the Exit softbutton to leave the menu 6 2 4 MAX PHONES LEVEL With this function you can determine the maximal headphones volume in the ratio to your pi...

Page 30: ...ded when the piano is turned on Last When being started he piano maintains the settings which were selected before switching it off 3 Use the Exit softbutton to leave the menu 6 2 8 PIANO INFORMATION This function provides information concerning the hardware and software version of your GEWA digital piano You need this information for callbacks with the service team Proceed as follows to access th...

Page 31: ...vigate to the submenu Keyboard Response by using the upper lower cursor keys 2 Enter the submenu by pressing the right cursor key The following settings are adjustable now Touch Curve Choose one of the preset levels of sensitivity Medium Default setting It corresponds to a medium sensitivity and is recommended for most players Soft 1 High touch sensitivity This is recommended for in experienced pl...

Page 32: ...sing the damper pedal 3 Use the Exit softbutton to leave the menu 6 3 4 SYMPATHETIC RESONANCE When pressing a key on an acoustic piano some strings start resonating indirectly This behaviour is simulated by your GEWA digital piano which contributes to a significantly natural sound You can define the intensity of this feature here To adjust the string resonance proceed as follows 1 Enter the Piano ...

Page 33: ...nor Meantone Based on pure 3rds suitable for Renaissance and Baroque music Werck III Well tempered tuning system which inspired J S Bach s Well Tempered Clavier Kirnb III A different well tempered tuning widely used in Baroque organs 3 Use the Exit softbutton to leave the menu 6 3 6 ROOT NOTE Within this submenu you can define the root note of a temperament see 6 3 5 If you choose When pressing a ...

Page 34: ...stration which has been saved on the USB device Save Song You can save a recording to the USB stick here Select the desired song by using the cursor keys and press the Save softbutton to store it to USB Save Registrations With this function you are able to save an individual registration to USB Select the desired registration by using the cursor keys and press the Save softbutton Delete File You c...

Page 35: ... 1 Enter the System Menu see 6 5 and navigate to the submenu Auto Power Off by using the upper lower cursor keys 2 Use the right left cursor keys to adjust the period of time as desired 3 Use the Exit softbutton to leave the menu 6 5 3 REGISTRATIONS RESTORE WARNING With this function you delete all registrations which are saved to the User Settings function page 38 Proceed as follows 1 Enter the S...

Page 36: ...s 1 Enter the MIDI Settings Menu see 6 6 and navigate to the submenu Local Control by using the upper lower cursor keys 2 Use the right left cursor keys to set the parameter to On Off 3 Use the Exit softbutton to leave the menu FUNCTIONS MENU MIDI SETTINGS 6 6 1 TRANSMIT CHANNEL Use the MIDI transmission channel to specify which channel 1 16 should transmit signals between the digital piano and th...

Page 37: ...softbutton to leave the menu FUNCTIONS MENU MIDI SETTINGS 6 6 4 PIANO MODE With the Piano Mode function you determine how incoming MIDI data of channels 1 and 2 are processed If the mode is disabled Off only the GM Chorus is available for all 16 MIDI transmit channels If the Piano Mode is enabled On and if a piano sound is selected channels 1 and 2 are enriched with compatible piano effects string...

Page 38: ...ettings readily available on demand You can register all sounds with assigned effects sound combinations Split Dual 4Hand metronome settings as well as almost every setting within the Function Menu To register a setting proceed as follows 1 Press the User Settings button 2 Press the Save softbutton 3 Use the Bank softbutton to select one of the banks and the upper lower cursor keys to select the f...

Page 39: ...t easier for you to begin playing in time 5 Press the Record button as usual to stop recording 8 RECORDING AND PLAYBACK Your GEWA digital piano is able to record your playing It can store up to 4 pieces of music which consist of 8 tracks each in your digital piano 8 1 RECORDING SONGS To record an own song proceed as follows 1 Enter the Recorder menu by pressing the Record button With the cursor ke...

Page 40: ...ong you want to practice and start the playback see 8 2 2 Press the Set A softbutton to determine the starting point of the loop 3 Press the Set B softbutton to determine the ending point of the loop Now the metronome counts one bar and starts playing the loop of the selected part 4 If you want to adjust the amount of counting bars press the Menu softbutton in the Song Player and select the prefer...

Page 41: ...try Piano Settings with the upper lower cursor keys and enter this menu with the right cursor key 3 Navigate through the menu with the upper lower cursor keys and use the right cursor key to select the entry User Key Calibration 9 2 CREATING A USER CALIBRATION If you have never used the Calibration Mode before the piano usually starts with the so called Factory Calibration When you change the cali...

Page 42: ...on or any later adjustments select the entry Save User Calib by using the upper lower cursor keys and confirm using the right cursor key To delete the created user calibration select the menu item Delete User Calib by using the upper lower cursor keys and confirm your choice using the right cursor key If you do not save the user calibration it is only applied until you turn your digital piano off ...

Page 43: ...ected headphones You can control the volume balance easily with the volume control 10 3 CONNECTING AN AMPLIFIER If you need your digital piano to play louder than with the built in speakers you can easily connect it to an amplification system using the LINE OUT outputs under the console 10 4 CONNECTING A PC You can link your digital piano with your PC with the USB B connection under the console Th...

Page 44: ...s 1 Press the Menu softbutton in the home screen The upper left softbutton is now defined as BT Pair 2 Press the BT Pair softbutton and search for the piano on your smartphone or tablet 3 The digital piano requires a PIN code now It is 4392 GEWA 4 After the connection has been successfully made you can play back audio files through the speakers as desired 5 You can also change the input volume pag...

Page 45: ...omputer Moreover they can be transformed into musical notation on screen if there is an appropriate program GM General MIDI abbrev GM standardises significantly more than the universal MIDI standard The latter is both a hardware and protocol specification General MIDI also specifies content GM sets a minimum standard for the allocation of instruments on the 128 program slots According to GM a comp...

Page 46: ...ase proof of purchase e g invoice Damage caused by force or other external influences are not covered by the warranty nor are the consumption of consumer goods such as rechargeable batteries strings skins or seals If you suspect a warranty claim with your device contact your dealer during normal business hours Possible cause and solution Problem Possible cause s Possible solution s The piano does ...

Page 47: ...Soft2 Medium Hard1 Hard2 and Constant Pedals Damper Sostenuto and Piano Pedal Sound source GEWA music samples with 4 stereo layers Polyphony 256 Amount of internal sounds 40 Amplifier output RMS 2 x 20 Watt Speakers 2 x fullrange speakers 2 x tweeters Recording function integrated recorder with 8 tracks per storage space Recording format Standard MIDI file Format 0 SMF Connections power socket MID...

Page 48: ...Manufacturer GEWA music GmbH Werkstraße 1 08626 Adorf GERMANY www gewamusic com Version 1 0 Errors and omissions excepted ...

Reviews: