(863) 248-2800
www.sensocon.com
9
Installation and Operation
Manual
Series A3 & A4
To move from one program menu to another, hold the up arrow or down arrow for
one second to move up or down one menu level. The control will start in the
“Main” menu, one level up is the “Set-up” menu, and one more level up is the
“Secure” menu.
The up and down arrows are used to navigate up and down through the parameters
in each menu. To change a parameter, use the up and down arrows until the
parameter is highlighted, then press the right arrow. This will advance you to
another screen where you can change the parameter. There are two different types
of parameter change screens, 1) you select a given option or 2) you change a
numerical value. To change a number, the left and right arrows are used to select
the digit you would like to change, the up and down arrow will increase or
decrease the value by the amount selected. Once you have made the change, you
can accept the change by holding the accept button for three seconds, this will
accept the change and take you back to the menu you were currently in. At any
point while in a parameter change screen, you can hold the cancel button for one
second to return to the previous menu without accepting a change to that
parameter.
To manually reset the alarm after an alarm condition has occurred (if this feature
is used) hold the right and left arrows simultaneously until the alarm resets.
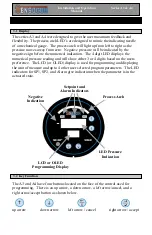
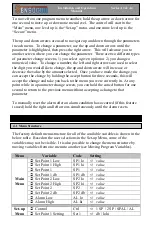
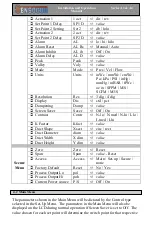
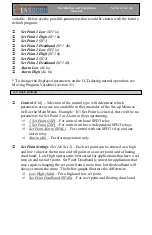
The factory default menu structure for all of the available variables is shown in the
below table. Based on the user selections in the Set-up Menu, some of the
variables may not be visible. It is also possible to change the menu structure by
moving variables from one menu to another (see Moving Program Variables).
Menu
Variable
Code
Setting
Set Point 1 Low
SP1 lo
value
Set Point 1 High
SP1 hi
value
Set Point 1
SP1
value
Set Point 1 db
SP1 db
value
Set Point 2 Low
SP2 lo
value
Set Point 2 High
SP2 hi
value
Set Point 2
SP2
value
Set Point 2 db
SP2 db
value
Alarm Low
AL lo
value
Main
Menu
Alarm High
AL hi
value
Control
Ctrl
1 SP / 2 SP / SPAL / AL
Set-up
Menu
Set Point 1 Setting
Set 1
db / lohi
4. PROGRAMMING
4.1 Menu Structure
Summary of Contents for LFGI-3USP
Page 1: ...Laminar Flow LFGI CAI or CACI User Manual ...
Page 33: ...33 ...
Page 51: ...SECTION IV UNIT DIAGRAM Made in the USA and available for purchase on the GSA 51 ...
Page 55: ...55 ...
Page 59: ...59 ...
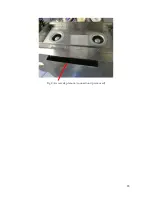
Page 63: ...Fig 2 Air recycle plenum connection tip removed 63 ...
Page 85: ... 863 248 2800 www sensocon com 20 Installation and Operation Manual Series A3 A4 ...

