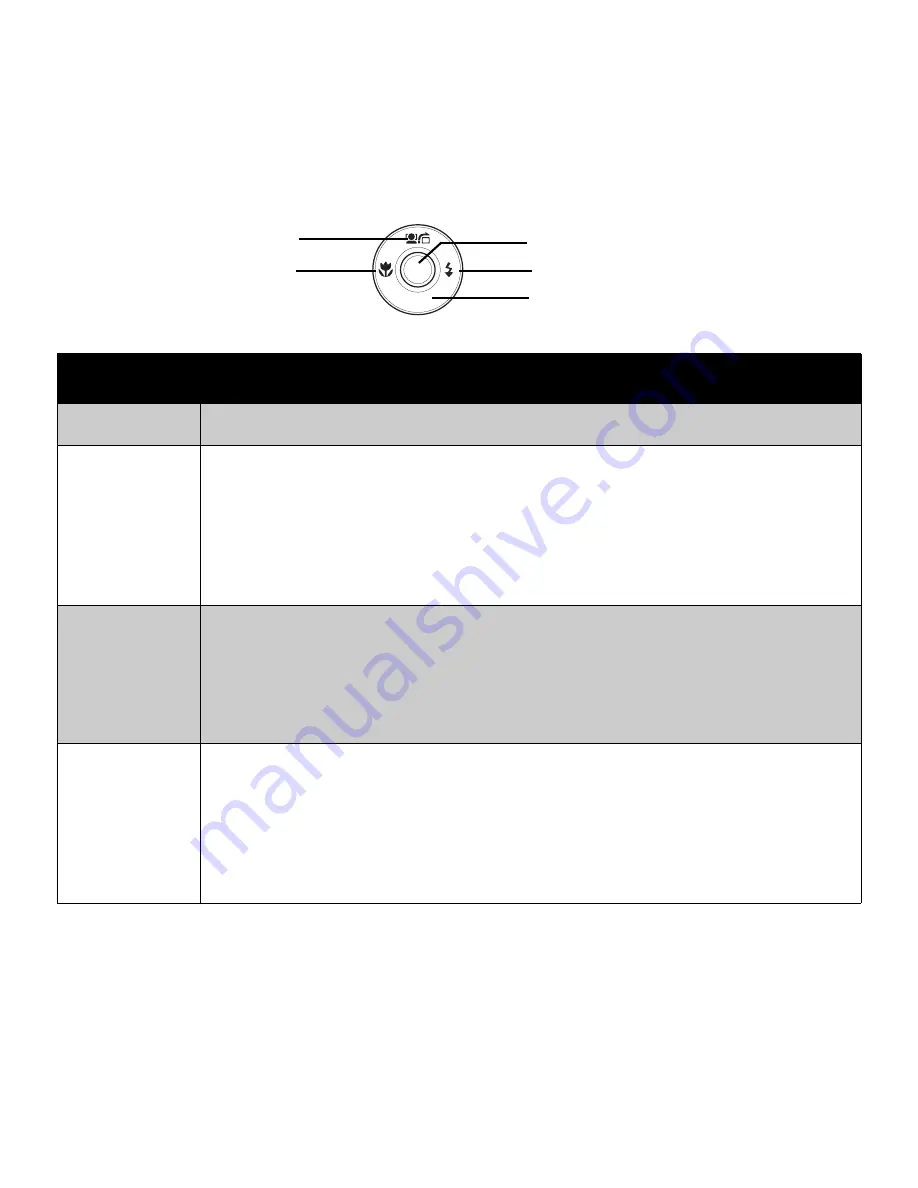
background image

6


Button

Usage

SET

1. Confirm a selection when using the OSD menus.

Flash/ Right

1. In Record mode, press to scroll through the flash mode options. (Auto, Anti 

Red-eye, Fill, Slow Sync and Off)

2. In Playback mode, press to view the next image, video or audio clip.
3. In Playback Video mode, press to fast forward video playback
4. In Menu, press to enter the submenu or to navigate through the menu 

selections.

Macro/ Left

1. In Record mode, press to turn on/off Macro.
2. In Playback mode, press to view the previous image, video or audio clip.
3. In Playback Video mode, press to retract video playback
4. In Menu, press to exit a submenu or to navigate through the menu 

selections.

Up/Face 
Tracking/
Rotate 

1. In Menu, press to navigate through the menu and submenu selections. 
2. In Record mode, press to turn the face tracking function on and off.
3. In Playback Video/ Audio mode, press to Start/Pause video or audio 

playback.

4. In Playback photo mode, press to rotate the image clockwise 90 degrees by 

each press of the button. This feature is applicable for still images only.

Flash Button

Macro Button

SET Button

Face Tracking/

Rotate Button

Display Button

SET

DISP

Summary of Contents for V1010

Page 1: ...e limits are designed to provide reasonable protection against harmful interference in a residential installation This equipment generates uses and can radiate radio frequency energy and if not instal...

Page 2: ...e illustrations in this manual are for the purpose of explanation and may differ from the actual design of your camera 4 The manufacturer assumes no liability for any errors or discrepancies in this u...

Page 3: ...physician to receive treatment A camera is a precision instrument Do not drop it strike it or use excessive force when handling the camera This might cause damage to the camera Do not use the camera i...

Page 4: ...t a malfunction The digital video camera may feel warm when being used continuously or for an extended period of time This is normal and not a malfunction If you will not be using the batteries for an...

Page 5: ...Strap 8 Inserting the Battery 8 Inserting an SD SDHC Memory Card 9 Charging the Battery 10 Turning the Power On and Off 10 Initial Settings 10 Modes 11 Using the LCD Monitor 13 LCD Monitor Layout 13 R...

Page 6: ...the Setup Menu 75 Setting Sounds 75 Setting Power Save 76 Setting LCD Save 76 Setting Date Time 77 Setting Language 77 Setting File Numbering 77 Setting TV Out 78 Setting LCD Brightness 78 Setting Bat...

Page 7: ...512MB or above HDD space 200 MB or above 16bit color display monitor Microsoft DirectX 9 0C USB port and CD ROM drive For Macintosh Power Mac G3 or later Mac OS 10 0 10 4 Memory 64MB or above HDD spa...

Page 8: ...ovies on your TV USB port to transfer photos and movies to your PC Package Contents Please check the contents of your camera package It should contain Digital camera AA battery x 2 pcs Wrist strap USB...

Page 9: ...ront View Back View Flash Zoom Lens Self timer LED AF Assist Lamp Microphone MENU FUNC DISP SET Zoom buttons Play button LCD screen Menu button SET button 4 way navigation control Function Delete butt...

Page 10: ...4 Top View Bottom View Left Right View Stabilizer button Shutter button Power button Speaker OPEN Battery compartment Tripod screw hole SD card compartment Strap ring USB TV Out...

Page 11: ...ss to turn on off the power Stabilizer The stabilizer sets the optimal ISO value according to light levels to compensate for camera shake Press to set stabilizer on off Shutter Press to capture an ima...

Page 12: ...de press to view the previous image video or audio clip 3 In Playback Video mode press to retract video playback 4 In Menu press to exit a submenu or to navigate through the menu selections Up Face Tr...

Page 13: ...memory slot the camera automatically saves all images videos and audio clips in the external storage card The icon indicates the camera is using SD card Not all cards may be compatible with your came...

Page 14: ...era Inserting the Battery Follow these instructions to insert the AA batteries into the battery compartment Please read Battery Information on page iv before inserting removing batteries 1 Make sure t...

Page 15: ...card into the memory card slot with the metallic part facing the front side of the camera 3 Push the SD SDHC card into the memory slot until it clicks into place 4 Close the SD card compartment To re...

Page 16: ...in Record mode The camera is turned on in Playback mode The zoom lens are not extended To turn off the camera press the Power button See Modes on page 11 to know more about Record and Playback mode In...

Page 17: ...a to Playback mode to view and edit captured images and playback videos and audio clips You can also attach voice memo to images in this mode When you turn on your camera using the Power button you ar...

Page 18: ...e then press to enter submenu 4 Select a mode 5 Press the SET button to apply selected mode For more information see Using the Record Menu on page 32 Use the 4 way navigation control to move through t...

Page 19: ...itor Layout The following illustrations show the LCD monitor layout and icon descriptions Record Mode Screen Layout No Item Description 1 Record Mode Indicates the current mode 2 Flash Indicates flash...

Page 20: ...Saturation Displays saturation settings 12 Contrast Displays contrast settings 13 Histogram Graphic display of ISO settings 14 ISO Displays ISO settings 15 Focus area Use to frame subject to capture 1...

Page 21: ...alance settings 23 Metering Displays metering settings 24 Sharpness Displays sharpness settings 25 Quality Displays quality settings 26 Resolution Displays resolution settings 27 AF lamp Indicates AF...

Page 22: ...otected 3 Voice memo Indicates voice memo is attached 4 Button intro Indicates the button to press on the camera to play a movie or audio file 5 File no Total no Indicates the file number over the tot...

Page 23: ...marked for printing 10 Resolution Displays the resolution settings No Item Description 1 Playback mode Indicates playback mode 2 Protect Indicates file is protected 3 Movie clip Indicates the file is...

Page 24: ...orage card 6 Battery Indicates battery level 7 Storage media Indicates used storage memory 8 Recording information Displays recording information of the file 9 Volume Indicates volume settings 10 Key...

Page 25: ...file 4 File no Total no Indicates the file number over the total number of files in the storage card 5 Battery Indicates battery level 6 Storage media Indicates used storage memory 7 Recording informa...

Page 26: ...ype to another In Record Mode the LCD display can be changed into any of the following 9 Key indicator Indicates the buttons to press on the camera to apply the functions 10 Played time Indicates play...

Page 27: ...e LCD display can be changed into any of the following LCD display cannot be changed in the following situations Manual exposure mode Recording movie or audio clips Playing movie or audio clips Playin...

Page 28: ...button The camera automatically adjusts the focus and exposure When the camera is ready to take the photo the frame bracket turns green the shutter speed and aperture value are displayed 4 Fully pres...

Page 29: ...chieved by mechanically adjusting the lens While digital zoom is activated through the menu settings Please refer to Setting the Digital Zoom on page 48 on how to setup digital zoom To adjusts the opt...

Page 30: ...ton to get correct exposure This function cannot be activated in recording movies or continuous shooting To activate Flash Press the Flash Right button on your camera repeatedly until your desired fla...

Page 31: ...n is only available in shooting still images but not available in Burst and AEB modes Do not charge the flash while pressing the zoom button Charge the flash after releasing the zoom button if necessa...

Page 32: ...nction Menu is used to adjust capture settings in Record Mode It contains My Mode Resolution Quality EV Compensation White Balance ISO Metering and Color Mode Press the FUNC button of your camera to l...

Page 33: ...ging the resolution affects the number of images that can be stored in your memory card The higher the resolution the more memory space is required The table below shows the resolution values for stil...

Page 34: ...e exposure value and correctly expose your images Available for still images only To adjust EV settings press the or keys to increase decrease the value As you adjust the settings the LCD monitor sync...

Page 35: ...with tungsten or halogen lighting without a flash Flourescent 1 Ideally used for indoor photos with reddish fluorescent lighting conditions Flourescent 2 Ideally used for indoor photos with bluish flu...

Page 36: ...0 16 9 2M VGA If the Stabilizer is enabled ISO is automatically set to Auto and cannot be adjusted To adjust ISO disable Stabilizer first Metering The Metering function lets you select the area of the...

Page 37: ...ures the average light from the entire frame but gives more importance to the values near the center Spot The camera selects the exposure value based on the center of your picture Icon Item Descriptio...

Page 38: ...de See Switching between Record Mode and Playback Mode on page 11 1 Press to launch the Record Menu 2 Use the or keys to move through the menu selections B W Images are captured in black and white Viv...

Page 39: ...Record Menu press to select Record Mode 2 Use the navigation controls to move through the selection 3 Press the SET button to save and apply changes The table below shows the available scene mode sett...

Page 40: ...ter speed and aperture value to correctly expose your images Intelligent Scene The camera detects the shooting conditions and automatically switches to the appropriate scene mode See Using Intelligent...

Page 41: ...es still images in high speed motions Party This feature is used for wedding or indoor party settings Candlelight This feature is used to capture warm candle light effects Night Portrait This feature...

Page 42: ...ure When smiles are detected it continuously captures the image See Using Smile Capture Mode on page 37 Blink Detection This feature detects if the subject blinked an eye when the image is captured an...

Page 43: ...n on the center of the screen To activate Smile Capture 1 Select from the Scene Mode submenu 2 Focus the camera on the subject to capture 3 The smile capture icon blinks every second and the white foc...

Page 44: ...cene Mode submenu 2 Focus the camera on the subject to capture 3 The camera detects the shooting conditions and switches to an appropriate scene mode 4 Half press the shutter button to focus the subje...

Page 45: ...s set when There is no face detected The focus distance is more than 1 5 meters The EV setting is greater than 11 or 10 5 Sunset This mode is automatically set when sunset lighting is detected Macro T...

Page 46: ...re is no face detected The focus distance is more than 1 5 meters The EV setting is lower than 5 or 4 5 Night Portrait This mode is set when a face is detected with an EV setting lower than 5 or 4 5 I...

Page 47: ...d or deleted from the memory To activate Blink Detection 1 Select from the Scene Mode submenu 2 Half press the shutter button to focus the subject The frame turns green to indicate focus is set 3 Pres...

Page 48: ...ture the image Using Shutter Priority Mode With Shutter Priority mode users can adjust the shutter speed and the camera automatically sets the aperture value to match the brightness To activate Shutte...

Page 49: ...ys to select the aperture value options 4 Use the or keys to increase or decrease the aperture or shutter speed values 5 Use the SET button to switch between aperture and shutter speed adjustment and...

Page 50: ...set the Drive Mode 1 From the Record menu select Drive Mode 2 Use the or keys to go through the selection 3 Press the SET button to save and apply changes The table below shows the available Drive mo...

Page 51: ...go through the selection 3 Press the SET button to save and apply changes Double Self timer Performs delay and capture twice Performs a 10 second delay then captures the image Performs another 2 seco...

Page 52: ...F Lamp is set to Auto the AF lamp located in the front of the camera see Front View on page 3 emits an red light by half pressing the shutter button allowing the camera to focus easily To set AF Lamp...

Page 53: ...aturation function lets you adjust the color saturation in your photos Use a higher saturation setting for rich colors and a lower saturation setting for more natural tones To set Saturation 1 From th...

Page 54: ...the Digital Zoom This feature controls the digital zoom mode of your camera Your camera enlarges an image using the optical zoom first When the zoom scale exceeds 5x the camera uses digital zoom To se...

Page 55: ...o they can no longer be edited or deleted Limitations of Date Stamp functions are as follows Available for still images only May slow down AEB continuous shooting when Date Stamp is enabled in AEB Bur...

Page 56: ...If Auto review is On the camera will display the captured image for 1 second on the LCD monitor To set Auto Review 1 From the Record menu select Auto Review 2 Use the or keys to go through the select...

Page 57: ...cording 4 Use the control to zoom in and zoom out an image 5 To pause recording press the key 6 To continue recording press the key again 7 To stop recording press the Shutter button When the maximum...

Page 58: ...d movies with predefined video settings for easy upload to the Internet website The Internet supports two file upload standards Single File Uploader The maximum movie file size is up to 100 MB Interne...

Page 59: ...efer to Folder Structure on page 82 To record a YouTube movie select from the Movie Size function Available recording time for a YouTube movie is up to 10 minutes Recording Voices 1 From the Record mo...

Page 60: ...e Record Mode Screen Layout on page 13 3 Use the or keys to view next previous image video audio 4 To play a movie or audio clip press the key See Playing Movies on page 56 and Playing Voice Recording...

Page 61: ...iption Voice Memo Indicates that a voice memo is attached to the image Movie Indicates a recorded movie The image displayed is the first frame of the movie clip Locked File Indicates that the image ha...

Page 62: ...0 x 240 resolution images you can only zoom in up to 6X Playing Movies 1 Set the camera to Playback mode 2 Use the navigation controls to scroll through the saved images A movie clip has a movie icon...

Page 63: ...displayed when the movie is paused during REW FF or frame by frame modes Volume cannot be adjusted when paused or during REW FF modes To capture screenshot image from a movie clip 1 During playback o...

Page 64: ...y to pause playback Press the key again to resume When paused the play info will remain on screen except 6 Press the key to stop the playback The LCD monitor displays the image in Single navigation mo...

Page 65: ...age Video Audio There are two ways to delete an image video audio Using the Delete button or Using Playback Menu Delete settings See Delete on page 62 Using the Delete Button Use the Delete button on...

Page 66: ...y to delete a locked file the camera displays File Locked message on the LCD monitor Playback Menu The Playback menu allows you to edit images records voice memo and setup playback settings To go to P...

Page 67: ...ing slideshow press the SET button to pause slideshow 5 Use the or keys t to move through the options Select whether to Continue or Exit the slideshow 6 Press the SET button to apply selected option T...

Page 68: ...displayed on the LCD monitor Select available settings Single Select one file to delete Voice Only Delete only the attached voice memo the image is retained in the memory Multi Select multiple files...

Page 69: ...ode 3 Use the or keys to scroll until the desired image with voice memo is displayed on the screen 4 Press to launch the Playback Menu 5 Use the or keys to move through the Playback menu selections th...

Page 70: ...to mark image video audio clip for deletion 4 Repeat step 3 until all desired images for deletion are marked 5 Press the MENU button A confirmation selection appears 6 Select Yes to confirm 7 Press t...

Page 71: ...the Protect submenu the images are displayed on the LCD monitor in single navigation mode 2 Use the or keys to scroll the display 3 When the desired file is displayed on the LCD monitor select Lock Un...

Page 72: ...mode To protect all files 1 Select Lock all in the Protect submenu A confirmation message appears 2 Select Yes 3 Press the SET button to delete all files To unlock all files 1 Select Unlock all in the...

Page 73: ...mage 3 Press the MENU button to launch the Playback menu 4 Select Red Eye Correction 5 Select Start 6 Press the SET button to start correction 7 After completing Red eye correction a menu selection ap...

Page 74: ...d select an image to attach voice memo to 3 Press the MENU button to launch the Playback menu 4 Select Voice Memo 5 Select Start then press the SET button to start recording 6 Select Stop then press t...

Page 75: ...edit 3 Press the MENU button to launch the Playback menu 4 Select Photo Edit The Photo Edit submenu appears 5 Press the or keys to scroll and select an option As you move through the selection the pr...

Page 76: ...ct an image to trim 3 Press the MENU button to launch the Playback menu B W Image is saved in black and white Negative Image appears to be the opposite of the original image Mosaic Image is saved with...

Page 77: ...el resize 9 Press the SET button to save cancel changes Trim function 3 2 16 9 and VGA are not available for photos with image size set to VGA All images will be trimmed in 4 3 ratio regardless of its...

Page 78: ...vary depending on original image size Unavailable settings appear as gray icons in Resize submenu 6 After selecting size a menu selection appears Select whether to Overwrite Save and replace the old...

Page 79: ...Print Order Format DPOF function allows you to mark image in your memory card for printing and allows you to specify the number of copies that you want to print at a later date When all images to be...

Page 80: ...eset DPOF 1 Select Reset on the DPOF submenu A confirmation message appears 2 Select Yes 3 Press the SET button to reset DPOF settings You can specify up to 99 copies for DPOF If you specify 0 copies...

Page 81: ...Connect your camera to a PictBridge compatible printer using the USB cable See illustration below If the printer does not support date stamp the date stamp function will be disabled in PictBridge Not...

Page 82: ...the menu selections 4 To select an item press the SET button or 5 Change the submenu settings using the 4 way navigation control 6 Press the SET button to save and apply settings Setting Sounds Use t...

Page 83: ...rkens Press any button to resume to normal brightness The camera is idle when no buttons are pressed LCD Save though enabled does not function during movie playback slideshow and video recording Item...

Page 84: ...croll through the list and select the desired language Press the SET button to confirm and apply settings Setting File Numbering This function allows you to select the method in which to assign file n...

Page 85: ...excluding Taiwan Oceania and others Setting LCD Brightness Use the LCD Brightness function to control the LCD brightness Setting Battery Type Use this function to select the battery type used for the...

Page 86: ...he memory slot the camera automatically saves all files to the memory card If there is no memory card or the internal memory is empty the Copy to Card function is disabled Reset All Use this function...

Page 87: ...ttom of your camera 4 Connect the other end of the cable to the TV s AV input port 5 The LCD monitor turns black and all images and video clips are displayed on the TV Connecting the Camera a PC You c...

Page 88: ...u can print your photos directly using a PictBridge compatible printer 1 Turn on your camera 2 Set PictBridge settings 3 Connect the camera to the printer using the USB cable For more details on how t...

Page 89: ...ber from 100 to 999 and followed by DICAM or _AUCT or _UTUBE Each folder holds up to 9999 files If new files are saved a new folder named in sequence will be automatically created File Naming File nam...

Page 90: ...on the memory card Image file format may not be supported LCD screen displays Not available for this file Function is only available for specific file types File format is not supported LCD screen dis...

Page 91: ...elete unnecessary files No image displays on the TV screen Incorrect TV out type was selected Set the correct TV out type to match your TV system The lens got stuck up Do not force the lens to go back...

Page 92: ...IF 2 2 compatible format JPEG compression Video AVI MJPEG Audio WAV Resolution Still image 10M 3648 X 2736 3 2 3648 X 2432 8M 3264 X 2448 5M 2592 X 1944 3M 2048 X 1536 HD 1920 x 1080 VGA 640 X 480 Res...

Page 93: ...o Edit Normal B W Sepia Negative Mosaic Vivid Red Vivid Green Vivid Blue Storage Internal memory 32MB flash memory External memory SD up to 4GB SDHC card up to 32GB guaranteed OSD Language English Fre...

Page 94: ...87 Speaker Built in Dimensions 92 X 60 5 X 25 03 mm Weight 125g...

Reviews: